Almond and Berry Cupcakes (Crabapple Recipe)

IMG_0527


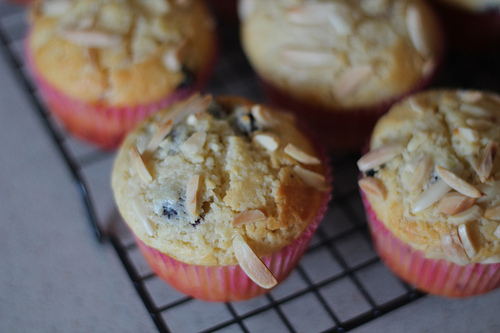
I’ve slightly changed this wonderful recipe taken from The Crabapple Bakery Cupcake Cookbook by Jennifer Graham. I didn’t add any decorations or icing to this cupcake and simply let the almonds and berries shine through. It’s basically a muffin disguised as a cupcake with all the icing added to it. I really liked this recipe, because it isn’t too heavy and feels less rich even though it still uses butter. I’ve added the decorations and frosting recipes for those that want to try it, but sometimes simplicity is best.

Brittany’s Fuss Free Muffin Cupcakes
– The Crabapple Bakery Cupcake Cookbook (Jennifer Graham)

Raspberry, Almond and Yoghurt Cakes
Makes 24

Ingredients
250g unsalted butter
2 cups natural yoghurt
4 eggs
2 2/3 cups plain flour
1 1/2 tablespoons baking powder
2 cups almond meal
1 2/3 cups castor sugar (used 1 cup)
500 g frozen berries (used mixed berries)
1/2 cup flaked almonds

Method
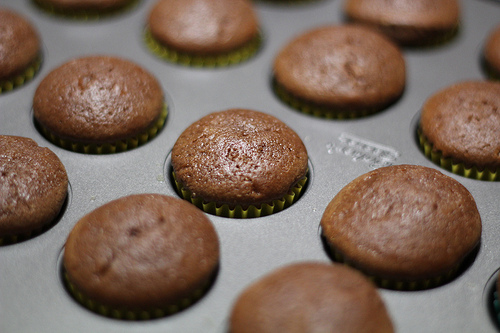
1. Preheat oven to 180C. Line two 12-hole muffin trays with cupcake papers

2. Melt the butter in a small saucepan over low heat. Leave to cool a little, then pur into a bowl with the yoghurt and eggs and whisk until thoroughly combined.

3. In a separate bowl, sift flour, baking powder and almond meal. Add castor sugar and combine.

4. Make a well in a centre and pour in the yoghurt mixture. Fold in gently using a rubber spatula,; do not over-stir, the mixture should be quite lumpy. Add the raspberries and fold in to just incorporate.

5. Spoon mixture into pans, filling each about three-quarters full. Sprinkle the flaked almonds evenly over the top of the cupcakes. Bake for 25 minutes, or until the cupcakes spring back when pressed. Should be slightly browned.

IMG_0523

6. Remove cupcakes from the trays immediately and cool on a wire rack for 30 minutes before frosting.

Decoration
Ingredients
1 cup icing sugar
Food Colouring: Brown and Yellow
24 White Sugar medallions
Piping Bag
Star Tip #9
1 Cup Vanilla Buttercream (Page 142)
Gold Glitter

Method

1. Sift icing sugar over the cooked cupcakes.

2. Add one drop of brown food colouring to ten drops of yellow food colouring to make a gold colour. Place an unused absorbent kitchen cloth onto a piece of greaseproof paper, and pout the gold colouring onto it, letting it absorb evenly. You can now use the cloth as a stamp pad. Stamp a gold letter B onto each of the sugar medallions (You may need two quantities of the gold food colouring)

3. Pipe a small swirl of buttercream in the centre of each cupcake. Place a medallion on top of each swirl and sprinkle with gold glitter.

Vanilla Buttercream Frosting
Ingredients
200g softened unsalted butter
1/2 cup milk
1 tablespoon vanilla extract
8 cups icing sugar

Makes: 4 cups of frosting (24 cupcakes)

Method
1. Cream the butter for 1-2 minutes. Add milk, vanilla extract and half of the sifted icing sugar, and beat for at least 3 minutes or until the mixture is light and fluffy. Add the remaining icing sugar and beat for a further 3 minutes or until the mixture is light and fluffy and of a spreadable consistency. Add extra milk if the mixture is too dry or extra icing sugar if the mixture is too wet.

2. If you wish to colour and/or flavour the buttercream then this is the time to do it.

IMG_0531

Impressions

What I liked about this recipe is the crunchiness from the slivered almonds on top, and the moist almond meal inside but also the sourness of the berries shines through. I used a mix of raspberries and blueberries that gave it that sweetness and sourness, as not to make it too sweet when you’re adding sugar to it anyway. The yoghurt gives it a denser texture but it makes it more moist. I think if it just used butter, the recipe would come out dry and unappetising. Another fantastic recipe from this recipe book.


Beef Wellington with Red Wine & Shallot Sauce (Gordon Ramsay)

IMG_7676-1

My first sighting of Beef Wellington was on Masterchef Australia. It looked so golden and delicious but not too scarily difficult to actually make yourself. I love anything with pastry so meat plus puff pastry is my ideal meal. One thing to note is if you love a more generous serving of the mushroom mixture to go around the beef, I’d say double the mushroom mixture ingredients and you may also need a few more slices of the prosciutto to cover it as well. The shallot and red wine sauce from the BBC Good Food with the Beef Wellington is an amazing combination. I highly recommend it. Check out Gordon Ramsay’s BBC Good Food recipe below!

Beef Wellington with Red wine & Shallot sauce (Gordon Ramsay)

Cooking and Prep Time 1 hr – 2 hrs / 20 minutes (Sauce)
Serves 6 / 4 (Sauce)

Ingredients (Beef Wellington)
1kg/2lb 4 oz a good beef fillet
3 tbsp olive oil
250g/9oz chestnut mushroom, include some wild ones if you like (I used Portobello mushrooms)
50g/2oz butter
1 large sprig fresh thyme
100ml/3.5 fl oz dry white wine
12 slices prosciutto
500g/1lb 2oz pack puff pastry, thawed if frozen
a little flour, for dusting
2 egg yolks beaten with 1 tsp water

IMG_7533-1IMG_7535-1

Ingredients (Shallot & Red Wine Sauce)
250g shallots, sliced
4 tbsp olive oil
1 garlic clove, lightly crushed
sprig rosemary
5 tbsp balsamic vinegar
400ml red wine
400ml beef stock or brown chicken stock, preferably homemade
knob of butter

IMG_7512-1

Method (Beef Wellington)
1. Heat oven to 220C/fan 200C/gas 7. Sit the 1kg beef fillet on a roasting tray, brush with 1 tbsp olive oil and season with pepper.

IMG_7553-1

2. Roast for 15 mins for medium-rare or 20 mins for medium. When the beef is cooked to your liking, remove from the oven to cool, then chill in the fridge for about 20 mins.

IMG_7565-1

3. While the beef is cooling, chop 250g mushrooms as finely as possible so they have the texture of coarse breadcrumbs. You can use a food processor to do this, but make sure you pulse-chop the mushrooms so they don’t become a slurry.

IMG_7554-1

4. Heat 2 tbsp of the olive oil and 50g butter in a large pan and fry the mushrooms on a medium heat, with 1 large sprig fresh thyme, for about 10 mins stirring often, until you have a softened mixture.

IMG_7561-1IMG_7569-1

5. Season the mushroom mixture, pour over 100ml dry white wine and cook for about 10 mins until all the wine has been absorbed. The mixture should hold its shape when stirred. Remove the mushroom duxelle from the pan to cool and discard the thyme.

IMG_7571-1IMG_7575-1

7. Overlap two pieces of cling film over a large chopping board. Lay 12 slices prosciutto on the cling film, slightly overlapping, in a double row. Spread half the duxelles over the prosciutto, then sit the fillet on it and spread the remaining duxelles over. Use the cling film’s edges to draw the prosciutto around the fillet, then roll it into a sausage shape, twisting the ends of cling film to tighten it as you go. Chill the fillet while you roll out the pastry.

IMG_7610-1IMG_7618-1

8. Dust your work surface with a little flour. Roll out a third of the 500g pack of puff pastry to a 18 x 30cm strip and place on a non-stick baking sheet. Roll out the remainder of the 500g pack of puff pastry to about 28 x 36cm. Unravel the fillet from the cling film and sit it in the centre of the smaller strip of pastry. Beat the 2 egg yolks with 1 tsp water and brush the pastry’s edges, and the top and sides of the wrapped fillet.

9. Using a rolling pin, carefully lift and drape the larger piece of pastry over the fillet, pressing well into the sides. Trim the joins to about a 4cm rim. Seal the rim with the edge of a fork or spoon handle. Glaze all over with more egg yolk and, using the back of a knife, mark the beef Wellington with long diagonal lines taking care not to cut into the pastry. Chill for at least 30 mins and up to 24 hrs.

IMG_7620-1

10. Heat oven to 200C/fan 180C/gas 6. Brush the Wellington with a little more egg yolk and cook until golden and crisp – 20-25 mins for medium-rare beef, 30 mins for medium. Allow to stand for 10 mins before serving in thick slices.

IMG_7656-1IMG_7665-1

Method (Sauce)

1. Sauté the shallots in a medium saucepan with the oil over a high heat for about 3 mins until lightly browned, stirring often. Season with ground black pepper and add the garlic and rosemary. Continue cooking for a further 3 mins, stirring often to prevent the shallots burning.

IMG_7521-1

2. Pour in the vinegar and cook until evaporated away to a syrup, then pour in the wine and cook until reduced by two thirds or until it thickens.

IMG_7548-1

3. Pour in the stock and bring to the boil. Turn down the heat and simmer until reduced by two-thirds again, to around 250ml. Remove the garlic and rosemary. Add a little salt to taste and finally ‘monte’ (whisk) in a knob of butter. Add any juices from the steaks just before serving.

IMG_7551-1IMG_7591-1

Notes

  • Please allot enough time for chilling. It helps with the rolling of the beef and so you don’t have a very wet base when you bake the pastry in the oven
  • The mushroom mixture can be doubled as it’s a very thin layer around the beef
  • I recommend finding less salty prosciutto as it can be quite overpowering with the seasoning of the beef and mushroom mix.

Beef Soft Tortilla Tacos

IMG_4175

I have some kind of fondness for anything Mexican. I think I just like their idea of meat, cheese and corn in many dishes. I also will always want to try making something entirely from scratch and in this case it was tortillas. I love making bread dough, the act of kneading is just so soothing that I really can’t get enough of it so why not try something slightly different but almost like making bread and pastry combined. I found this wonderful recipe from the Homesick Texan whose images look absolutely mouthwatering. There were many tortilla recipes using corn flour (masa harina) but I had such difficulty finding where any store sold this that I gave up and found a superb plain flour recipe.

The beef taco recipe I found on the BBC website, not the most authentic of places to look but it seemed quite simple enough and came out surprisingly good too. If you don’t want to make the tortillas just scroll down for the beef recipe.

Texas Flour Tortillas (Homesick Texan)
Makes: 8 tortillas

Ingredients
Two cups of all-purpose flour (can make them whole wheat by substituting one cup of whole-wheat flour for white flour)
1 1/2 teaspoons of baking powder
1 teaspoon of salt
2 teaspoons of vegetable oil
3/4 cups of warm milk

Method
1. Mix together the flour, baking powder, salt and oil. Then, slowly add the warm milk

2. Stir until a loose, sticky ball is formed. Knead for two minutes on a floured surface. Dough should be firm and soft.

IMG_0225

3. Place dough in a bowl and cover with a damp cloth or plastic wrap for 20 minutes.

4. After the dough has rested, break off eight sections, roll them into balls in your hands, place on a plate (make sure they aren’t touching) and then cover balls with damp cloth or plastic wrap for 10 minutes. (It’s very important to let the dough rest, otherwise it will be like elastic and won’t roll out to a proper thickness and shape.)

IMG_0226

5. After dough has rested, one at a time place a dough ball on a floured surface, pat it out into a four-inch circle, and then roll with a rolling pin from the center until it’s thin and about eight inches in diameter. Don’t over work the dough, or it’ll be stiff. Keep rolled-out tortillas covered until ready to cook.

IMG_4167

6. In a dry iron skillet or comal heated on high, cook the tortilla about thirty seconds on each side. It should start to puff a bit when it’s done.

IMG_4174

7. Keep cooked tortillas covered wrapped in a napkin until ready to eat.

Notes
Can be reheated in a dry iron skillet, over your gas-burner flame or in the oven wrapped in foil.

Beef Tortilla/Tacos

Ingredients
For the beef filling
500g/1lb 2oz beef mince
1 onion, chopped
150g/5oz field mushrooms, sliced (optional)
1 green pepper, seeds removed, chopped
1 garlic clove, crushed
½ tsp hot paprika
¼ tsp ground cumin
200ml/7fl oz beef stock
6 tbsp tomato purée
sea salt and freshly ground black pepper
Sprinkling of chilli power (optional)

12 taco shells/tortillas bought (or 8 fresh tortillas)
lettuce shredded
diced tomatoes
grated or shredded cheese (any kind but I used cheddar/mozzarella mix)
corn (canned or from freshly cooked corn)
tabasco sauce (if feeling adventurous)

Method
1. Preheat the oven to 180C/350F.

2. For the beef filling, fry the mince in a frying pan over a medium-high heat for 5-6 minutes, stirring occasionally and breaking it up with a wooden spoon, or until browned. Add the onion, mushrooms if using, green pepper and garlic and cook, stirring occasionally, for five minutes or until the vegetables are softened. Stir in the paprika and cumin and season to taste with salt and freshly ground black pepper. Pour in the beef stock and tomato purée and mix well. Cover and simmer gently for 10 minutes, stirring occasionally.

IMG_4169

3. To serve, place the taco shells on a baking tray and warm them in the oven for 2-3 minutes. Spoon the beef filling into the warm taco shells,  add toppings or basically whatever you like to add in and it’s ready to eat!

Impressions

I actually forgot to buy the capsicum and mushrooms. So basically my beef mix was beef, onions, chicken stock, tomato puree, spices and salt and pepper. With a sprinkling of chilli powder. I probably added a bit more paprika to my liking, but it’s basically all to your taste buds. It has a nice rounded taste of paprika which went really well with the beef and toppings.

I love recipes that just let you mix it up or add what you like. Just like a pizza. I probably could have added some fresh capsicum on top, avocado spread and onions too but I think it tasted delicious like that.

The tortillas were a joy to make, and very simple too. They came out soft and light, but a bit crunchy when using the skillet. Worked out so well, I’d probably make this again and again.

Mango and Vanilla Pannacotta

IMG_0206

I’m not sure how I came around to liking Panna Cotta’s, it’s probably Masterchef Australia but making a great Panna Cotta that is silky smooth, not too sweet but just enough richness is something I’ve been seeking in a recipe. I’ve made Vanilla Panna Cotta before but I’ve always been fascinated by mango jelly with Vanilla Panna Cotta. I found this recipe on Kothiyavunu.com and it looked great and panna cotta’s don’t take toooo much time, and it’s usually easy enough to make too so I had to try it out.

Mango and Vanilla Panna Cotta (Kothiyavunu.com)

Preparation Time : 10 minutes + Setting Time : 3-4 hrs
Cooking Time : 15 minutes
Serves : 4

Ingredients

Panna Cotta
Heavy Cream : 1 cup /240 ml (Or thickened cream)
Sugar : 1 tbsp /15 grms (or to your taste)
Milk/Half & Half : 1 cup /240 ml
Unflavored Gelatin : 1 packet /11/2 tsp
Honey : 1/3 cup /80 ml
Pure Vanilla Extract : 1 tsp

Mango Jelly
Mango Puree : 1 cup / 240 ml
Sugar : 1/4 cup /60 grms (or to your taste) – I used 1/8 cup
Cool Water : 3 tbsp/45 ml
Unflavored Gelatin : 1 packet /11/2 tsp

Method

Panna Cotta

1. Pour 1/2 cup of the milk into a bowl and sprinkle the gelatin over. Let stand until gelatin has softened, about 5 minutes.

2. Meanwhile, in a small saucepan combine remaining cup of milk, cream, honey, sugar,and bring to a simmer over medium. Heat until all the sugar and honey have dissolved 5-7 minutes. Remove from heat and stir in the the vanilla extract. Watch the nix carefully as it is prone to splitting.

3. Now add and mix the gelatin until it is completely dissolved and allow the mixture come down to room temperature.

4. Pour into the serving bowls/glass as desired, cover with plastic wraps and refrigerate at least 2-4 hours or until set.

IMG_0202

Mango Jelly

1. Sprinkle gelatin over cool water.

2. Pour mango puree and sugar in a small saucepan and simmer until sugar has dissolved.

3. Now mix the gelatin into the mango mixture and stir until gelatin has dissolved.

IMG_0203

4. Remove from heat and allow to cool; pour it over the frozen panna cotta.

5. Allow to set it in a refrigerator for 3 to 4 hours until set.

IMG_0204


Impressions

I think I made the worst mistake when cooking the panna cotta mix. I split the cream. Once it set, I realised that my thickened cream split into three layers! I tried scooping some of the fat from the top out (slightly yellow tinged) to make as “normal” as I could. The recipe wasn’t at fault though, I just left it on the stove too long and let it bubble/boil.

The mango jelly was easy to make, using the same kind of method as with the panna cotta mix and luckily I couldn’t have split that too!

The overall result was still quite decent. The panna cotta came out slightly grainy due to my neglect but flavour wise I couldn’t be happier. However, I found the use of thickened cream/heavy cream to be too dense for my liking. I’m not sure if using the standard cream would be harder to set but it didn’t seem as light as I would have liked. Other then that I enjoyed eating it and that’s as best of compliment I can give.

Parsnip and Swede Mash (BBC GoodFood)

IMG_0215

I was searching for a replacement recipe to mash potato, just to try something different. Even though I am a potato head, I heard about parsnip mash in Masterchef and they always make some weird vegetable into a mash so why can’t I be weird too! I found this recipe from the BBC GoodFood website titled Winter root mash with buttery crumbs and looked quite delicious and didn’t seem to difficult to make either. Although they said it’s for winter I didn’t care, mash is all year round.

Winter root mash with buttery crumbs aka Parsnip and Swede Mash (BBC GoodFood)

Serves 10

Ingredients
650g parsnips , cut into even chunks
650g swedes , cut into same size chunks as the parsnips
142ml tub soured cream
1 rounded tbsp hot horseradish (English Provender is good) (I used Spiced Mustard)
2 tbsp fresh thyme leaves
butter , for greasing

Butter topping
50g butter
1 small onion , finely chopped
50g fresh white breadcrumbs (from about 4 slices)
a small handful thyme leaves, plus extra for scattering
25g parmesan , coarsely grated (I used a mix of parmesan and mozzarella)

Method
1. In a large pan of boiling salted water, cook the parsnips and swede, covered, for about 20 minutes until tender. Drain well, then mash them together using a masher or food processor until reasonably smooth but still with a bit of texture. Stir in the soured cream, horseradish and thyme and season with salt and pepper.

2. Spoon into a buttered shallow ovenproof dish and put to one side.

IMG_0201

3. Make the topping. Melt the butter in a frying pan and cook the onion for 5-6 minutes, until gorgeously golden. Mix in the breadcrumbs and stir to brown and crisp a little. Season with salt and pepper and add the thyme. Take the pan off the heat.

4. Spoon the mixture casually over the top of the mash. Scatter over the parmesan. (Can be made ahead to this point and kept covered in the fridge for up to a day. Or can be frozen for up to a month.)

IMG_0212

5. Bake at 190C/gas 5/ fan 170C for 35-40 minutes if doing from cold, 25-30 minutes if not, or 1 1?2 – 1 3?4 hours from frozen (put foil on top, and remove it for the last 10 minutes) – until golden and crisp on top. Serve scattered with a few more thyme sprigs and leaves.

Impressions

I absolutely loved this recipe, especially fresh from the oven. Although I made a slight alteration with the recipe using spiced mustard instead of horseradish I don’t think it made much of a difference.

I did steps 1 and 2 the day before since I was baking a few other things the next day too but it didn’t appear to affect the mash when I took it out of the fridge the next day. 

I think the use of fresh thyme leaves (from my garden!) made it smell so good. I really couldn’t get enough thyme in this recipe, it was used profusely into the mash and sprinkled on top and in the topping.

I also used a mix of parmesan and mozzarella as the cheese topping which I think worked in its favour. Very tasty cheese on top, indeed. The topping was cheesy but crispy and the breadcrumbs added a nice crunch too. The swede and parsnip mash was just cooked to perfection. It also didn’t seem too fattening either, the sour cream adds to this idea but since it doesn’t use all that much, it tastes very much fresh and light (well as light as a buttery cheesy mash can be). I’m definitely making this again, such a pleasant surprise.

Sweet Potato Fries

IMG_0224

Around my holiday break I wanted to try making something with potatoes. Something crunchy, and yet not too fattening (as least fattening as potatoes can be), so I thought about sweet potato fries. Sweet potatoes are regarded as the healthier option but the difference is actually not too large as you might have heard. I read about the difficulties people have with making sweet potato fries crispy since they have a higher water content, so they tend to sag a bit unless you try deep frying it. Me, trying to avoid any heavy oils, and particularly deep frying anything, I wanted to grill/oven bake them. They certainly are very difficult to crisp up but other than that, they turned out decent enough for a side dish.

I found this recipe from the Food Network by Paula Deen. The original recipe as noted by the comments appears to be way over salted, luckily having read the comments I stuck by that and divided it by 4.

Baked Sweet Potato Fries (Food Network)

Ingredients
Olive Oil, for tossing
5 sweet potatoes, peeled and sliced into 1/4-inch long slices, then 1/4-wide inch strips, using a crinkle cut knife
1 tablespoon House Seasoning (recipe follows)
1/2 teaspoon paprika

House Seasoning:
1/4 cup salt
1/4 cup black pepper
1/4 cup garlic powder

Method
1. Preheat oven to 230 degrees C. Line a sheet tray with parchment. In a large bowl toss sweet potatoes with just enough oil to coat.

2. Mix house seasoning ingredients together and store in an airtight container for up to 6 months.

IMG_0207

3. Sprinkle potatoes with House Seasoning and paprika.

IMG_0208
4. Spread sweet potatoes in single layer on prepared baking sheet, being sure not to overcrowd.

IMG_0213

5. Bake until sweet potatoes are tender and golden brown, turning occasionally, about 20 minutes. Let cool 5 to 10 minutes before serving.

IMG_0223


Impressions

Baking sweet potato fries requires a lot more time than I imagined, simply because you need to keep flipping these around so that the entire chip crisps up. Otherwise you’d find that only one side is “crispy” (aka just slightly firmer in my case) and the bottom side is like a baked potato. Then, you have to consider the air temperature when turning the fries around as you would lose a lot of heat. So bear that in mind.

As you may see, the fries were a bit on the floppy side but nonetheless the flavour of the fries was decent. I think I may have added too much black pepper to my seasoning. Probably I would have added let’s say 1/5 cup or about there instead, and maybe sprinkled a bit more paprika and used a tad of chicken salt to replace the regular salt I used.

Keep in mind too, that only a very small amount of oil is needed for the seasoning to stick as then you may end up with wet potatoes that won’t evaporate in time. I enjoyed the process though don’t get me wrong, but I’m still searching for that perfect recipe.

Neil Perry’s Guacamole Recipe

IMG_4166

After coming back from a holiday in the USA and Canada, I became a larger fan of Mexican cuisine. On our way to the Grand Canyon we found this family Mexican restaurant that had really good (and absolutely filling) dishes. Of course for starters we had guacamole, and it was beautiful. So tasty, had a nice hint of lime, and coriander but not overbearing and letting the avocado shine. So when I came back to Australia I though what they hey, let’s try making it. I found this recipe on Good Food by Neil Perry that looked nice and fresh but I made some variations to it below.

Guacamole (Good Food)

Ingredients
1/2 small red onion
3 jalapeno chillies, seeds removed
1/2 bunch coriander, leaves only,
sea salt and freshly ground pepper
3 ripe avocados
juice of 2 limes
8 cherry tomatoes, roughly chopped
corn chips, to serve

Method
1. Finely chop the onion, chillies and coriander leaves.

2. Place in a mortar with a generous amount of sea salt and pound with a pestle until you have a rough paste.

3. Peel, stone and halve the avocados and add to the mortar, pounding until they start to mash.

4. Add the lime juice and a good grind of pepper and fold through.

5. Add the cherry tomatoes and fold through gently. (I didn’t)

Note: If the mortar is an attractive granite one, serve the guacamole straight out of that, with a bowl of corn chips.

IMG_4157


Impressions

I actually didn’t have any jalapeño chillies so instead I used red chillies but I think I used the small type which are more on the mouth burning hot kind. Luckily I used only one very tiny chilli with the seeds out so it wasn’t too bad. I didn’t add the tomatoes either because I thought it might be nice to try it held back and simple.

I found the recipe to be decent, not anywhere to the level of the ones I’ve found on holiday but I think it was also because I used too much coriander! It asks for half a bunch, which I did use but it was so overbearing that I had to add another avocado to the mix to balance it out.  I’d probably only use a a 1/8 cup at first and keep adding a bit more to your liking. It still wasn’t how I wanted it in the end because I ran out of avocados to mix in, haha, but it tasted pretty good with corn chips (and beer). I think it was also because the avocados I purchased weren’t ripe yet, as they were still a tad hard when extracting them from the skin and had very minimal flavour.

If you’re looking for a guacamole recipe with a slight twist and zing, I think this is it. For something more authentic, I think it’s best to keep looking.


Homemade Sausage Rolls (Everyday Gourmet)

IMG_0173

I saw this recipe on TV on Everyday Gourmet, with former Masterchef contestant Justine Schofield. What attracted me to the recipe was the ingredients she used, adding sambal oelek made me quite curious to taste how it would turned out. It also looked delicious when the sausage rolls were taken out of the oven. I thought why not give it a try, it’d be way better than those frozen/Four and Twenty/tucker shop varieties.

My primary difference was using Beef Mince, along with Beef/Pork Sausages (With no skin) as noted below.

Sausage Rolls (Everyday Gourmet – Justine Schofield)

Time: 35 minutes
Serves: 16

Ingredients
2 sheets frozen puff pastry, thawed
300g lamb mince (Or Beef)
3 Italian sausages, skin removed (6 small Beef/Pork Sausages – no skin)
1 ½ tsp. fennel seeds
1 tbs sambal oelek (2 1/2 tbs sambal oelek)
1 tbs tomato paste
1 onion, finely chopped and fried
2 tbs parsley, finely chopped
2 eggs, 1 lightly beaten
1 carrot, finely grated
Salt and pepper
Toasted Sesame Seeds (Optional)

Method

1. Pre heat the oven to 200C. Lightly grease and line a large baking tray with baking paper.

2. In a large bowl mix lamb (beef) mince, sausages, fennel seeds, tomato paste, sambal oelek, onion, grated carrot, parsley and 1 egg. Season well with salt and pepper. With your hands thoroughly combine the meat mixture. If you want to taste whether or not the seasoning is to your liking, try  taking a small spoonful of the meat mixture and cooking it (pan/oven/microwave) but if using a microwave make sure it’s cooked all the way through.

IMG_0166

3. Cut pastry sheet in half. Place one quarter of the mixture along the length of the pastry pressing together tightly. Roll the sausage roll log until the meat is completely covered with ½ of pastry. Cut excess pastry. Cut into 4 pieces and place on the baking tray.Repeat the process with the remaining ingredients.

IMG_0167

4. Brush some lightly beaten egg over the mini sausage rolls and sprinkle the sesame seeds on top, cook in the oven for 20 minutes or until the pastry is golden brown. Serve with your favourite tomato chutney or sauce.

IMG_0168

IMG_0171

Impressions

I loved this recipe! Having the sambal oelek in the recipe makes the difference, It simply cannot be ignored. I saw in Justine’s pictures that she sprinkled what looked like black sesame seeds on top but I wasn’t sure. We didn’t have any so I used the white variety instead, made it look better (I think).

You may notice that the fat from the sausages/ mince etc liquifies and spills on to the baking paper. This is what happened with mine, I just scraped it off from the bottom and cut it off from the sausage rolls and re-plated it.

Using beef does give it a strong beef taste but I think some will enjoy it, as not everybody seems to like the taste/smell of lamb.


Chocolate Orange Mini Cupcakes

IMG_0546

Orange and Chocolate go so well together, so I decided to try to bake some mini cupcakes. The recipe I used also had a orange and white chocolate buttercream icing on top but I thought I’d try it without it. Sometimes cupcakes just don’t need icing. I found this recipe off BBC Food which has many interesting recipes to try, luckily they also have both the metric and imperial measurements.

Chocolate Orange Cupcakes

Ingredients
For the cupcakes
120g/4oz plain flour
140g/5oz caster sugar (Halved to 70g)
1 tsp baking power
40g/1½oz unsalted butter
50g/2oz dark chocolate, melted
1 free-range egg
125ml/4fl oz milk
1 orange, juice only
3 tbsp granulated sugar

For the white chocolate and orange buttercream
125g/4½oz unsalted butter, softened
250g/9oz icing sugar
2-3 tbsp milk
50g/1¾oz white chocolate, melted
1 orange, zest only
100g/3½oz orange chocolate


Method
1. Preheat the oven to 170C/325F/Gas 3. Line a 12-hole muffin tin with paper cases.

2. Mix the flour, sugar and baking powder together in a food processor. Add the butter and pulse until combined.

3. Whisk the melted chocolate, egg and milk together in a jug.

4. Stir the chocolate mixture into the flour mixture until just combined.

IMG_0541

5. Spoon the mixture into the cases and bake for 15-20 minutes, or until risen and golden-brown and a skewer inserted into the middle comes out clean. Remove from the oven and set aside to cool for 10 minutes.

6. Meanwhile, mix the orange juice and granulated sugar together in a bowl. Carefully pour the orange juice mixture over the warm cakes and set aside to cool completely.

7. For the white chocolate and orange buttercream, beat the butter in a bowl until light and fluffy. Carefully stir in the icing sugar and continue to beat for five minutes. Beat in the milk, melted chocolate and orange zest.

8. Decorate the cupcakes with the buttercream

Impressions

I found the recipe did require the buttercream icing on top because the orange juice mixture didn’t really soak through the cupcakes. They basically just slid off the tops. It also gave the cakes a slightly damp feel to them as a result. The chocolate flavour was quite good though, perhaps its because the recipe requires chocolate and not just cocoa powder as some recipes do. With the orange juice mix you can taste it slightly but just not enough. I think I’ll try making it with an orange buttercream but without white chocolate as white chocolate tends to be extra sweet.

Ginger Snaps (SimpleRecipes)

IMG_0177

 It’s that festive time of year and what better way to get into the mood then to bake some ginger cookies! I really don’t know why I like ginger snaps/cookies so much, I have such a strong distaste for ginger in anything. I found this recipe on SimpleRecipes.com and thought they looked quite cute. Little did I know how out of ordinary the recipe was when I started to make it.

Gingersnap Cookies (SimplyRecipes)

Yield: Makes 6 to 8 dozen cookies.

Ingredients
8 oz unsalted butter (226g)
1 1/4 cup + 2 Tbsp. granulated sugar (I used a bit more than 1/2 cup brown sugar)
1/2 teaspoon vanilla extract
2 small eggs or 1 1/2 large eggs
1/3 cup molasses
3 cups all-purpose flour
2 1/2 teaspoon baking soda
1/2 teaspoon salt
2 1/2 teaspoon cinnamon
2 1/2 teaspoon ground ginger
1/8 teaspoon finely ground black pepper

Method
1. Cream butter until soft; add sugar, and beat until light and fluffy. Add vanilla and eggs, and beat until fluffy. Add molasses and beat until well-mixed.

2. Sift the dry ingredients; add to the mixture, 1/3 at a time. Mix only until the dry ingredients become incorporated.

IMG_0174

3. Line a 9″ x 5″ loaf pan with plastic wrap, so that some hangs over the outsides. Press the dough into the bottom of the pan. Pack it tightly, and try to make the top as level as possible. Cover the dough with the plastic overhangs. Freeze until very firm, preferably overnight.

IMG_0175

4. Unwrap and remove dough from the pan. Slice brick into thin slices, no more than 1/8″. Place on a parchment or Silpat-lined sheetpan (space at least an inch apart) and bake at 175 degrees Celsius until the edges turn dark brown, 7-12 minutes, depending on how thinly you have sliced the dough. Check the oven for doneness at 7 minutes.

IMG_0176

IMG_0178


Impressions

I made a few variations that didn’t seem to turn out that well. For one, I used cooking margarine which will have a lower fat content so it makes it less firm. So you’ll have difficulty trying to slice it evenly after it’s supposedly frozen and it’s hard to cut thin pieces because of it. Using a loaf pan is probably a good idea so you’ll get a consistent shape. My cookies certainly look terrible unattractive so that’s a reason to use a loaf pan instead of just throwing it into the freezer on a flat surface.

The other change I made was to the sugar content, I halved roughly but the cookies come out slightly less sweet then I would have liked. Probably 3/4 cup brown sugar would be the right amount if you’re eating them like this. I think if you intended on icing these

Other than that, taste wise it’s pretty good. I added a tad more ground ginger maybe 1/2 tsp and it gives it a more pronounced flavour to it.

Would I try the recipe again? I might, the long “cooking” time is a bit of a disincentive as you’ll have to wait one night or so to bake it but if I had an abundance of free time it’s worth a shot to try and perfect it.

Merry Xmas and have a safe and joyous New Year!