Beef Wellington with Red Wine & Shallot Sauce (Gordon Ramsay)

IMG_7676-1

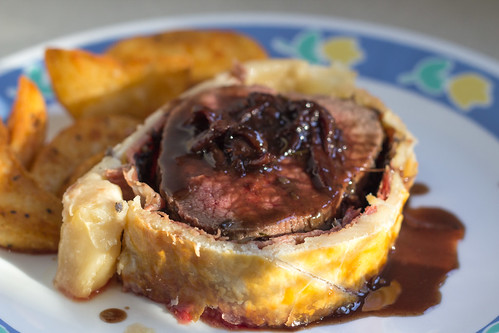
My first sighting of Beef Wellington was on Masterchef Australia. It looked so golden and delicious but not too scarily difficult to actually make yourself. I love anything with pastry so meat plus puff pastry is my ideal meal. One thing to note is if you love a more generous serving of the mushroom mixture to go around the beef, I’d say double the mushroom mixture ingredients and you may also need a few more slices of the prosciutto to cover it as well. The shallot and red wine sauce from the BBC Good Food with the Beef Wellington is an amazing combination. I highly recommend it. Check out Gordon Ramsay’s BBC Good Food recipe below!

Beef Wellington with Red wine & Shallot sauce (Gordon Ramsay)

Cooking and Prep Time 1 hr – 2 hrs / 20 minutes (Sauce)
Serves 6 / 4 (Sauce)

Ingredients (Beef Wellington)
1kg/2lb 4 oz a good beef fillet
3 tbsp olive oil
250g/9oz chestnut mushroom, include some wild ones if you like (I used Portobello mushrooms)
50g/2oz butter
1 large sprig fresh thyme
100ml/3.5 fl oz dry white wine
12 slices prosciutto
500g/1lb 2oz pack puff pastry, thawed if frozen
a little flour, for dusting
2 egg yolks beaten with 1 tsp water

IMG_7533-1IMG_7535-1

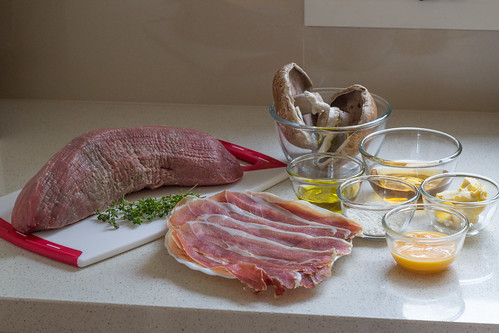
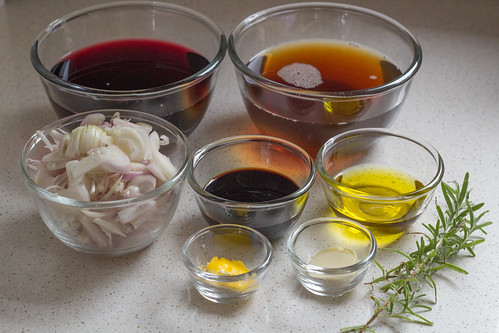
Ingredients (Shallot & Red Wine Sauce)
250g shallots, sliced
4 tbsp olive oil
1 garlic clove, lightly crushed
sprig rosemary
5 tbsp balsamic vinegar
400ml red wine
400ml beef stock or brown chicken stock, preferably homemade
knob of butter

IMG_7512-1

Method (Beef Wellington)
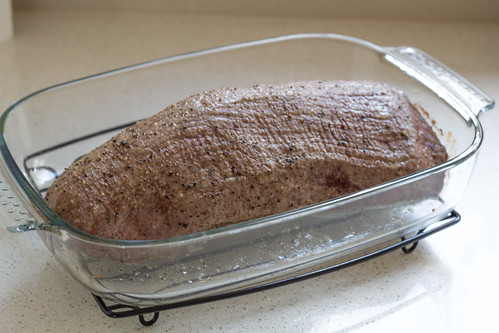
1. Heat oven to 220C/fan 200C/gas 7. Sit the 1kg beef fillet on a roasting tray, brush with 1 tbsp olive oil and season with pepper.

IMG_7553-1

2. Roast for 15 mins for medium-rare or 20 mins for medium. When the beef is cooked to your liking, remove from the oven to cool, then chill in the fridge for about 20 mins.

IMG_7565-1

3. While the beef is cooling, chop 250g mushrooms as finely as possible so they have the texture of coarse breadcrumbs. You can use a food processor to do this, but make sure you pulse-chop the mushrooms so they don’t become a slurry.

IMG_7554-1

4. Heat 2 tbsp of the olive oil and 50g butter in a large pan and fry the mushrooms on a medium heat, with 1 large sprig fresh thyme, for about 10 mins stirring often, until you have a softened mixture.

IMG_7561-1IMG_7569-1

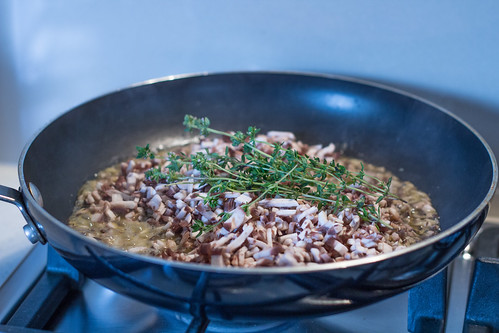
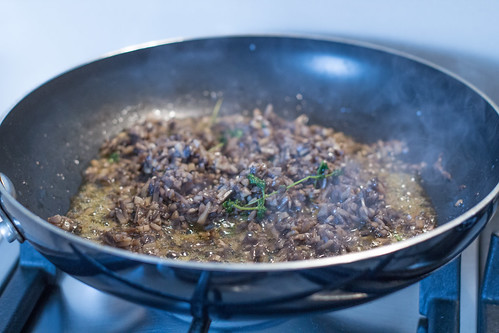
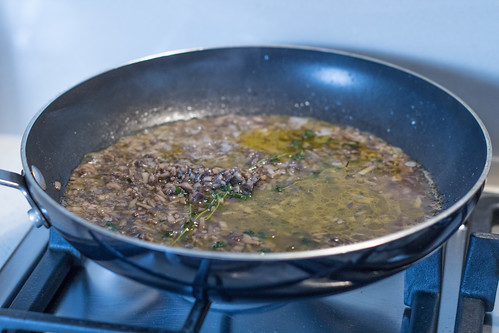
5. Season the mushroom mixture, pour over 100ml dry white wine and cook for about 10 mins until all the wine has been absorbed. The mixture should hold its shape when stirred. Remove the mushroom duxelle from the pan to cool and discard the thyme.

IMG_7571-1IMG_7575-1

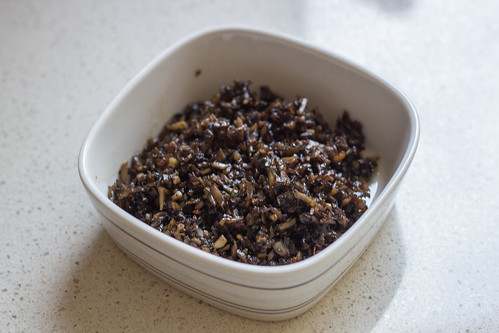
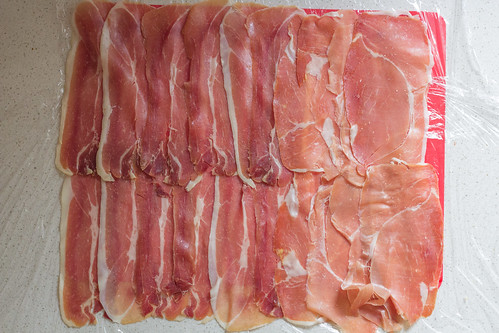
7. Overlap two pieces of cling film over a large chopping board. Lay 12 slices prosciutto on the cling film, slightly overlapping, in a double row. Spread half the duxelles over the prosciutto, then sit the fillet on it and spread the remaining duxelles over. Use the cling film’s edges to draw the prosciutto around the fillet, then roll it into a sausage shape, twisting the ends of cling film to tighten it as you go. Chill the fillet while you roll out the pastry.

IMG_7610-1IMG_7618-1

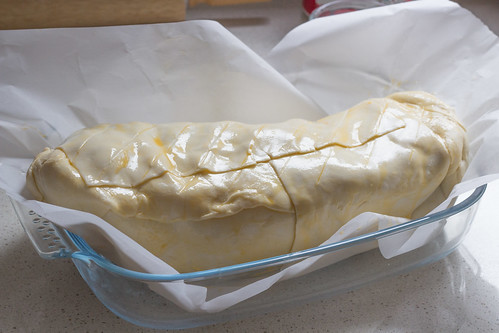
8. Dust your work surface with a little flour. Roll out a third of the 500g pack of puff pastry to a 18 x 30cm strip and place on a non-stick baking sheet. Roll out the remainder of the 500g pack of puff pastry to about 28 x 36cm. Unravel the fillet from the cling film and sit it in the centre of the smaller strip of pastry. Beat the 2 egg yolks with 1 tsp water and brush the pastry’s edges, and the top and sides of the wrapped fillet.

9. Using a rolling pin, carefully lift and drape the larger piece of pastry over the fillet, pressing well into the sides. Trim the joins to about a 4cm rim. Seal the rim with the edge of a fork or spoon handle. Glaze all over with more egg yolk and, using the back of a knife, mark the beef Wellington with long diagonal lines taking care not to cut into the pastry. Chill for at least 30 mins and up to 24 hrs.

IMG_7620-1

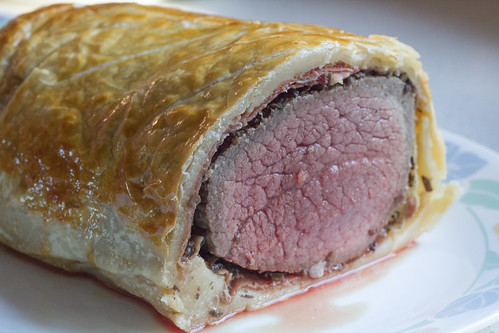
10. Heat oven to 200C/fan 180C/gas 6. Brush the Wellington with a little more egg yolk and cook until golden and crisp – 20-25 mins for medium-rare beef, 30 mins for medium. Allow to stand for 10 mins before serving in thick slices.

IMG_7656-1IMG_7665-1

Method (Sauce)

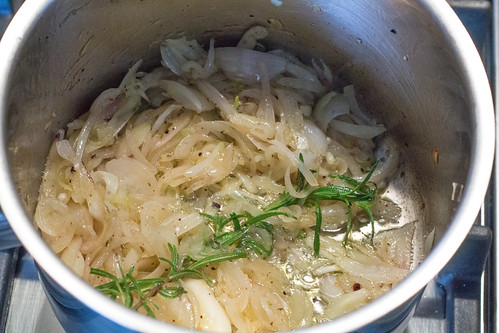
1. Sauté the shallots in a medium saucepan with the oil over a high heat for about 3 mins until lightly browned, stirring often. Season with ground black pepper and add the garlic and rosemary. Continue cooking for a further 3 mins, stirring often to prevent the shallots burning.

IMG_7521-1

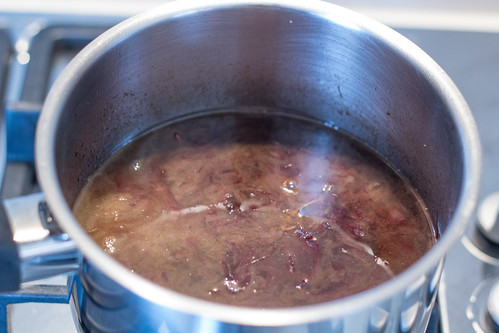
2. Pour in the vinegar and cook until evaporated away to a syrup, then pour in the wine and cook until reduced by two thirds or until it thickens.

IMG_7548-1

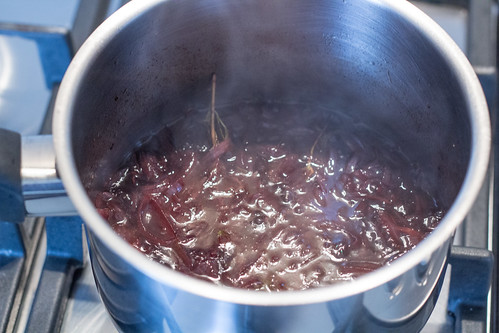
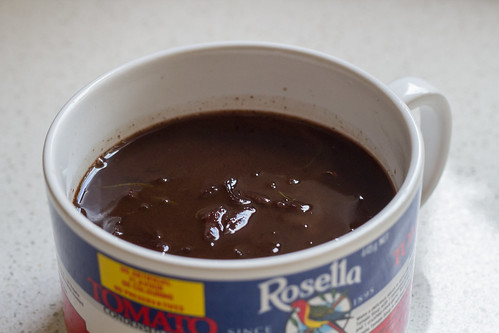
3. Pour in the stock and bring to the boil. Turn down the heat and simmer until reduced by two-thirds again, to around 250ml. Remove the garlic and rosemary. Add a little salt to taste and finally ‘monte’ (whisk) in a knob of butter. Add any juices from the steaks just before serving.

IMG_7551-1IMG_7591-1

Notes

  • Please allot enough time for chilling. It helps with the rolling of the beef and so you don’t have a very wet base when you bake the pastry in the oven
  • The mushroom mixture can be doubled as it’s a very thin layer around the beef
  • I recommend finding less salty prosciutto as it can be quite overpowering with the seasoning of the beef and mushroom mix.

Beef Soft Tortilla Tacos

IMG_4175

I have some kind of fondness for anything Mexican. I think I just like their idea of meat, cheese and corn in many dishes. I also will always want to try making something entirely from scratch and in this case it was tortillas. I love making bread dough, the act of kneading is just so soothing that I really can’t get enough of it so why not try something slightly different but almost like making bread and pastry combined. I found this wonderful recipe from the Homesick Texan whose images look absolutely mouthwatering. There were many tortilla recipes using corn flour (masa harina) but I had such difficulty finding where any store sold this that I gave up and found a superb plain flour recipe.

The beef taco recipe I found on the BBC website, not the most authentic of places to look but it seemed quite simple enough and came out surprisingly good too. If you don’t want to make the tortillas just scroll down for the beef recipe.

Texas Flour Tortillas (Homesick Texan)
Makes: 8 tortillas

Ingredients
Two cups of all-purpose flour (can make them whole wheat by substituting one cup of whole-wheat flour for white flour)
1 1/2 teaspoons of baking powder
1 teaspoon of salt
2 teaspoons of vegetable oil
3/4 cups of warm milk

Method
1. Mix together the flour, baking powder, salt and oil. Then, slowly add the warm milk

2. Stir until a loose, sticky ball is formed. Knead for two minutes on a floured surface. Dough should be firm and soft.

IMG_0225

3. Place dough in a bowl and cover with a damp cloth or plastic wrap for 20 minutes.

4. After the dough has rested, break off eight sections, roll them into balls in your hands, place on a plate (make sure they aren’t touching) and then cover balls with damp cloth or plastic wrap for 10 minutes. (It’s very important to let the dough rest, otherwise it will be like elastic and won’t roll out to a proper thickness and shape.)

IMG_0226

5. After dough has rested, one at a time place a dough ball on a floured surface, pat it out into a four-inch circle, and then roll with a rolling pin from the center until it’s thin and about eight inches in diameter. Don’t over work the dough, or it’ll be stiff. Keep rolled-out tortillas covered until ready to cook.

IMG_4167

6. In a dry iron skillet or comal heated on high, cook the tortilla about thirty seconds on each side. It should start to puff a bit when it’s done.

IMG_4174

7. Keep cooked tortillas covered wrapped in a napkin until ready to eat.

Notes
Can be reheated in a dry iron skillet, over your gas-burner flame or in the oven wrapped in foil.

Beef Tortilla/Tacos

Ingredients
For the beef filling
500g/1lb 2oz beef mince
1 onion, chopped
150g/5oz field mushrooms, sliced (optional)
1 green pepper, seeds removed, chopped
1 garlic clove, crushed
½ tsp hot paprika
¼ tsp ground cumin
200ml/7fl oz beef stock
6 tbsp tomato purée
sea salt and freshly ground black pepper
Sprinkling of chilli power (optional)

12 taco shells/tortillas bought (or 8 fresh tortillas)
lettuce shredded
diced tomatoes
grated or shredded cheese (any kind but I used cheddar/mozzarella mix)
corn (canned or from freshly cooked corn)
tabasco sauce (if feeling adventurous)

Method
1. Preheat the oven to 180C/350F.

2. For the beef filling, fry the mince in a frying pan over a medium-high heat for 5-6 minutes, stirring occasionally and breaking it up with a wooden spoon, or until browned. Add the onion, mushrooms if using, green pepper and garlic and cook, stirring occasionally, for five minutes or until the vegetables are softened. Stir in the paprika and cumin and season to taste with salt and freshly ground black pepper. Pour in the beef stock and tomato purée and mix well. Cover and simmer gently for 10 minutes, stirring occasionally.

IMG_4169

3. To serve, place the taco shells on a baking tray and warm them in the oven for 2-3 minutes. Spoon the beef filling into the warm taco shells,  add toppings or basically whatever you like to add in and it’s ready to eat!

Impressions

I actually forgot to buy the capsicum and mushrooms. So basically my beef mix was beef, onions, chicken stock, tomato puree, spices and salt and pepper. With a sprinkling of chilli powder. I probably added a bit more paprika to my liking, but it’s basically all to your taste buds. It has a nice rounded taste of paprika which went really well with the beef and toppings.

I love recipes that just let you mix it up or add what you like. Just like a pizza. I probably could have added some fresh capsicum on top, avocado spread and onions too but I think it tasted delicious like that.

The tortillas were a joy to make, and very simple too. They came out soft and light, but a bit crunchy when using the skillet. Worked out so well, I’d probably make this again and again.

Parsnip and Swede Mash (BBC GoodFood)

IMG_0215

I was searching for a replacement recipe to mash potato, just to try something different. Even though I am a potato head, I heard about parsnip mash in Masterchef and they always make some weird vegetable into a mash so why can’t I be weird too! I found this recipe from the BBC GoodFood website titled Winter root mash with buttery crumbs and looked quite delicious and didn’t seem to difficult to make either. Although they said it’s for winter I didn’t care, mash is all year round.

Winter root mash with buttery crumbs aka Parsnip and Swede Mash (BBC GoodFood)

Serves 10

Ingredients
650g parsnips , cut into even chunks
650g swedes , cut into same size chunks as the parsnips
142ml tub soured cream
1 rounded tbsp hot horseradish (English Provender is good) (I used Spiced Mustard)
2 tbsp fresh thyme leaves
butter , for greasing

Butter topping
50g butter
1 small onion , finely chopped
50g fresh white breadcrumbs (from about 4 slices)
a small handful thyme leaves, plus extra for scattering
25g parmesan , coarsely grated (I used a mix of parmesan and mozzarella)

Method
1. In a large pan of boiling salted water, cook the parsnips and swede, covered, for about 20 minutes until tender. Drain well, then mash them together using a masher or food processor until reasonably smooth but still with a bit of texture. Stir in the soured cream, horseradish and thyme and season with salt and pepper.

2. Spoon into a buttered shallow ovenproof dish and put to one side.

IMG_0201

3. Make the topping. Melt the butter in a frying pan and cook the onion for 5-6 minutes, until gorgeously golden. Mix in the breadcrumbs and stir to brown and crisp a little. Season with salt and pepper and add the thyme. Take the pan off the heat.

4. Spoon the mixture casually over the top of the mash. Scatter over the parmesan. (Can be made ahead to this point and kept covered in the fridge for up to a day. Or can be frozen for up to a month.)

IMG_0212

5. Bake at 190C/gas 5/ fan 170C for 35-40 minutes if doing from cold, 25-30 minutes if not, or 1 1?2 – 1 3?4 hours from frozen (put foil on top, and remove it for the last 10 minutes) – until golden and crisp on top. Serve scattered with a few more thyme sprigs and leaves.

Impressions

I absolutely loved this recipe, especially fresh from the oven. Although I made a slight alteration with the recipe using spiced mustard instead of horseradish I don’t think it made much of a difference.

I did steps 1 and 2 the day before since I was baking a few other things the next day too but it didn’t appear to affect the mash when I took it out of the fridge the next day. 

I think the use of fresh thyme leaves (from my garden!) made it smell so good. I really couldn’t get enough thyme in this recipe, it was used profusely into the mash and sprinkled on top and in the topping.

I also used a mix of parmesan and mozzarella as the cheese topping which I think worked in its favour. Very tasty cheese on top, indeed. The topping was cheesy but crispy and the breadcrumbs added a nice crunch too. The swede and parsnip mash was just cooked to perfection. It also didn’t seem too fattening either, the sour cream adds to this idea but since it doesn’t use all that much, it tastes very much fresh and light (well as light as a buttery cheesy mash can be). I’m definitely making this again, such a pleasant surprise.

Chocolate Orange Mini Cupcakes

IMG_0546

Orange and Chocolate go so well together, so I decided to try to bake some mini cupcakes. The recipe I used also had a orange and white chocolate buttercream icing on top but I thought I’d try it without it. Sometimes cupcakes just don’t need icing. I found this recipe off BBC Food which has many interesting recipes to try, luckily they also have both the metric and imperial measurements.

Chocolate Orange Cupcakes

Ingredients
For the cupcakes
120g/4oz plain flour
140g/5oz caster sugar (Halved to 70g)
1 tsp baking power
40g/1½oz unsalted butter
50g/2oz dark chocolate, melted
1 free-range egg
125ml/4fl oz milk
1 orange, juice only
3 tbsp granulated sugar

For the white chocolate and orange buttercream
125g/4½oz unsalted butter, softened
250g/9oz icing sugar
2-3 tbsp milk
50g/1¾oz white chocolate, melted
1 orange, zest only
100g/3½oz orange chocolate


Method
1. Preheat the oven to 170C/325F/Gas 3. Line a 12-hole muffin tin with paper cases.

2. Mix the flour, sugar and baking powder together in a food processor. Add the butter and pulse until combined.

3. Whisk the melted chocolate, egg and milk together in a jug.

4. Stir the chocolate mixture into the flour mixture until just combined.

IMG_0541

5. Spoon the mixture into the cases and bake for 15-20 minutes, or until risen and golden-brown and a skewer inserted into the middle comes out clean. Remove from the oven and set aside to cool for 10 minutes.

6. Meanwhile, mix the orange juice and granulated sugar together in a bowl. Carefully pour the orange juice mixture over the warm cakes and set aside to cool completely.

7. For the white chocolate and orange buttercream, beat the butter in a bowl until light and fluffy. Carefully stir in the icing sugar and continue to beat for five minutes. Beat in the milk, melted chocolate and orange zest.

8. Decorate the cupcakes with the buttercream

Impressions

I found the recipe did require the buttercream icing on top because the orange juice mixture didn’t really soak through the cupcakes. They basically just slid off the tops. It also gave the cakes a slightly damp feel to them as a result. The chocolate flavour was quite good though, perhaps its because the recipe requires chocolate and not just cocoa powder as some recipes do. With the orange juice mix you can taste it slightly but just not enough. I think I’ll try making it with an orange buttercream but without white chocolate as white chocolate tends to be extra sweet.