Parsnip and Swede Mash (BBC GoodFood)

IMG_0215

I was searching for a replacement recipe to mash potato, just to try something different. Even though I am a potato head, I heard about parsnip mash in Masterchef and they always make some weird vegetable into a mash so why can’t I be weird too! I found this recipe from the BBC GoodFood website titled Winter root mash with buttery crumbs and looked quite delicious and didn’t seem to difficult to make either. Although they said it’s for winter I didn’t care, mash is all year round.

Winter root mash with buttery crumbs aka Parsnip and Swede Mash (BBC GoodFood)

Serves 10

Ingredients
650g parsnips , cut into even chunks
650g swedes , cut into same size chunks as the parsnips
142ml tub soured cream
1 rounded tbsp hot horseradish (English Provender is good) (I used Spiced Mustard)
2 tbsp fresh thyme leaves
butter , for greasing

Butter topping
50g butter
1 small onion , finely chopped
50g fresh white breadcrumbs (from about 4 slices)
a small handful thyme leaves, plus extra for scattering
25g parmesan , coarsely grated (I used a mix of parmesan and mozzarella)

Method
1. In a large pan of boiling salted water, cook the parsnips and swede, covered, for about 20 minutes until tender. Drain well, then mash them together using a masher or food processor until reasonably smooth but still with a bit of texture. Stir in the soured cream, horseradish and thyme and season with salt and pepper.

2. Spoon into a buttered shallow ovenproof dish and put to one side.

IMG_0201

3. Make the topping. Melt the butter in a frying pan and cook the onion for 5-6 minutes, until gorgeously golden. Mix in the breadcrumbs and stir to brown and crisp a little. Season with salt and pepper and add the thyme. Take the pan off the heat.

4. Spoon the mixture casually over the top of the mash. Scatter over the parmesan. (Can be made ahead to this point and kept covered in the fridge for up to a day. Or can be frozen for up to a month.)

IMG_0212

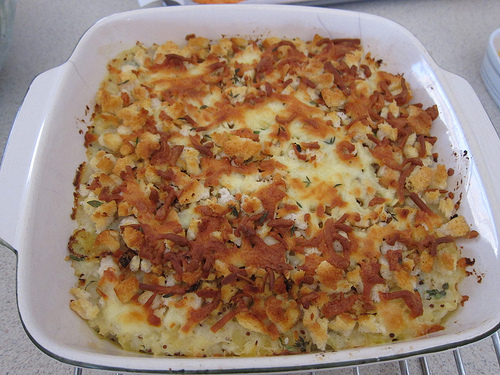
5. Bake at 190C/gas 5/ fan 170C for 35-40 minutes if doing from cold, 25-30 minutes if not, or 1 1?2 – 1 3?4 hours from frozen (put foil on top, and remove it for the last 10 minutes) – until golden and crisp on top. Serve scattered with a few more thyme sprigs and leaves.

Impressions

I absolutely loved this recipe, especially fresh from the oven. Although I made a slight alteration with the recipe using spiced mustard instead of horseradish I don’t think it made much of a difference.

I did steps 1 and 2 the day before since I was baking a few other things the next day too but it didn’t appear to affect the mash when I took it out of the fridge the next day. 

I think the use of fresh thyme leaves (from my garden!) made it smell so good. I really couldn’t get enough thyme in this recipe, it was used profusely into the mash and sprinkled on top and in the topping.

I also used a mix of parmesan and mozzarella as the cheese topping which I think worked in its favour. Very tasty cheese on top, indeed. The topping was cheesy but crispy and the breadcrumbs added a nice crunch too. The swede and parsnip mash was just cooked to perfection. It also didn’t seem too fattening either, the sour cream adds to this idea but since it doesn’t use all that much, it tastes very much fresh and light (well as light as a buttery cheesy mash can be). I’m definitely making this again, such a pleasant surprise.

Almond and Vanilla Cupcakes

IMG_0539

Using The Crabapple Bakery Cupcake Cookbook by Jennifer Graham again (Buy it here/official website), we decided to do a variation of their Sweetheart cakes minus the icing and shape…. and probably the whole intention of making it actually!

Without any of the decorations and grandeur, these cupcakes are basically Vanilla/Almond flavoured cupcakes.  Don’t they look all rustic and homely?! Check out the recipe below with how to make the decorations/icing as well for those that want to try it.

Almond and Vanilla Cakes

Makes 18 min-heart cakes/24 cupcakes

Ingredients
1 1/2 cups plain flour
1 tablespoon baking powder
3 cups almond meal
250g softened unsalted butter
1 1/2 cups castor sugar (Used 3/4 cups)
6 eggs
1 tablespoon vanilla extract
1/4 cup natural yoghurt

Method
1. Preheat oven to 160C. Lightly grease three six-hole mini heart cake trays (Or just use cupcake pans with paper cups)

2. Sift together flour and baking powder. Add almond meal and combine

3. In a separate bowl, cream the butter for 1-2minutes. Add half the sugar and beat for 2 minutes. Add the rest of the sugar and beat for a further 2 minutes or until light and fluffy. Add the eggs two at a time, beating for 2 minutes after each addition or until mixture is light and fluffy. Add the vanilla and beat until combined.

4. Add a third of the flour to the creamed mixture and beat on low speed until combined. Add half of the yoghurt and beat until combined. Repeat this process. Add the remaining third of the flour and beat until thoroughly combined; do not over-beat as this will toughen the mixture.

5. Spoon mixture into the cake trays, filling each heart just over half full. Bake for 15 minutes or until a fine skewer inserted comes out clean. Leave to cool for about 5 minutes before turning out onto a wire rack to cool for a further 30 minutes before icing.

To make regular cupcakes
5. If using regular cupcake papers instead of mini-heart trays, this recipe makes 24 cupcakes. Bake at 160 C for 20-25 minutes or until a skewer inserted comes out clean.

Decoration
2 quantities Quick Royal Icing
Rose Essence
Food Colouring: Rose Pink
1 quantity Sugared Rose Petals

1. Prepare the icing to pouring consistency. Add 2-3 drops rose essence and 3-4 drops pink food colouring during preparation.

2. Place the sweetheart cakes onto a fine wire rack with feet. Pour over most of the icing, so that each cake is completely covered. Add a few more drops of the pink food colouring to the remaining icing to create a mid-pink colour.

3. Using a teaspoon, drizzle the icing over so that it runs down the sides a little. Use an offset palette knife to life the cakes onto a serving plate, then sprinkle with the sugared rose petals.

Variation
If you’re making these cakes for a man, ice the cakes with Dark Chocolate Ganache  and top with chocolate truffles.

Quick Royal Icing
Ingredients
Water
500 g bag premix royal icing

Makes 3/4 cup icing – enough for 12 cupcakes

1. Simply add a little water at a time to the sifted icing sugar, until you have the required consistency. If you want to use a flavouring essence, add a couple drops to the icing sugar before you add the water. If you want to use colouring, add it before you reach the desired consistency (if you add it at the end it will thin the icing). Use fruit juice or coconut milk instead of water for a flavoured icing.

Sugared Rose Petals
2 Fresh Pink Rose Heads (Not chemically sprayed)
1 egg white, lightly beaten
Castor Sugar

1. Rinse rose heads under cold water. Gently pat dry. Dip each rose petal into the egg white until just covered. Dip the wet petals into a bowl of fine castor sugar and shake off any excess. Place them on a wire rack to dry for about 1 hour.

Dark Chocolate Ganache
1 1/2 cups cream
400 g dark cooking chocolate (chopped)

Makes: 3 cups frosting
1. In a heavy based saucepan, bring the cream to the boil. Place the chocolate into a bowl and pour the boiling cream over. Leave for 1 minute to soften. Use a small spatula to carefully stir the ganache, being careful not to incorporate any air, until you achieve a silky frosting.

2. To use: If you want to achieve a smooth surface, dip cupcakes into the frosting immediately. If you want to achieve a fluffy frosting, let the ganache cool to room temperature and then apply to the cupcake with a small spatula. Do not stir the set ganache too much as it will become dull.

IMG_0540

Impressions

We didn’t go through all that shebang as I’m not a big fan of icing as I find it usually sickly sweet. Crazy I know. So what you get here is cupcakes dressed down to look like muffins. They have this rough texture mostly because of the almond meal that isn’t a fine powder. The process of making this is quite simple, it’s like baking any other cupcake.

As the cupcake itself it’s quite pleasant, it’s light and has a predominant almond flavour. Which isn’t a bad thing by all means. The texture of the cupcake is more grainy because of the almond meal, the yoghurt helps to make it lighter against the richness of the butter so it doesn’t feel like you’re just having a vanilla butter cake. Overall, I think it makes a nice treat that jumps between muffin and cupcake.

Orange Chiffon Cake

IMG_5914

After baking my first Pandan Chiffon Cake, we decided to try baking the Orange Chiffon Cake. Usually Pandan and Orange and they two popular versions in Melbourne. I’m really not sure of many other versions, I’ve seen someone do a Black Sesame one but haven’t had a chance to try that yet.

The difference between the Pandan and Orange Chiffon Cake recipes is the Orange version tastes much lighter because  of the use of coconut milk in the Pandan recipe which makes it slightly more dense. Without further adieu here is my mother’s recipe which works a treat!

Orange Chiffon Cake
Ingredients

8 egg whites
100 g sugar
1/2 tsp cream of tartar

8 egg yolks
60 g sugar

180 g self-raising flour (or 160 g plain flour and 20g cornflour)

1/2 tsp salt
1 1/4 tsp baking powder

120ml vegetable oil/corn oil
80ml orange juice

1 tsp orange extract

Method
1. Preheat oven to 160/170 degrees Celsius.
2. Sieve the flour, salt and baking powder into a medium sized bowl.
3. Add the vegetable oil, orange juice, orange extract, egg yolks and sugar into the dry ingredients and mix until just combined.
4. Whip the egg whites and once it starts to bubble add the cream of tartar.
5. Keep whipping until the mixture is nearing soft peaks, then slowly add the sugar with the electric mixer is still running and until hard peaks form.

IMG_5891
6. Add 1/3 of the meringue into the wet mixture until the thick mixture softens. Then slowly add in the rest of the meringue until just combined. Do not overmix!
7. Pour into the cake pan (one made for upside down cakes – it has a hole in the middle)
8. Place in the oven for 30/40 minutes. If the top of your cake gets brown too quickly, lower the oven temperature to around 150. To see if it’s done, you can use a skewer and poke it through the middle. If it comes out clean, it’s done.

IMG_5898
9. Remove from the oven when done, and flip it upside. If the cake as risen higher than the cake pan’s height, use a mug and rest the middle cylinder on top.

IMG_5940
IMG_5904
10. Allow the cake to cool until room temperature.

IMG_5916

Here’s how it looks inside!

IMG_5951

I find that you’ll always have a slight depression and density at the bottom because of the meringue cooling. You’ll be hard pressed to find a Chiffon cake that doesn’t sink a bit so don’t worry if yours does. It’s fine!

IMG_5949

Impressions

I find the Orange Chiffon Cake to be extremely light, but full of orange flavour. The orange juice really adds the much needed freshness and flavour. It really will depend on the oranges and how ripe they are but a little bit of orange extract is good just in case the orange juice doesn’t do its job.

Using a stand mixer really makes a difference to a hand mixer. I find the hand mixer either overbeats the meringue, or doesn’t evenly beat the egg whites. Maybe it’s just my poor hand mixing but with a stand mixer and especially a planetary mixer, you get hard peaks extremely quickly and without much fuss. The key in making a good Chiffon Cake is obtain hard peaks and carefully mix it in with the batter but just enough. Once you’ve tried it a couple of times, you’ll know how hard/gentle to mix and after that it really does become easy to make.

If you love light, fluffy cakes  and you don’t want a buttery aftertaste, Chiffon Cakes are excellent for your cake fix.

Banana Cake

IMG_6956

Ba-na-na-na-na-na-na-na-nana-na. Make those bodies sing. I’m so glad bananas have dramatically dropped in price and no longer cost at least $10. Rejoice! To celebrate the comeback of Australian Banana’s here is a recipe for those with extra ripe bananas and don’t know what to do with them. It’s a quick and easy recipe, and very difficult to get wrong.

Banana Cake

Ingredients
8 ounces (228 grams) self raising flour
2 tablespoons plain flour
1-2 tsps baking soda
1/2 tsp salt

3.5 ounces (100 grams) caster sugar
5 ounces (142 grams) butter/cooking margarine (6/7 ounces, you probably will get a slightly more moist cake)
1 tsp vanilla extract
4 eggs (at room temperature)

1-2 ripe bananas (mashed)
1/2 cup chopped walnuts (optional)

Method
1. Preheat oven to 180 C. Sift the self raising flour, plain flour, baking soda and salt and leave aside.
2. Cream the butter and sugar until light. You can add the vanilla extract when whisking or afterwards, it doesn’t really matter too much.
3. Add each egg one at a time until all is mixed through well.
4. Combine the sifted dry ingredients slowly to the wet batter.
5. Add the bananas and walnuts to the mixture and it’s done!.
6. Place the batter into muffin/cupcake pans. Then place in oven for 15-20 minutes/ until golden brown (or when the skewer comes out clean)

IMG_6957

I like this recipe, since you can adjust the sugar, butter to your liking. The banana adds to the sweetness so you don’t really need that much extra sugar to be honest. The banana makes the mixture quite wet, so you may need to add extra baking powder so that it rises properly and doesn’t sink afterwards! I’ll keep trying to find the perfect banana cake recipe.

Pad Thai

IMG_5474

There is just something about Thai food that I love. I think it’s probably how well balanced their food seems to be. It has this perfect blend of sweet, sour, salt and spice. Pad Thai is a rice noodles stir fry that incorporates the many commonly used Thai ingredients such as tamarind paste, fish sauce and chilli along with a mix of eggs, preserved turnip, nuts, tofu and shrimp.

I’ve used the SBS Food’s Pad Thai Recipe and made slight changes to my preferences.

Pad Thai

Ingredients

Sauce
100g tamarind in block form
300ml warm water
200g palm sugar
50g caster sugar
150ml Thai seasoning sauce

Other ingredients 
Large green prawns, heads and shells removed (allow 2-3 per person)
10g dried shrimp
¼ red onion, sliced
40g hard tofu, sliced
40g preserved turnip
2 eggs
200g rice noodles, soaked in warm water for 30 minutes
Garlic chives
Bean sprouts
Fried shallots
Roasted peanuts, chopped
Dried chilli
Lime wedges

Preparation

1. Soak the tamarind in warm water, kneading with your fingers to separate the pulp from the seeds. Squeeze out liquid, strain and pour into a frying pan or wok. Add palm sugar, caster sugar and seasoning sauce. Bring to the boil and boil until it has reduced and is syrupy.

2. Fry prawns until they curl and change colour. Add dried shrimp, red onion, tofu and preserved turnip. Push contents of pan to one side and add egg, breaking up just a little as it cooks.

3. Add drained noodles, 2 tablespoon of water, the tamarind sauce, garlic chives and a few bean sprouts, fried shallots, chopped peanuts and chilli.

4. Pile into a serving bowl and garnish with more fried shallots, bean sprouts, a wedge of lime, garlic chives and crushed peanuts.

Note:
The amount of sauce added to the Pad Thai can be adjusted according to how strong a flavour you like. Usually this quantity of sauce is fine for 4 people. Any unused sauce can be kept in a clean jar in the refrigerator.

Impressions:
I quite liked this recipe, it’s quite easy to make actually, and I actually used a lot of the sauce because we used the whole packet of rice noodles (Much larger than 200g). I have a slight dislike of all things coriander so I’ve neglected to add it here, but I can see how it can make this dish a bit more refreshing with coriander added to it.
I think I also may have added too much dried shrimp so the Pad Thai ended up having a strong shrimp taste, but it still tasted nice and light. It tasted similar to what I’ve eaten at Thai restaurants but I can’t really tell whether or not it’s truly authentic or not but it tastes great so that’s all that matters to me!


Chocolate Mousse Torte

IMG_5309

I found this recipe in one of Coles free food magazines. It looked like a really nice mousse and I guess that’s how they get you! By having attractive and delicious looking pictures. I commend their photographer for making it look delectable.

I made a couple of alterations to the recipe. I substituted the Oreo cookies with just a packet of Arnott’s Chocolate cookies and 250g of Dark Chocolate. I also reduced the sugar to around half as well, and with the top layer I reduced the butter by just half and I used Crunchy Peanut Butter.

IMG_5306

Here is the recipe below;
Chocolate Mousse Torte
Prep Time: 40 minutes
Cook Time: 10 minutes
Serves 10

Chilling Overnight
150 g Oreo Cookies
40 g butter melted
250 g Coles Milk Chocolate chopped
50 g dark chocolate chopped
½ cup thickened cream

Chilling Overnight
4 Coles Free Range Eggs separated
10 g sachet powdered gelatine
¼ cup boiling water

Chilling Overnight
¾ cup caster sugar
small Easter eggs and white chocolate curls to decorate

Ganache Topping
¾ cup dark chocolate melts
½ cup Coles Smooth Peanut Butter (see tip)
40 g butter chopped

Method
1. Line base of 20cm springform pan with plastic wrap. Spray sides of pan with cooking oil and line with baking paper.

2. Place cookies in a food processor. Process until crushed. Add butter and process until combined. Press into base of prepared pan and refrigerate while preparing filling.

3. Melt milk and dark chocolate in a heatproof bowl over a pan of gently simmering water until smooth. Remove from heat and stir in cream. Whisk in egg yolks. Whisk together gelatine and boiling water until gelatine dissolves. Add to chocolate mixture and mix to combine.

4. Using an electric mixer, beat egg whites until soft peaks form. Add sugar, 1 tbsp at a time, beating constantly until thick and glossy. Carefully fold into chocolate mixture until just combined. Pour over biscuit base. Refrigerate overnight until firm.

5. To make ganache topping, combine chocolate, peanut butter, butter and ½ cup of water in a small saucepan. Stir on low heat until chocolate has melted and mixture is smooth. Set aside to cool completely.

6. Pour ganache evenly over top of mousse and refrigerate for 2 hrs, or until ganache is firm. Unmould cake and place on a serving plate. Decorate with Easter eggs and choc curls.

Tip: You can replace the peanut butter in the Ganache ingredients with ½ cup cream and then omit the water added in the method.

IMG_5317
IMG_5315
Impressions
While the torte was pretty easy to make, I wasn’t too fond of the top layer. Either I over heated the chocolate or I probably should have used the correct amount of butter because it wasn’t as smooth as I would have liked. Also the nuts probably may have made a slight impact on the texture too.

The bottom layer wasn’t as rich and tasty as a Oreo base would have been, it didn’t taste like those cookies you find in a Cookies & Cream ice-cream or the bottom of ice-cream cakes. I was just confused on whether the filling of those Oreos were to be processed too so I opted for a different brand.

The mousse of the other hand, was light and fluffy. It was moist and smooth, and nicely aerated. So I deemed the whole cake a success because the mousse was just how I wanted it. Maybe my cake base was too big for the mixture, but I’d also prefer a higher mousse filling so maybe If were to make it another time, I’d use a smaller base.

Seafood Risotto

IMG_5282

Every time I go to an Italian restaurant or even just a cafe that has risotto, I just have to order it. My first taste experience was at Sofia’s Restaurant in Ferntree Gully, and well I found it to be delicious. I don’t think Sofia’s is an example of true authentic Italian food but it tastes quite good and I can’t argue with that.

So I’ve wanted to cook risotto for some time too, just something that seemed fun to do since we hardly go to Italian restaurants so it was just another way to eat it.

I found a couple of recipes on the internet but I needed one that had a seafood mix (Scallops, prawns, mussells, fish, squid rings) since we bought the frozen type at the supermarket and some of the risotto recipes get you to buy different types of seafood for the stock so it wasn’t any use to me.

I finally decided on the Taste.com.au’s recipe, and just bought some fresh mussels to use for the stock as the mussels in the mix were already opened. I made a couple of tweaks to the recipe though.

IMG_5267

At first I couldn’t find Fish stock, so I bought some Ikan Bilis stock cubes from my Asian Grocer, and then I found a small carton of Fish stock at my local supermarket so I mixed them both to make my fish stock.

For my dry white wine, I used Somerton 2010 Semillon – Chardonnay, one of the cheapest dry white wines I could find at Dan Murphy’s actually.

IMG_5269

I didn’t have enough prawns in my mix, and forgot to buy extra prawns but it didn’t impact upon taste really. It’s just a matter of what seafood you prefer.

I really like the recipe but one thing I forgot to do was to add more passata into it after I added another half cup of arborio rice so it was a bit drier then I would like but the taste and flavours were all still there. With my fresh parsley straight from my herb garden, chilli flakes and a sprinkle of parmesan cheese, my Seafood Risotto came out pretty well I thought.

I also pretty much used all the stock available because I added more rice, so it wasn’t as wet as what you might get in a restaurant but still moist enough.

If I made this again, I would probably use less mussels and more prawns, just because of preference and there were probably too many mussels in there and slightly overwhelmed everything else. Other than that, I really enjoyed making it and the end result was great too.

Seafood Risotto (Taste.com.au)
Ingredients (serves 4)
1 1/4 cup (310ml) dry white wine
500g black mussels, scrubbed, debearded
1.25L good-quality gluten-free fish stock (see note)
1/4 tsp saffron threads
40g unsalted butter
2 tbs olive oil
500g prawns, peeled (tails intact), deveined
2 squid tubes, cut into rings
8 scallops
1 onion, finely chopped
2 garlic cloves, finely chopped
2 cups (440g) arborio rice
1/2 cup tomato passata (see note) or roasted-tomato sugo (see related recipe)
2 tbs chopped flat-leaf parsley leaves, plus extra to garnish
Chilli flakes
Grated parmesan cheese

Method
1. Place wine in a wide pan over medium-high heat. Bring to a simmer, then add mussels and cover. Cook, shaking the pan occasionally, for 3 minutes until almost all shells have opened (discard any mussels that remain unopen after this time). Strain, reserving liquid, then remove mussels from shells and set aside. Place reserved liquid, fish stock and saffron in a pan and keep at a simmer over low heat.

2. Melt 30g butter with 1 tbs oil in a large, heavy-based frypan over medium heat. Add prawns and cook for 2-3 minutes, turning, until cooked through. Remove to a bowl and set aside. Increase heat to high. Add squid and scallops. Cook, turning, for 1-2 minutes until just opaque and almost cooked through. Set aside with prawns.

3. Reduce heat to medium and melt remaining 10g butter with remaining 1 tbs oil. Cook the onion, stirring, for 2-3 minutes until softened. Add garlic and rice and stir for 1-2 minutes to coat the grains. Add a ladleful of hot stock and stir until absorbed. Continue adding stock, 1 ladleful at a time, stirring and making sure each is absorbed before adding the next, until rice is al dente. This will take about 20 minutes. (You may not need all the stock.) Stir in the seafood, passata or sugo and parsley. Season and cook for 1 minute until heated through. Serve garnished with parsley, chilli flakes and parmesan.