Homemade Hot Cross Buns

IMG_0321

This probably isn’t the best time to post this seeing as it’s July. I always end up making things too late or even after the particular festive time comes around so this is just typical me. I love the smell of warm hot cross buns, it’s that cinnamon and spice mix that just keeps me calm. I also love kneading bread so making hot cross buns is jut plain relaxing. I found a recipe on Taste.com.au and it’s quite a good recipe irrespective of my little mistakes whilst trying to make it. Check it out below!

Hot Cross Buns (Taste.com.au)
Makes 12 large buns
Ingredients
4 cups plain flour
2 x 7g sachets dried yeast
1/4 cup caster sugar (a bit less)
1 1/2 teaspoons mixed spice (I didn’t have this so I used 1tbsp cinnamon, 1/2tsp ground ginger, 1/4tsp ground cloves)
pinch of salt
1/2 cups currants
1/2 dark chocolate bits
40g butter
300ml milk
2 eggs, lightly beaten

Flour paste
1/2 cup plain flour
4 to 5 tablespoons water

Glaze
1/3 cup water
2 tablespoons caster sugar

Method
1. Combine flour, yeast, sugar, mixed spice, salt and currants in a large bowl. (I split my recipe in half half, with one adding currants and the other with dark chocolate buttons)

2. Melt butter in a small saucepan over medium heat. Add milk. Heat for 1 minute, or until lukewarm.

3. Add warm milk mixture and eggs to currant mixture. Use a flat-bladed knife to mix until dough almost comes together. Use clean hands to finish mixing to form a soft dough.

IMG_0310IMG_0311

4. Turn dough out onto a floured surface. Knead for 10 minutes, or until dough is smooth. Place into a lightly oiled bowl. Cover with plastic wrap. Set aside in a warm, draught-free place for 1 to 1 1/2 hours, or until dough doubles in size.

IMG_0312IMG_0313

5. Line a large baking tray with non-stick baking paper. Punch dough down to its original size. Knead on a lightly floured surface until smooth. Divide into 12 even portions. Shape each portion into a ball. Place balls onto lined tray, about 1cm apart. Cover with plastic wrap. Set aside in a warm, draught-free place for 30 minutes, or until buns double in size. Preheat oven to 150/160°C.

IMG_0314IMG_0315IMG_0316IMG_0317

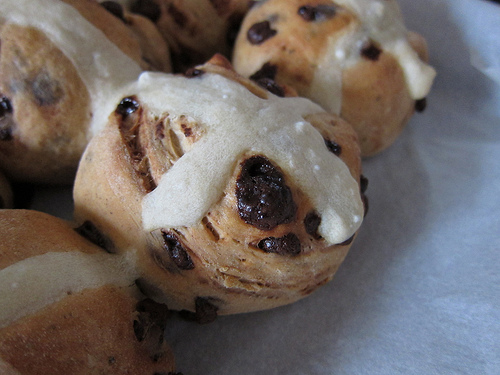
6. Make flour paste: Mix flour and water together in a small bowl until smooth, adding a little more water if paste is too thick. Spoon into a small snap-lock bag. Snip off 1 corner of bag. Pipe flour paste over tops of buns to form crosses. Bake for 20 to 25 minutes, or until buns are cooked through.

IMG_0318

7. Make glaze: Place water and sugar into a small saucepan over low heat. Stir until sugar dissolves. Bring to the boil. Boil for 5 minutes. Brush warm glaze over warm hot cross buns. Serve warm or at room temperature.

IMG_0319

Impressions

The original recipe asked to preheat at 190. I disagree as it turns out, it’s way too hot for my particular oven. It should be more at 150/160 especially if it’s fan forced. Otherwise the bun browns too fast and the inside is undercooked.

My other mistake was I poured the warm mixture of butter and milk onto my dry ingredients for my choc buns I let it sit there whilst I kneaded my currant dough. Big mistake, as it became all stiff and hard once I got back to it. So if you want to split the mixes, either knead/mix the wet and dry ingredients really quickly or do it one at a time. I was just worried the warm milk and butter mixture would cool too quickly (it didn’t).

My currant hot cross buns were soft and had a beautiful fragrance to it. These are best eaten fresh as they get hard pretty quickly unless you warm them up in the microwave. So it’s a good recipe but I’ll probably try another recipe when Easter comes around again.

IMG_0322


Orange Chiffon Cake

IMG_5914

After baking my first Pandan Chiffon Cake, we decided to try baking the Orange Chiffon Cake. Usually Pandan and Orange and they two popular versions in Melbourne. I’m really not sure of many other versions, I’ve seen someone do a Black Sesame one but haven’t had a chance to try that yet.

The difference between the Pandan and Orange Chiffon Cake recipes is the Orange version tastes much lighter because  of the use of coconut milk in the Pandan recipe which makes it slightly more dense. Without further adieu here is my mother’s recipe which works a treat!

Orange Chiffon Cake
Ingredients

8 egg whites
100 g sugar
1/2 tsp cream of tartar

8 egg yolks
60 g sugar

180 g self-raising flour (or 160 g plain flour and 20g cornflour)

1/2 tsp salt
1 1/4 tsp baking powder

120ml vegetable oil/corn oil
80ml orange juice

1 tsp orange extract

Method
1. Preheat oven to 160/170 degrees Celsius.
2. Sieve the flour, salt and baking powder into a medium sized bowl.
3. Add the vegetable oil, orange juice, orange extract, egg yolks and sugar into the dry ingredients and mix until just combined.
4. Whip the egg whites and once it starts to bubble add the cream of tartar.
5. Keep whipping until the mixture is nearing soft peaks, then slowly add the sugar with the electric mixer is still running and until hard peaks form.

IMG_5891
6. Add 1/3 of the meringue into the wet mixture until the thick mixture softens. Then slowly add in the rest of the meringue until just combined. Do not overmix!
7. Pour into the cake pan (one made for upside down cakes – it has a hole in the middle)
8. Place in the oven for 30/40 minutes. If the top of your cake gets brown too quickly, lower the oven temperature to around 150. To see if it’s done, you can use a skewer and poke it through the middle. If it comes out clean, it’s done.

IMG_5898
9. Remove from the oven when done, and flip it upside. If the cake as risen higher than the cake pan’s height, use a mug and rest the middle cylinder on top.

IMG_5940
IMG_5904
10. Allow the cake to cool until room temperature.

IMG_5916

Here’s how it looks inside!

IMG_5951

I find that you’ll always have a slight depression and density at the bottom because of the meringue cooling. You’ll be hard pressed to find a Chiffon cake that doesn’t sink a bit so don’t worry if yours does. It’s fine!

IMG_5949

Impressions

I find the Orange Chiffon Cake to be extremely light, but full of orange flavour. The orange juice really adds the much needed freshness and flavour. It really will depend on the oranges and how ripe they are but a little bit of orange extract is good just in case the orange juice doesn’t do its job.

Using a stand mixer really makes a difference to a hand mixer. I find the hand mixer either overbeats the meringue, or doesn’t evenly beat the egg whites. Maybe it’s just my poor hand mixing but with a stand mixer and especially a planetary mixer, you get hard peaks extremely quickly and without much fuss. The key in making a good Chiffon Cake is obtain hard peaks and carefully mix it in with the batter but just enough. Once you’ve tried it a couple of times, you’ll know how hard/gentle to mix and after that it really does become easy to make.

If you love light, fluffy cakes  and you don’t want a buttery aftertaste, Chiffon Cakes are excellent for your cake fix.

Homemade Ice Cendol

IMG_3782

After holidaying in Malaysia for around three weeks late last year, and after eating Ice Cendol and Ice Kacang nearly every single day. I wanted to make these green jellies myself.

So my mother found a recipe she wanted to try and it was on this website that I am unable to find now. Luckily, I saved the recipe but I cannot give my thanks to the Indonesian site for their recipe.

It’s actually quite simple but pushing out the dough to make the worms is quite tough if you don’t have a cendol mold. We just used a strainer and it didn’t work out too well and took ages to push it all through the pasta strainer but we just had to use what we had in the kitchen. Might have to go buy the cendol mold when I get the chance to go back to Malaysia because it looks much easier with it.

Here is the recipe:

Green Jellies Ice (Cendol)

Ingredients:

For Jellies:
50g mung bean flour (hunkwee)
40g rice flour
10g tapioca flour
1/2 tsp salt
3 tbs sugar
625ml pandan / screw-pine leaves water (by blending 100 gr chopped pandan / screwpine leaves with 650 ml water)
Half basin iced water
Cendol mold

For the coconut milk:
1000 ml coconut milk
1/4 tsp salt
3 pandan leaves

For the palm sugar syrup:
250g palm sugar (or coconut sugar)
250ml water
3 pandan leaves

Directions:
For jellies:
1. Bring 425 ml of the pandan leaves water to boil.

2. Meanwhile, mix mung bean flour, rice flour, tapioca flour, salt, sugar, and the rest (200 ml) of the pandan leaves water in a bowl.

3. Pour the mixture into the boiling pandan leaves water. Keep stirring until the mixture co-mixtures with the pandan water. Turn the heat off when the liquid thickens and forms a transparent colour.

4. Prepare a basin filled with iced water (1/2 basin). Put the mold on top of the basin. It is easier when the diameter of the basin is more or less the same with of the basin’s.

5. Pour the jellies liquid in the mold, press it. The liquid soon becomes jellies when it gets into the iced water. Continue pressing until no liquid is left.

6. Set aside. Let it for some time to give a sufficient firmness. When it is firm enough, drain it.

For coconut milk:
1. Meanwhile, bring the coconut milk, salt and the pandan leaves into boil. Do not leave unattended as over heated coconut milk will be ruined.

2. Immediately turn off the heat once the surface is starting to raise.

For palm sugar syrup:
1. Boil the palm sugar, water, and pandan leaves. Strain if necessary; sometimes they are not well strained in the making.

How to serve:
1. Pour the palm sugar in the bottom (approx. 5 tbs)

2. Add the jellies (approx. 5 tbs)

3. Add the coconut milk

4. Add ice cubes if desired

IMG_3786IMG_3787IMG_3788

It was really tasty and you don’t really need shaved ice, ice cubes will do just fine. Homemade cendol is always nicer then those you can buy, they are usually a bit too sweet and too hard and stale. You can even have cendol warm since it’s getting colder and closer to winter.