Walnut and Choc Chip Cookies

IMG_4620E

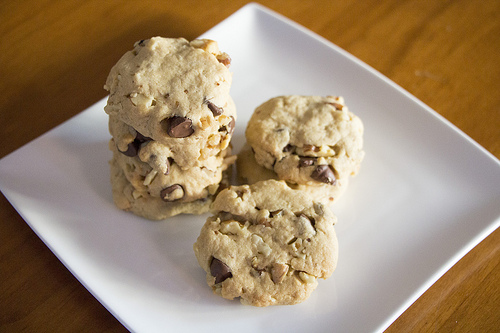
I love freshly baked cookies and even more so love making cookies. For one, it’s so easy to make and secondly, just the smell of them baking in the oven makes you all feel like a kid again. I made these cookies when I really had nothing else to do and had walnuts and choc chips lying around in the pantry. I must point out that these cookies don’t use baking powder so you will find they will not expand in the oven nor will they have that chewy texture some might prefer (like Subway cookies). These are slightly denser but tasty nonetheless. Check out the recipe from Taste.com.au below

Walnut and Choc Chip Cookies (Taste.com.au)

Ingredients
125g butter, softened (You can use baking margarine but will not have the same taste)
50g (1/4 cup, firmly packed) brown sugar
1 egg, at room temperature
225g (1 1/2 cups) plain flour
150g good-quality dark cooking chocolate, coarsely chopped (or buttons)
150g (1 1/2 cups) walnut halves, coarsely chopped

Method
1. Preheat oven to 180°C. Line 2 baking trays with non-stick baking paper.

2. Use an electric beater to beat butter and sugar in a medium bowl until well combined. Add the egg and beat until combined.
IMG_0521

3. Sift the flour over the butter mixture and stir with a wooden spoon until well combined. Add the chocolate and walnuts, and stir to combine.
IMG_0522IMG_0524
4. Use your hands to roll tablespoonsful of the cookie mixture into balls. Place the balls, 3cm apart, on prepared trays. Use a fork to flatten slightly.

IMG_0525IMG_0527

5. Bake in preheated oven, swapping the trays halfway through cooking, for 20 minutes or until light golden. Remove from oven and set aside to cool on the trays for 5 minutes. Transfer cookies to a wire rack to cool completely.

IMG_4624E

Impressions

I used margarine (that can be used for baking) but found it lacks the buttery taste that makes cookies so tasty and also slightly drier. It’s a somewhat strange taste at first but after a few bites it isn’t so bad and actually kinda addictive. The chopped walnuts have this beautiful aroma in the cookies and the dark chocolate chips give it just enough sweetness. I know most would prefer more sugar, so even doubling the sugar while using dark chocolate chips still would be not too sweet.

I found that the original recipe uses 200g of cooking chocolate but when mixing it all in, it looked like a ridiculously large quantity that would overwhelm the entire cookie and you wouldn’t be able to shape them properly. Just slowly add the walnuts and chocolate in until you come to your preferred balance. As mentioned above, the cookies will almost be the same size before and after baking so keep that in mind. I wouldn’t call these healthy cookies but they are a lighter option if using margarine and less chocolate (and sugar)

White Chocolate Panna Cotta with Espresso Coffee Syrup and Toffee

IMG_4849E

 Wanting to make a Panna Cotta but without the trouble of pureeing fruits like mangos to make the Panna Cotta, I found this white chocolate recipe on Taste.com.au. The addition of the coffee syrup intrigued me as it seemed too delicious not to give it a try. I’ve made this a couple times already and have made a few changes to the recipe to my liking. As something extra, I tried to add some toffee on top just to make it look nicer.

White Chocolate Panna Cotta with Espresso Coffee Syrup (Taste.com.au)

Equipment
You will need eight 150ml capacity dariole moulds for this recipe. If you like to serve it in bowls, just any small bowls will do.

Ingredients
Panna Cotta
600ml thickened cream
1 x 180g pkt white chocolate, broken into small pieces
160ml (2/3 cup) milk (can use light milk)
70g (1/3 cup) caster sugar
2 tbs boiling water
3 tsp powdered gelatine

Coffee Syrup (Version 1)
100ml freshly brewed strong espresso coffee or 3 Nespresso capsules using the espresso function
3 or 4 tsp white sugar

Coffee Syrup (Version 2)
100ml freshly brewed espresso coffee (3 Nespresso capsules using the espresso function – froth skimmed off)
100g raw sugar/caster sugar

Toffee (Taste.com.au)
215g (1 cup) caster sugar
60ml (1/4 cup) water

Panna Cotta
Method
1. Heat water in a small saucepan over medium/high heat until it starts to boil. In a separate heat-proof bowl place the cream, chocolate, milk and caster sugar in the bowl and over the saucepan over medium/low heat.   Cook, stirring, for 3-4 minutes or until chocolate melts and mixture is smooth.
IMG_4807EIMG_4808E

2. Place the boiling water in a heatproof bowl. Sprinkle with gelatine and whisk with a fork to remove any lumps. Set aside for 3 minutes or until gelatine dissolves. (I also just place the bowl of gelatine on top of my bowl of boiling water which helps keep it warm/dissolve any extra gelatine powder)
IMG_4810E

3. Add gelatine to cream mixture and whisk to combine.

4. Pour among eight 150ml capacity dariole moulds. Place on a baking tray. Cover with plastic wrap and place in the fridge for 6 hours to set. Or overnight. Make sure the plastic wrap is tight as some of the heat from the mixture may create water droplets and affect the consistency on the top layer of the panna cotta (Although not an issue if using dariole moulds and turning them upside down)

5. Dip moulds, 1 at a time, into hot water for 1-2 seconds, then turn onto serving plates. Drizzle with coffee syrup (steps below) to serve.

IMG_4852E

Coffee Syrup (Version 1)

1. Place the coffee and white sugar in a small saucepan over medium heat. Cook, stirring, for 3 minutes or until sugar dissolves. Set aside to cool.

Note: You may not even need to heat it over a saucepan if you can dissolve the sugar in the hot coffee/espresso. If using Nespresso capsules, just skim off the froth before serving.

IMG_4809E

Coffee Syrup (Version 2)
1. Place the coffee and sugar in a small saucepan over medium/high heat until it starts to boil. Reduce down to a medium/low heat and stir until the syrup coats the back of the spoon or until the consistency desired. Please note that if you place the syrup in the fridge (or when cooled down) the syrup will be slightly more thicker and viscous than when it was cooking. Set aside to cool and then place into the fridge if you prefer it to be a thicker consistency.

IMG_4838E

Toffee
1. Stir water and sugar in a saucepan over low heat until the sugar dissolves. Don’t bring it to the boil until all the sugar is dissolved.
IMG_4820E
2. Increase heat to high. To dissolve any sugar left on the side of the pan, brush down with a wet pastry brush. Bring to boil.
3. Cook until the mixture is a rich golden colour – don’t let it burn. Remove from heat – the residual heat continues to colour toffee.

4. Allow to cool and break into pieces to decorate. Please only add the toffee when wanting to serve, otherwise the moisture from the panna cotta will result in the toffee to turn to liquid.
IMG_4825EIMG_4826E

Notes:

  • Toffee troubleshooting: A common problem when making toffee is crystallisation. The sugar clumps together into a white and grainy syrup that turns into a messy solid mass. To avoid starting again, try these tips.
  • Dissolve the sugar completely before increasing the heat and bringing the mixture to the boil. You’ll know when it’s dissolved – there won’t be any crystals on your spoon.
  • Brush any sugar crystals from the side of the pan with a wet pastry brush during the toffee-making process. Undissolved sugar on the side of the pan causes crystallisation.
  • Don’t stir the toffee mixture once it comes to the boil – this also leads to crystallisation.

Impressions

I reduced the sugar from the original recipe as I find the white chocolate already adds a significant amount of sugar to the panna cotta. The panna cotta here is smooth and creamy but slightly denser due to the larger quantity of thickened cream used. Some may prefer a lighter panna cotta (I actually do) but due to the amount of cream used and in the white chocolate too, it really can’t be helped. I’m not sure if increasing the milk quantity and lowering the cream would result in a panna cotta that sets properly but certainly I’ll keep you updated to see if that does work.

The coffee syrup (Number 1) is a more liquid syrup with less sugar. It allows the bitterness and strong espresso flavour to come out and since the panna cotta has enough sweetness, the contrast makes an excellent combination.

Version 2 of the coffee syrup is sweeter due to the requirement to make it more viscous and thicker. You don’t know how many times I tried reducing the first version into a thicker syrup when it couldn’t possibly do so with the minimal sugar added. The consistency of version 2 is lovely though.

As mentioned above, the toffee should only be added at the very last minute, as it will start to turn to liquid when either in contact with the panna cotta or coffee syrup slowly.

This recipe was a crowd pleaser so I definitely can recommend giving it a try and it’s very easy to make as well.


Homemade Hot Cross Buns

IMG_0321

This probably isn’t the best time to post this seeing as it’s July. I always end up making things too late or even after the particular festive time comes around so this is just typical me. I love the smell of warm hot cross buns, it’s that cinnamon and spice mix that just keeps me calm. I also love kneading bread so making hot cross buns is jut plain relaxing. I found a recipe on Taste.com.au and it’s quite a good recipe irrespective of my little mistakes whilst trying to make it. Check it out below!

Hot Cross Buns (Taste.com.au)
Makes 12 large buns
Ingredients
4 cups plain flour
2 x 7g sachets dried yeast
1/4 cup caster sugar (a bit less)
1 1/2 teaspoons mixed spice (I didn’t have this so I used 1tbsp cinnamon, 1/2tsp ground ginger, 1/4tsp ground cloves)
pinch of salt
1/2 cups currants
1/2 dark chocolate bits
40g butter
300ml milk
2 eggs, lightly beaten

Flour paste
1/2 cup plain flour
4 to 5 tablespoons water

Glaze
1/3 cup water
2 tablespoons caster sugar

Method
1. Combine flour, yeast, sugar, mixed spice, salt and currants in a large bowl. (I split my recipe in half half, with one adding currants and the other with dark chocolate buttons)

2. Melt butter in a small saucepan over medium heat. Add milk. Heat for 1 minute, or until lukewarm.

3. Add warm milk mixture and eggs to currant mixture. Use a flat-bladed knife to mix until dough almost comes together. Use clean hands to finish mixing to form a soft dough.

IMG_0310IMG_0311

4. Turn dough out onto a floured surface. Knead for 10 minutes, or until dough is smooth. Place into a lightly oiled bowl. Cover with plastic wrap. Set aside in a warm, draught-free place for 1 to 1 1/2 hours, or until dough doubles in size.

IMG_0312IMG_0313

5. Line a large baking tray with non-stick baking paper. Punch dough down to its original size. Knead on a lightly floured surface until smooth. Divide into 12 even portions. Shape each portion into a ball. Place balls onto lined tray, about 1cm apart. Cover with plastic wrap. Set aside in a warm, draught-free place for 30 minutes, or until buns double in size. Preheat oven to 150/160°C.

IMG_0314IMG_0315IMG_0316IMG_0317

6. Make flour paste: Mix flour and water together in a small bowl until smooth, adding a little more water if paste is too thick. Spoon into a small snap-lock bag. Snip off 1 corner of bag. Pipe flour paste over tops of buns to form crosses. Bake for 20 to 25 minutes, or until buns are cooked through.

IMG_0318

7. Make glaze: Place water and sugar into a small saucepan over low heat. Stir until sugar dissolves. Bring to the boil. Boil for 5 minutes. Brush warm glaze over warm hot cross buns. Serve warm or at room temperature.

IMG_0319

Impressions

The original recipe asked to preheat at 190. I disagree as it turns out, it’s way too hot for my particular oven. It should be more at 150/160 especially if it’s fan forced. Otherwise the bun browns too fast and the inside is undercooked.

My other mistake was I poured the warm mixture of butter and milk onto my dry ingredients for my choc buns I let it sit there whilst I kneaded my currant dough. Big mistake, as it became all stiff and hard once I got back to it. So if you want to split the mixes, either knead/mix the wet and dry ingredients really quickly or do it one at a time. I was just worried the warm milk and butter mixture would cool too quickly (it didn’t).

My currant hot cross buns were soft and had a beautiful fragrance to it. These are best eaten fresh as they get hard pretty quickly unless you warm them up in the microwave. So it’s a good recipe but I’ll probably try another recipe when Easter comes around again.

IMG_0322


Lemon Macarons

DSC00309

 I love lemons and when I make something new, if there is a way to add lemons to it I will. I made Lemon Macarons with Lemon Curd and they turned out quite well if I don’t say so myself. I remember making macarons again and again but never could get those damned feet until I switched to the Italian Meringue method. This was my only success with French Meringue. Check out the recipe from Tartelette Blog with the Lemon Curd recipe from Taste.com.au.

Lemon Macarons (Tartelette Blog) with Lemon Curd

French Meringue Macarons

Ingredients

Makes 50 to 60 shells, for 25 to 30 filled macarons.
2¾ cups (8.8 ounces/250 grams) almond flour
2¾ cups (12.4 ounces/350 grams)
powdered sugar
1 cup egg whites (from 7 or 8 eggs),
at room temperature
Pinch of salt
2 teaspoons powdered egg whites, if weather is humid
¾ cup (5.3 ounces/150 grams) superfine granulated sugar
5 to 7 drops gel paste food coloring (optional) (I used 2 teaspoons lemon zest instead)

Method

1. Preheat the oven to 300°F (325°F for a non-convection oven) 150°C, and line your baking sheets with parchment paper.

2. Blend the almond flour with the powdered sugar in your food processor to make a fine powder (or sift together, discarding any large crumbs and adding a bit more almond flour and powdered sugar as needed to compensate). Then sift the mixture through a strainer until it is as fine as you can get it. This keeps crumbs from forming on the macaron tops as they bake.

3. With the wire whip attachment on the electric mixer, beat the egg whites with the salt and the powdered egg whites (if you are using them), starting slowly and then increasing speed as the whites start to rise. Add the granulated sugar and the food coloring. Beat until the egg whites form stiff peaks and your meringue is firm and shiny.

4. Pour the beaten egg whites onto your almond flour mixture and gently fold them in, using a rubber spatula. Move your spatula from the bottom of the bowl to the edges with one hand, using your other hand to rotate the bowl. Now slap the sides of the bowl until the batter falls in a wide ribbon when you raise your spatula. When you can’t see any crumbs of almond flour and the mixture is shiny and flowing, you are ready to start piping.
The French have a special word—macaronner—to describe the physical action of mixing all the ingredients for macarons. This has to be done by hand. You cannot do it with your mixer—you must be able to feel the consistency of the macaron batter.

5.  Fit your pastry bag with a number 8 tip and fill with batter. Start by squeezing out a small amount of mix onto a parchment-lined baking sheet to form a 2½-inch circle. Be sure to leave 1 inch of space between macarons so they will not touch each other while they bake.
If the peak that forms on the top of the macaron does not disappear after piping, it means the batter could have been beaten a little more. Tap the baking sheet on the tabletop, making sure to hold the parchment paper in place with your thumbs.
Let the piped macarons rest for 15 minutes.

6. Bake for 14 minutes at 300°F/ 150°C. After the first 5 minutes, open the oven door briefly to let the steam out.
Let the macarons cool completely on a rack before taking them off the parchment paper. Press the bottom of a cooled baked macaron shell with your finger; it should be soft. If the bottom of the shell is hard, reduce the baking time for the rest of your macarons from 14 minutes to 13 minutes.
Using a pastry bag requires some practice. It may seem awkward at first, but you’ll soon get the hang of it.

Prepare the bag (if it hasn’t been used before) by cutting about 2 inches off the narrow end—just enough so that when you insert a number 8 decorating tip, about a third of the tip extends outside the bag. Push the tip firmly in place and spoon in your filling, leaving enough room at the top to twist the bag shut. It is best to fill the bag with half of the batter at a time, that way it is not too heavy. To make it easier to fill your pastry bag, place it upright in an empty jar or other straight-sided container. This will help steady the bag while you fill it with batter.
Squeezing the bag slowly, pipe each macaron shell out in a single dollop. Lift the bag quickly to finish.

Lemon Curd (Taste.com.au)
Ingredients
2 eggs, plus 2 egg yolks
3/4 cup (165g) caster sugar (Half sugar to 80g)
1/3 cup (80g) chilled unsalted butter
Zest and juice of 2 lemons

Method
1. Whisk whole eggs, yolks and sugar in a saucepan until smooth, then place pan over a low heat.
2. Add the butter, juice and zest and whisk continuously until thickened. Strain through a sieve into a sterilised jar. Lemon curd keeps, covered, in the fridge for 2 weeks.

Impressions

This was the first time I made macarons and they came out with feet! I don’t know what happened with the proportions for the shell because I recall reducing the icing sugar to half but it ended up extremely sweet anyway! Maybe I didn’t reduce the sugar at all haha. I loved the lemon curd, it was perfectly sweet and sour with that lemon aftertaste tang. Lovely.

Lasagne (Taste.com.au)

DSC00306

Lasagne, Italian but as common as a hot dog or meat pie in Australia. I have a strong dislike for those frozen Lasagne packets, or those in the foil, they taste so artificial, lots of cheese and strange mince meat. Ever since I tried making lasagne for myself, I can never go back to the store-bought versions. The Taste.com.au recipe works a treat, isn’t too complex but still requires a few different procedures but well worth it.

“Our Favourite Lasagne Recipe” (Taste.com.au)

Preparation Time
20 minutes

Cooking Time
80 minutes

Ingredients (serves 8)

Mince Mixture
2 tsp olive oil
1 brown onion, halved, finely chopped
2 garlic cloves, crushed
750g beef mince
2 x 400g cans Italian diced tomatoes
125ml (1/2 cup) dry red wine
55g (1/4 cup) tomato paste
Salt & freshly ground black pepper
Bechamel (Cheese) sauce
1L (4 cups) milk
1 brown onion, halved, coarsely chopped
8 fresh parsley stalks
8 whole black peppercorns
4 whole cloves
2 bay leaves
60g butter (Cooking Margarine can be used instead)
50g (1/3 cup) plain flour
70g (1 cup) finely grated parmesan
Pinch ground nutmeg
Salt & ground white pepper
Optional: Dried chilli flakes

Olive oil, extra, to grease
4 fresh lasagne sheets (Or cannelloni sheets but they are smaller and harder to use)
55g (1/2 cup) coarsely grated mozzarella
Mixed salad leaves, to serve

Method

Mince Mixture

1. Heat the oil in a large frying pan over medium heat. Add the onion and garlic and cook, stirring, for 5 minutes or until onion softens. Add the mince and cook, stirring with a wooden spoon to break up any lumps, for 5 minutes or until mince changes colour.

2. Add the tomato, wine and tomato paste, and bring to the boil. Reduce heat to low. Simmer, uncovered, stirring occasionally, for 30 minutes or until sauce thickens slightly. Remove from heat. Taste and season with salt and pepper.

Cheese Sauce

3. Meanwhile, to make the cheese sauce, combine the milk, onion, parsley stalks, peppercorns, cloves and bay leaves in a medium saucepan and bring to a simmer over medium heat. Remove from heat and set aside for 15 minutes to infuse.

4. Strain the milk mixture through a fine sieve into a large jug. Discard solids.

5. Melt the butter in a large saucepan over medium-high heat until foaming. Add the flour and cook, stirring, for 1-2 minutes or until mixture bubbles and begins to come away from the side of the pan. Remove from heat.

6. Gradually pour in half the milk, whisking constantly with a balloon whisk, until mixture is smooth. Gradually add the remaining milk, whisking until smooth and combined.

7. Place saucepan over medium-high heat and bring to the boil, stirring constantly with a wooden spoon, for 5 minutes or until sauce thickens and coats the back of the spoon. Remove from heat. Add the parmesan and stir until cheese melts. Taste and season with nutmeg, salt and white pepper.

Layering

8. Preheat oven to 180°C. Brush a rectangular 3L (12 cup) capacity ovenproof dish with oil to lightly grease. Spread one-quarter of the bechamel sauce over the base of the prepared dish. Arrange 1 lasagne sheet over the sauce. Top with one-third of the mince mixture and one-third of the remaining bechamel (Cheese sauce) sauce. Continue layering with the remaining lasagne sheets, mince mixture and bechamel, finishing with a layer of bechamel. Sprinkle with mozzarella. Place on a baking tray. Bake in preheated oven for 40 minutes or until cheese melts, is golden brown, and the edges are bubbling. Remove from oven and set aside for 10 minutes to set.

9. Cut the lasagne into 8 portions and serve with mixed salad leaves.


Impressions

Making lasagne is like making a tomato based pasta sauce halfway as the mince mixture is not as wet but the flavours of it and procedure is basically the same and yes I do add chilli flakes in there too.

The cheese sauce needs a bit more watching as to avoid the milk mixture from frothing over the saucepan so be careful. The other focus point is when pouring the flour into the butter mixture, it can stick to the bottom of the saucepan/pot that you are using.

I love the bechamel sauce that it makes, it’s so flavourful unlike those take-away sauces. I know it’s an unfair comparison but that’s what most people are used to eating.

We actually used cannelloni sheets because we had some left over but they work just as well as lasagne sheets, but I think they are just a tad smaller so the sauce kinda seeps through when layering. Just layer twice and cover the gaps and it should be fine. I really do enjoy making lasagne and this recipe in particular, and the layering part is fun for kids too!

Homemade Pizza

IMG_6652

One of things I’ve realised from making a nice tasty homemade pizza is that it doesn’t really come cheap! Unless you make huge batches it won’t necessarily be budget friendly but of course this depends on the ingredients you use. On the plus side these pizzas were worlds apart from the fast food pizzas such as Dominos. They really can’t compare to a homemade pizza at all.

IMG_6641

I’ve taken this recipe from Jamie Oliver‘s website, which I believe is in the Jamie At Home cookbook, and I have now made pizza a couple of times with this recipe so for me, it works quite well, and is very easy to do. Here is the recipe I’ve used below.

Makes 6 to 8 medium-sized thin pizza bases

Ingredients

1kg strong white bread flour or Tipo ‘00’ flour
or 800g strong white bread flour or Tipo ‘00’ flour, plus 200g finely ground semolina flour
1 level tablespoon fine sea salt
2 x 7g sachets of dried yeast
1 tablespoon golden caster sugar
4 tablespoons extra virgin olive oil
650ml lukewarm water

Method

1. Sieve the flour/s and salt on to a clean work surface and make a well in the middle.

2. In a jug, mix the yeast, sugar and olive oil into the water and leave for a few minutes, then pour into the well. Using a fork, bring the flour in gradually from the sides and swirl it into the liquid. Keep mixing, drawing larger amounts of flour in, and when it all starts to come together, work the rest of the flour in with your clean, flour-dusted hands. Knead until you have a smooth, springy dough.

3. Place the ball of dough in a large flour-dusted bowl and flour the top of it. Cover the bowl with a damp cloth and place in a warm room for about an hour until the dough has doubled in size.

4. Now remove the dough to a flour-dusted surface and knead it around a bit to push the air out with your hands – this is called knocking back the dough. You can either use it immediately, or keep it, wrapped in clingfilm, in the fridge (or freezer) until required. If using straight away, divide the dough up into as many little balls as you want to make pizzas – this amount of dough is enough to make about six to eight medium pizzas.

5. Timing-wise, it’s a good idea to roll the pizzas out about 15 to 20 minutes before you want to cook them. Don’t roll them out and leave them hanging around for a few hours, though – if you are working in advance like this it’s better to leave your dough, covered with clingfilm, in the fridge. However, if you want to get them rolled out so there’s one less thing to do when your guests are round, simply roll the dough out into rough circles, about 0.5cm thick, and place them on slightly larger pieces of olive-oil-rubbed and flour-dusted tinfoil. You can then stack the pizzas, cover them with clingfilm, and pop them into the fridge. (I made the doughs in the morning and let them sit in a warm area for most of the day so it could rise to it’s maximum size)

IMG_6642

With these pizzas the toppings are all up to you and the beauty of it all is you can add as little or as much as your want!

I halved the above recipe and used semolina and it made two large(ish) sized pizzas so you can take that into consideration. I’ve listed the ingredients I’ve used below.

Pizza Tomato Base (I’ve used Leggos, but anything is fine)
Capsicum
Mushroom
Jalapenos (From Woolworths are absolutely amazing on a pizza – be warned though they are not that cheap!)
Pizza Cheese (Cheddar/Mozarella mix)
Chorizo
Pancetta
Hot Salami

Here is a recipe from Taste.com.au which you can use to go by for oven temperature and general how to.

Cooking Time
20 minutes

Ingredients (serves 4)

4 pita pockets
2 tbs tomato tapenade (see note)
125g chorizo sausage, thinly sliced
60g (1/3 cup) bought roasted capsicum, drained, thinly sliced
100g baby bocconcini, drained, halved
40g (1/2 cup) shredded parmesan
50g baby rocket leaves

Method

1. Preheat oven to 200°C.

2. Place the pita pockets on a large baking tray. Spread with the tomato tapenade. Top with the chorizo, capsicum and bocconcini. Sprinkle with the parmesan.
3. Bake in oven for 10 minutes or until the parmesan melts and the base is light brown and crisp.

Notes
If tomato tapenade is unavailable, use tomato paste. Shopping tip: Look for tomato tapenade and bottled roasted capsicum, sometimes called fire-roasted peeled peppers, in the antipasto section at Woolworths, near the olives. Swap it: For a different flavour, swap the tomato tapenade for bought basil pesto and swap the chorizo sausage for coarsely chopped ham slices.

IMG_6643
IMG_6647

Impressions

I really liked the Jamie Oliver pizza dough recipe, it works wonders. However to be honest, I haven’t tried any others when this one worked well for me. It has a nice crunch on the outside and it lovely and soft inside, plus if you cook it long enough the base crisps nicely and it is just fantastic.

Basically you leave it in the oven at roughly 200 degrees fan forced if you have ingredients that don’t need much cooking (or really none at all). If you do have toppings that may need to be cooked, please pre-cook them to be safe, and so the dough is well cooked while the toppings aren’t overly over cooked.

It’s a great recipe that I’ll be using more regularly from now on!

Chocolate Souffle

DSC00372

I’ve always wanted to eat souffle, and when we went to the Conservatory at Crown, their chocolate souffles were quite the popular dessert so I didn’t have a chance to taste it.

So at last, I tried making it myself. I found this recipe on Taste.com.au, and it’s the basic run of the mill type of recipe but since I had never made it before and it didn’t require that many eggs I chose this one

Chocolate Souffle (Taste.com.au)
Preparation Time
20 minutes

Cooking Time
20 minutes

Ingredients (serves 6)
Melted butter, to grease
4 1/2 tbscaster sugar
60g butter
2 tbs plain flour
160ml (2/3 cup) milk
210g good-quality dark chocolate, chopped
3 eggs, separated
125ml (1/2 cup) thin cream
2 tbs brown sugar
1 tsp vanilla essence
Icing sugar, to dust

Method
1. Preheat oven to 180°C. Brush six 160ml (2/3-cup) ovenproof souffle dishes with melted butter to grease (using upward strokes on side). Sprinkle the inside with 1 1/2 tablespoons of caster sugar, shake out any excess.

2. Melt 30g of the butter in a saucepan over medium heat. Add flour and use a wooden spoon to stir for 1 minute or until mixture is smooth and begins to bubble. Remove from heat, gradually add milk, stirring until smooth and combined. Return to medium heat, stir until mixture thickens and comes to the boil. Boil for 1 minute, stirring. Remove from heat.

3. Stir in 125g of the chocolate and remaining caster sugar until combined. Transfer to a bowl. Add egg yolks and stir until well combined.

4. Use an electric beater to whisk egg whites in a clean, dry bowl until firm peaks form. Use a metal spoon to fold one-third of the egg whites into chocolate mixture. Fold in remaining egg whites until just combined.

5. Spoon the mixture evenly into prepared dishes. Place on a baking tray. Bake in preheated oven for 15-20 minutes or until well risen.

6. Meanwhile: combine remaining chocolate, remaining butter, brown sugar, cream and vanilla essence in a saucepan over low heat. Cook, stirring, for 2 minutes or until chocolate melts and mixture is well combined. Simmer, uncovered, for 1 minute. Remove from heat. Place in a jug.

7. To serve, place ramekins on plates. Dust with icing sugar. Use a spoon to make a hole in top of each souffle, pour in a little chocolate sauce.

Impressions:
I found it to be quite nice and moist on my first tasting, but I wasn’t too sure if I was doing it right since they seemed to sink after taking it out of the oven. You also kinda need to serve them all hot and fresh out of the oven otherwise it just doesn’t retain that moistness. Unless I was just doing it all wrong. I don’t know

Seafood Risotto

IMG_5282

Every time I go to an Italian restaurant or even just a cafe that has risotto, I just have to order it. My first taste experience was at Sofia’s Restaurant in Ferntree Gully, and well I found it to be delicious. I don’t think Sofia’s is an example of true authentic Italian food but it tastes quite good and I can’t argue with that.

So I’ve wanted to cook risotto for some time too, just something that seemed fun to do since we hardly go to Italian restaurants so it was just another way to eat it.

I found a couple of recipes on the internet but I needed one that had a seafood mix (Scallops, prawns, mussells, fish, squid rings) since we bought the frozen type at the supermarket and some of the risotto recipes get you to buy different types of seafood for the stock so it wasn’t any use to me.

I finally decided on the Taste.com.au’s recipe, and just bought some fresh mussels to use for the stock as the mussels in the mix were already opened. I made a couple of tweaks to the recipe though.

IMG_5267

At first I couldn’t find Fish stock, so I bought some Ikan Bilis stock cubes from my Asian Grocer, and then I found a small carton of Fish stock at my local supermarket so I mixed them both to make my fish stock.

For my dry white wine, I used Somerton 2010 Semillon – Chardonnay, one of the cheapest dry white wines I could find at Dan Murphy’s actually.

IMG_5269

I didn’t have enough prawns in my mix, and forgot to buy extra prawns but it didn’t impact upon taste really. It’s just a matter of what seafood you prefer.

I really like the recipe but one thing I forgot to do was to add more passata into it after I added another half cup of arborio rice so it was a bit drier then I would like but the taste and flavours were all still there. With my fresh parsley straight from my herb garden, chilli flakes and a sprinkle of parmesan cheese, my Seafood Risotto came out pretty well I thought.

I also pretty much used all the stock available because I added more rice, so it wasn’t as wet as what you might get in a restaurant but still moist enough.

If I made this again, I would probably use less mussels and more prawns, just because of preference and there were probably too many mussels in there and slightly overwhelmed everything else. Other than that, I really enjoyed making it and the end result was great too.

Seafood Risotto (Taste.com.au)
Ingredients (serves 4)
1 1/4 cup (310ml) dry white wine
500g black mussels, scrubbed, debearded
1.25L good-quality gluten-free fish stock (see note)
1/4 tsp saffron threads
40g unsalted butter
2 tbs olive oil
500g prawns, peeled (tails intact), deveined
2 squid tubes, cut into rings
8 scallops
1 onion, finely chopped
2 garlic cloves, finely chopped
2 cups (440g) arborio rice
1/2 cup tomato passata (see note) or roasted-tomato sugo (see related recipe)
2 tbs chopped flat-leaf parsley leaves, plus extra to garnish
Chilli flakes
Grated parmesan cheese

Method
1. Place wine in a wide pan over medium-high heat. Bring to a simmer, then add mussels and cover. Cook, shaking the pan occasionally, for 3 minutes until almost all shells have opened (discard any mussels that remain unopen after this time). Strain, reserving liquid, then remove mussels from shells and set aside. Place reserved liquid, fish stock and saffron in a pan and keep at a simmer over low heat.

2. Melt 30g butter with 1 tbs oil in a large, heavy-based frypan over medium heat. Add prawns and cook for 2-3 minutes, turning, until cooked through. Remove to a bowl and set aside. Increase heat to high. Add squid and scallops. Cook, turning, for 1-2 minutes until just opaque and almost cooked through. Set aside with prawns.

3. Reduce heat to medium and melt remaining 10g butter with remaining 1 tbs oil. Cook the onion, stirring, for 2-3 minutes until softened. Add garlic and rice and stir for 1-2 minutes to coat the grains. Add a ladleful of hot stock and stir until absorbed. Continue adding stock, 1 ladleful at a time, stirring and making sure each is absorbed before adding the next, until rice is al dente. This will take about 20 minutes. (You may not need all the stock.) Stir in the seafood, passata or sugo and parsley. Season and cook for 1 minute until heated through. Serve garnished with parsley, chilli flakes and parmesan.