Homemade Pork and Cabbage Dumplings (Poh’s Kitchen)

IMG_0491

Making your own dumplings is pretty simple. I’m the type of person that likes to make things from scratch to see if it tastes any better than those manufactured/processed ingredients. At least once anyway.

After watching Poh from Poh’s Kitchen/Masterchef Australia Season 1 make dumplings I thought what they hey, let’s do it. We made the dumpling skins, filling and sauce and it wasn’t too much of a challenge!

Pork and Cabbage Dumplings (Poh’s Kitchen)

Ingredients
Dumpling Skins
½ cup plain flour
½ cup wheat starch (wheat cornflour)
Boiled hot water

Dumpling Filling
2 ½ cups Chinese cabbage, finely shredded
½ tsp salt
250g pork mince
3 tsp ginger, chopped finely
1/3 cup spring onions or Chinese chives, chopped
1/8 tsp ground white pepper
¼ cup chicken stock or water
4 ½ tsp light soy sauce
3 tsp Shaoxing wine
1 tbs vegetable oil
4 ½ tsp sesame oil
½ cup shitake dried mushrooms, soaked and chopped

Spicy Dipping Sauce 
¼ cup light soy sauce (1/8 tsp of soy)
6 tsp Chinkiang vinegar (1/4 cup of vinegar)
1/8 cup sugar
2-3 tsp chilli oil
3 tsp ginger, finely shredded
2 tsp garlic, chopped finely
A sprinkling of fresh diced chilli (Optional)

Method
Dumpling Skins
1. Place flour and wheat starch in a bowl.
2. Pour a small amount of hot water into the flour and starch mix and stir with a fork until you can tip it onto the bench top and knead into a firmish, smooth ball. Poh’s recipe doesn’t specify how much water to add, so add maybe a tablespoon at a time because I accidentally added too much and had to re-add the flour and wheat starch to balance everything out.
If it feels a little sticky, add a small amount of equal plain flour and wheat starch and mix to the dough.
3. Wrap in cling wrap and rest for an hour.
Note: If you don’t have wheat starch the traditional way is to use one cup plain flour but follow the same method.

IMG_0487

Dumpling Filling
1. Mix salt with cabbage and allow to sit for 15 minutes so salt can draw liquid out of the cabbage. Wash cabbage briefly before squeezing to remove as much liquid as possible. You should end up with a heaped half cup of cabbage.
2. Mix together with remaining ingredients until everything is incorporated.
3. To make dumplings, sprinkle dough with some plain flour and roll into cylinders with a diameter the size of a 20 cent coin.
3. Cut into one centimetre thick disks and flatten with the palm of your hand. Tuck the disks under an overturned plastic container so they stay moist. With a dumpling rolling pin or 20 centimetre piece of dowel, roll ONLY inwards from the outer edge of each circle, so you maintain a regular circle. If you roll outwards, you will find the circle will become misshapen very quickly.
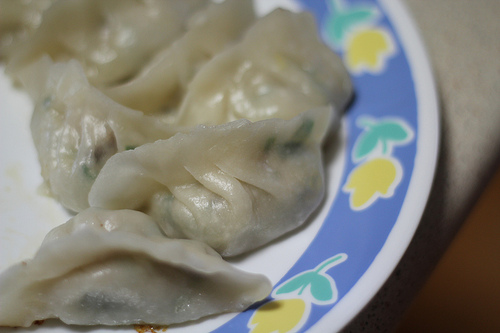
4. Once the dough has been rolled out to about one millimetre thick, spoon a teaspoonful of the filling onto the centre of the wrapper. When crimping, only pleat one side of the dumpling leaving the other edge straight. This will give the dumpling an attractive crescent shape and let it sit nicely.
5. There are two ways you can cook these. Firstly, you can just boil them in plenty of salt water. When they float, allow them to cook for a further ten seconds, then scoop out with a slotted spoon into a colander.
6. If you want a crispy bottomed finish, position the dumplings neatly in a frypan filled with about one centimetre of water and a dash of peanut oil.
7. Cover and allow the dumplings to steam for about eight to ten minutes. When all the water evaporates, the little bit of oil that remains will help crisp up the bottom. Serve immediately with spice dipping sauce.

IMG_0490

Spicy Dipping Sauce
1. Mix all the ingredients together and serve with dumplings. In brackets I’ve mentioned using minimal soy and more vinegar, I found it was much more reminiscent of the sauces you’d find in any dumpling house. Poh’s recipe uses way too much soy sauce that you can’t even taste the slightly sour/salty Chinkiang vinegar.

We also added diced fresh chilli that really gave it a kick.

IMG_0494

Impressions

The actual process of making the skins was extremely straight forward, and fun to make so that’s a definite plus!

The skin when cooked didn’t have the same bite to it as dumplings at a restaurant. Usually there is this slight chewiness   but nonetheless I found the dumplings to be pretty darn good.

With the changes I made to the sauce, it just made a good dish to a great dish. Loved the Chinkiang vinegar with chilli.

The filling was pretty much what you’d get elsewhere so I’d say that’s a good achievement.  What I liked about these dumplings is that it wasn’t drenched in oil. We used minimal oil or only as much as required so it didn’t stick to the pan and they came out well so I was very happy with the end result.

I might try a different skin recipe but I’d keep the filling and sauce (with changes) recipe for the next time I make it.

Almond and Vanilla Cupcakes

IMG_0539

Using The Crabapple Bakery Cupcake Cookbook by Jennifer Graham again (Buy it here/official website), we decided to do a variation of their Sweetheart cakes minus the icing and shape…. and probably the whole intention of making it actually!

Without any of the decorations and grandeur, these cupcakes are basically Vanilla/Almond flavoured cupcakes.  Don’t they look all rustic and homely?! Check out the recipe below with how to make the decorations/icing as well for those that want to try it.

Almond and Vanilla Cakes

Makes 18 min-heart cakes/24 cupcakes

Ingredients
1 1/2 cups plain flour
1 tablespoon baking powder
3 cups almond meal
250g softened unsalted butter
1 1/2 cups castor sugar (Used 3/4 cups)
6 eggs
1 tablespoon vanilla extract
1/4 cup natural yoghurt

Method
1. Preheat oven to 160C. Lightly grease three six-hole mini heart cake trays (Or just use cupcake pans with paper cups)

2. Sift together flour and baking powder. Add almond meal and combine

3. In a separate bowl, cream the butter for 1-2minutes. Add half the sugar and beat for 2 minutes. Add the rest of the sugar and beat for a further 2 minutes or until light and fluffy. Add the eggs two at a time, beating for 2 minutes after each addition or until mixture is light and fluffy. Add the vanilla and beat until combined.

4. Add a third of the flour to the creamed mixture and beat on low speed until combined. Add half of the yoghurt and beat until combined. Repeat this process. Add the remaining third of the flour and beat until thoroughly combined; do not over-beat as this will toughen the mixture.

5. Spoon mixture into the cake trays, filling each heart just over half full. Bake for 15 minutes or until a fine skewer inserted comes out clean. Leave to cool for about 5 minutes before turning out onto a wire rack to cool for a further 30 minutes before icing.

To make regular cupcakes
5. If using regular cupcake papers instead of mini-heart trays, this recipe makes 24 cupcakes. Bake at 160 C for 20-25 minutes or until a skewer inserted comes out clean.

Decoration
2 quantities Quick Royal Icing
Rose Essence
Food Colouring: Rose Pink
1 quantity Sugared Rose Petals

1. Prepare the icing to pouring consistency. Add 2-3 drops rose essence and 3-4 drops pink food colouring during preparation.

2. Place the sweetheart cakes onto a fine wire rack with feet. Pour over most of the icing, so that each cake is completely covered. Add a few more drops of the pink food colouring to the remaining icing to create a mid-pink colour.

3. Using a teaspoon, drizzle the icing over so that it runs down the sides a little. Use an offset palette knife to life the cakes onto a serving plate, then sprinkle with the sugared rose petals.

Variation
If you’re making these cakes for a man, ice the cakes with Dark Chocolate Ganache  and top with chocolate truffles.

Quick Royal Icing
Ingredients
Water
500 g bag premix royal icing

Makes 3/4 cup icing – enough for 12 cupcakes

1. Simply add a little water at a time to the sifted icing sugar, until you have the required consistency. If you want to use a flavouring essence, add a couple drops to the icing sugar before you add the water. If you want to use colouring, add it before you reach the desired consistency (if you add it at the end it will thin the icing). Use fruit juice or coconut milk instead of water for a flavoured icing.

Sugared Rose Petals
2 Fresh Pink Rose Heads (Not chemically sprayed)
1 egg white, lightly beaten
Castor Sugar

1. Rinse rose heads under cold water. Gently pat dry. Dip each rose petal into the egg white until just covered. Dip the wet petals into a bowl of fine castor sugar and shake off any excess. Place them on a wire rack to dry for about 1 hour.

Dark Chocolate Ganache
1 1/2 cups cream
400 g dark cooking chocolate (chopped)

Makes: 3 cups frosting
1. In a heavy based saucepan, bring the cream to the boil. Place the chocolate into a bowl and pour the boiling cream over. Leave for 1 minute to soften. Use a small spatula to carefully stir the ganache, being careful not to incorporate any air, until you achieve a silky frosting.

2. To use: If you want to achieve a smooth surface, dip cupcakes into the frosting immediately. If you want to achieve a fluffy frosting, let the ganache cool to room temperature and then apply to the cupcake with a small spatula. Do not stir the set ganache too much as it will become dull.

IMG_0540

Impressions

We didn’t go through all that shebang as I’m not a big fan of icing as I find it usually sickly sweet. Crazy I know. So what you get here is cupcakes dressed down to look like muffins. They have this rough texture mostly because of the almond meal that isn’t a fine powder. The process of making this is quite simple, it’s like baking any other cupcake.

As the cupcake itself it’s quite pleasant, it’s light and has a predominant almond flavour. Which isn’t a bad thing by all means. The texture of the cupcake is more grainy because of the almond meal, the yoghurt helps to make it lighter against the richness of the butter so it doesn’t feel like you’re just having a vanilla butter cake. Overall, I think it makes a nice treat that jumps between muffin and cupcake.

Coconut Lemon Syrup Cupcakes

IMG_0536

Lemons. So useful in so many ways, a good cold remedy but also enjoyable as a refreshing drink or in sweets. I’ve seen Lemon Syrup cakes made previously and when I tasted it I was amazed at how moist it was. It wasn’t very light, it’s actually quite dense as a cake but because of the syrup that oozes through the cake it changes how everything tastes. Yes, lemons can do this.

There were plentiful of recipes out there for Lemon Syrup Cakes but none for cupcakes. Of course cupcakes are just mini cakes but I wasn’t sure of how many cupcakes one batch would make. Alas, I just tried one cake recipe and I made a mix of mini cupcakes and small cupcakes, not those normal sized cupcakes you commonly see.

I found a recipe by Donna Hay, I was hesitant to try it at first because she only knows how to make things look nice to sell magazines and books. However as it turned out, it was a delight. Check out the recipe and my impressions below!

Coconut and Lemon Syrup Cupcakes (Donna Hay)

Makes: Roughly 12-18 average sized cupcakes

(But I can’t be certain as it depends on the size of your cupcake cups)

Ingredients

Cake
150g butter
1/2 cup (100g) caster (superfine) sugar
1 tablespoon finely grated lemon rind
3 eggs
1½ cups (120g) dessicated coconut
1½ cups (225g) self-raising (self-rising) flour
¾ cup (185ml) milk
Lemon Syrup
1 cup (100g) caster (superfine) sugar
¾ cup (185ml) water
2 tablespoons lemon juice (add more to your liking)
Method

1. Preheat oven to 180°C (355ºF).
2. Beat the butter, sugar and lemon rind in an electric mixer until light and creamy. Add the eggs and beat well.
3. Mix through the coconut, flour and milk with a wooden spoon until smooth.
4. Place muffin/cupcake paper into the pans. Pour mixture into pans and bake for 25-35 minutes or until cooked when tested with a skewer. Leave to cool.

IMG_0533
5. To make the lemon syrup, combine the sugar, water and lemon juice in a saucepan over medium heat and stir until dissolved. If you like your syrup to be more “lemony” keep adding tablespoons full of juice until you get your desired flavour. I basically used a whole lemon’s juice but some may prefer just a touch of it.

IMG_0535
6. Simmer for 5 minutes or until thickened slightly and sticky. Pour over warm or cool cake.

7. If pouring is too difficult or slides off (top of cakes may be too crispy), use a brush instead and gently tab over it until it soaks in slightly.

IMG_0538

IMG_0532

Impressions

This recipe is quite easy to make. I had a slight hiccup when the batter looked all kinds of wrong, with the batter separating from the butter. I’m not sure if it was the acidic nature of the lemon rind or not or if I beat the mixture too long but it turned out reasonably well so maybe it was all for the best!

The coconut in the cake gives it such a pleasant texture and bite to it, we used coconut flakes which are chunkier than desiccated coconut but it was still good.

If you reduce the sugar in the lemon syrup as I did you can either reduce the water too or just wait it out and simmer it for longer. I mistakenly poured in the entire 185 mls when I halved the sugar to 100g but it just meant it took a bit longer for it to get thick.

Since my cakes were crispy on top, the syrup just slid right off if you tried pouring it on top. Instead a brush works wonders and can the cake seems to actually absorb more of the syrup. The syrup gives the cupcakes this amazing gloss, I loved it.

I was so pleased with the end result, packed full of lemon flavour. Not too sweet, just right. Would definitely make it again. Good job Donna Hay.


Dragon Cookies

IMG_3813

Once a year, in late January or early February, Chinese New Year comes along celebrating the next animal. Chinese New Year isn’t as extravagant in Australia but in recent years, the festivals in the Chinese dominated suburbs have gotten larger and larger.  I have never experienced an “authentic” CNY in Malaysia, where my parents were born, but they have certainly tried to bring their Malaysian/Chinese culture to Australia. One of the things I love doing is making treats and snacks to celebrate CNY and one of the tastiest treats is the Dragon Cookies. These cookies are so light, it should practically melt in your mouth as soon as you put it in there! It should be crispy and easy to break. It has such a pleasant, slightly buttery flavour but I can’t really describe it. All I know is, it tastes good. Check out the recipe from Home-made Cakes & Pastries – The Best of Patsie Cheong, it’s so easy to make!

Dragon Cookies 

Ingredients

150g Butter

150g Icing Sugar

2 Egg Yolks

1 Egg White


300g Cornflour

30g Milk Powder

60g Plain Flour

1/2 tsp vanilla essence


Method

1. Place the softened butter, icing sugar and eggs (yolks and white) in a bowl.

2. Beat until creamy and light.

3. Slowly stir in the sifted cornflour, milk powder, plain flour and then stir in the vanilla essence.

IMG_3802

4. Put it in a piping bag and press out the pattern. This mixture can get quite soft if it’s humid, so it’s best to do this part quickly.

IMG_3792

5. Put in oven, bake at 150C for 15 mins or until hard all the way through. (Should come out light yellow in colour) Leave to cool.

6. Enjoy!

IMG_3795

Impressions

This is a really simple recipe, but the “Dragon Cookies” can be easily to overcook if you don’t keep watch of them in the oven. As you can see, a few of mine are a tad too golden brown. However, they still taste good, it’s just doesn’t melt in your mouth as well. I have made this every year for the past couple years, and if you have kids it’s great fun for them to pipe and try different shapes, letters, or anything you can think of.

Orange Chiffon Cake

IMG_5914

After baking my first Pandan Chiffon Cake, we decided to try baking the Orange Chiffon Cake. Usually Pandan and Orange and they two popular versions in Melbourne. I’m really not sure of many other versions, I’ve seen someone do a Black Sesame one but haven’t had a chance to try that yet.

The difference between the Pandan and Orange Chiffon Cake recipes is the Orange version tastes much lighter because  of the use of coconut milk in the Pandan recipe which makes it slightly more dense. Without further adieu here is my mother’s recipe which works a treat!

Orange Chiffon Cake
Ingredients

8 egg whites
100 g sugar
1/2 tsp cream of tartar

8 egg yolks
60 g sugar

180 g self-raising flour (or 160 g plain flour and 20g cornflour)

1/2 tsp salt
1 1/4 tsp baking powder

120ml vegetable oil/corn oil
80ml orange juice

1 tsp orange extract

Method
1. Preheat oven to 160/170 degrees Celsius.
2. Sieve the flour, salt and baking powder into a medium sized bowl.
3. Add the vegetable oil, orange juice, orange extract, egg yolks and sugar into the dry ingredients and mix until just combined.
4. Whip the egg whites and once it starts to bubble add the cream of tartar.
5. Keep whipping until the mixture is nearing soft peaks, then slowly add the sugar with the electric mixer is still running and until hard peaks form.

IMG_5891
6. Add 1/3 of the meringue into the wet mixture until the thick mixture softens. Then slowly add in the rest of the meringue until just combined. Do not overmix!
7. Pour into the cake pan (one made for upside down cakes – it has a hole in the middle)
8. Place in the oven for 30/40 minutes. If the top of your cake gets brown too quickly, lower the oven temperature to around 150. To see if it’s done, you can use a skewer and poke it through the middle. If it comes out clean, it’s done.

IMG_5898
9. Remove from the oven when done, and flip it upside. If the cake as risen higher than the cake pan’s height, use a mug and rest the middle cylinder on top.

IMG_5940
IMG_5904
10. Allow the cake to cool until room temperature.

IMG_5916

Here’s how it looks inside!

IMG_5951

I find that you’ll always have a slight depression and density at the bottom because of the meringue cooling. You’ll be hard pressed to find a Chiffon cake that doesn’t sink a bit so don’t worry if yours does. It’s fine!

IMG_5949

Impressions

I find the Orange Chiffon Cake to be extremely light, but full of orange flavour. The orange juice really adds the much needed freshness and flavour. It really will depend on the oranges and how ripe they are but a little bit of orange extract is good just in case the orange juice doesn’t do its job.

Using a stand mixer really makes a difference to a hand mixer. I find the hand mixer either overbeats the meringue, or doesn’t evenly beat the egg whites. Maybe it’s just my poor hand mixing but with a stand mixer and especially a planetary mixer, you get hard peaks extremely quickly and without much fuss. The key in making a good Chiffon Cake is obtain hard peaks and carefully mix it in with the batter but just enough. Once you’ve tried it a couple of times, you’ll know how hard/gentle to mix and after that it really does become easy to make.

If you love light, fluffy cakes  and you don’t want a buttery aftertaste, Chiffon Cakes are excellent for your cake fix.

Juniors’ Little Fellas Berry Swirls Cheesecake

IMG_6480

I wanted to try these mini baked Cheesecakes from Junior’s, which is a popular Cheesecake store in New York. I hadn’t used this book in a while as I dislike the sponge base, I prefer the biscuit base and most if not all of the recipes in the Junior’s Cheesecake Cookbook: 50 To-Die-For Recipes for New York-Style Cheesecake are in fact sponge based.

I made a Peanut Butter Cheesecake from this book and it turned out quite well, but wasn’t fond of the sponge cake base. I like the crunch and butteriness of the crumbed biscuits. The actual recipe calls for Raspberry puree, but I only had a packet of mixed assorted frozen berries (Raspberries, Blueberries and I think a few Black currents) but works quite well anyway. I’ve left the American measurements as is from the recipe book but added in the commonly used Australian measurements so you don’t have to!

Little Fella Raspberry Swirls

Makes 13 Little Fellas
Ingredients
6 ounces (about 2/3 cup/170g) dry-pack frozen whole raspberries (unsweetened, not in syrup) thawed and drained well
Two 8-ounce packages cream cheese (only full fat) at room temperature (Roughly 450g)
2/3 cup sugar (I reduced it to 1/2 cup)
3 tablespoons cornstarch
1 tablespoon pure vanilla extract
2 extra-large eggs
1/2 cup heavy or whipping cream
13 fresh raspberries (large, pretty ones) (I didn’t have any of these at the time)

Method
1. Preheat the oven to 350 F (176 C). Line 13 standard muffin cups with silicone, foil, parchment or paper lines. (If you have only 12, use a custard cup for the thirteenth one)

2. Pulse the thawed raspberries in your food processor until smooth (you need 1/3 cup of puree). Set aside.

3. Put one package of the cream cheese, 1/3 cup of sugar, and the cornstarch in a large bowl. Beat with an electric mixer on low until creamy, about 3 minutes, scraping down the bowl a few times. Blend in the remaining package of cream cheese. Increase the mixer seed to medium and beat in the remaining 1/3 cup sugar, then the vanilla. Blend in the eggs, one at a time, beating well after adding each one. Beat in the cream just until it’s completely blended. Be careful not to overmix!

IMG_6477

4. Divide the batter among the 13 muffin cups (fill each one almost up to the top). Drop a heaping teaspoon of the raspberry puree in the centre of each cup, pushing it down slightly into each little cake as you go. Using a thin, pointed knife, cut through the batter a few times, just until the raspberry swirls appear (do not mix in the puree completely or the cakes will turn pink and the swirls will disappear).

5. Place the muffin tin in a large shallow pan and pour hot water in until it comes about 1 inch (2.54cm) up the sides of the tin. Bake the cakes until set and the centres are slightly puffy and golden with red raspberry swirls, about 45 minutes. Remove the cakes from the water bath, transfer the tin to a wire rack and let cool for 2 hours. Cover the cakes with a plastic wrap (do not remove from the tin) and put in the freezer until cold, at least 1 hour.

IMG_6495

6. To remove the cakes, lift them out the cups with your hands ad peel off the liners. Place the cakes, top side up, on a serving platter or individual dessert plates. Top each with a raspberry and refrigerate until ready to serve. If there are any cakes left, cover with plastic wrap and store in the refrigerator. Or remove the fresh berries, then wrap and freeze for up to 1 month.

IMG_6496
Impressions

I like this recipe but it sure does take a seemingly long time to get any results.

Letting these babies cool for 2 hours felt like forever since I did it at night, and waiting another 1 hour in the freezer before placing it in the refrigerator for storage. So really what seemed like a short prep time, the waiting can be excruciating if you really had a cheesecake craving that night.

The water bath is a bit troublesome if you’ve never done it before. I also probably didn’t have a high enough pan to place my muffin trays on in order for the water to be high enough to reach 2.5 cm. Mine was probably around 1.5cm at most. So I have a feeling I may have over baked it, as I did leave it in the oven too long.

For that haven’t tried a well done one, you’d still be hard pressed to see any faults. Apart from the sullen appearance. You still get a nice cream cheese flavour, along with a touch of berry flavour. I wish I added more puree to be honest, or maybe my frozen berries weren’t very flavourful so I’ll give it another shot and see how those turn out. Overall, it’s a good recipe, I enjoyed the end results even though I know it wasn’t at all perfect (or even close). It doesn’t have a sponge or biscuit base at all. It’s more like a cheesecake muffin so if the the base is something you can’t live without you could probably add a biscuit base to a separate muffin tray (paper), let it set in the fridge and then once the cheesecakes are cooled, peel it off (if you put it in cups) and just place it on top of the base. I’m sure it’ll add a nice crunchy texture to it all.

Pandan Chiffon Cake

IMG_5873

Chiffon Cake was invented in America but have remained popular in South-East Asian countries, and extremely popular in Malaysia. The most popular versions are Orange or Pandan/Coconut Chiffon Cakes and are enjoyed by many for its light and fluffy texture. Here is a version of my Pandan Chiffon Cake. Chiffon Cakes sometimes take a couple of tries to get right due to different oven temperatures and the mixing of the meringue and wet mixture so if you don’t succeed on your first try. Please try again!

Pandan Chiffon Cake
Ingredients

7 egg whites
100 g sugar
1/2 tsp cream of tartar

7 egg yolks
60 g sugar

190 g flour
1/2 tsp salt
2 tsp baking powder

80ml vegetable oil
140ml coconut milk
1/2 tsp pandan extract

Method
1. Preheat oven to 160/170 degrees Celsius.
2. Sieve the flour, salt and baking powder into a medium sized bowl.
3. Add the vegetable oil, coconut milk, extract, egg yolks and sugar into the dry ingredients and mix until just combined.
IMG_5851
4. Whip the egg whites and once it starts to bubble add the cream of tartar.
5. Keep whipping until the mixture is nearing soft peaks, then slowly add the sugar with the electric mixer is still running and until hard peaks form.
IMG_5855
6. Add 1/3 of the meringue into the wet mixture until the thick mixture softens. Then slowly add in the rest of the meringue until just combined. Do not overmix!
7. Pour into the cake pan (one made for upside down cakes – it has a hole in the middle)
8. Place in the oven for 30/40 minutes. If the top of your cake gets brown too quickly, lower the oven temperature to around 150. To see if it’s done, you can use a skewer and poke it through the middle. If it comes out clean, it’s done.
9. Remove from the oven when done, and flip it upside. If the cake as risen higher than the cake pan’s height, use a mug and rest the middle cylinder on top.
IMG_5871
10. Allow the cake to cool until room temperature.

IMG_5878

Impressions
What I like about this recipe is how light the chiffon cake is. When you take a bite, the cake just melts in your mouth. Not to inflate my ego or anything but I found it better than those purchased in my local Asian Grocers. This recipe isn’t too sweet, but still has that nice and subtle pandan flavour. You can always increase or decrease the amount of pandan extract you put it, as well as the coconut to whatever you prefer. That’s the fun thing about making things yourself, you can make something just to your liking.

If your chiffon cakes sinks slightly when cooling, that’s fine. All cakes shrink slightly when cooled. If your cake shrinks too much, this may be a result of over mixing for the batter or the meringue. Or even under mixing for the meringue.

IMG_5884

I find that if you use a good stand mixer, it’s much easier to make the meringue and definitely more consistent than using a hand held mixer. It’s also less troublesome to try pouring sugar into the egg whites if you use a stand mixer (I know, I’ve tried)

All in all, Chiffon cakes can be slightly difficult but once you get the basics down, you’ll find it isn’t so hard after all.

Banana Cake

IMG_6956

Ba-na-na-na-na-na-na-na-nana-na. Make those bodies sing. I’m so glad bananas have dramatically dropped in price and no longer cost at least $10. Rejoice! To celebrate the comeback of Australian Banana’s here is a recipe for those with extra ripe bananas and don’t know what to do with them. It’s a quick and easy recipe, and very difficult to get wrong.

Banana Cake

Ingredients
8 ounces (228 grams) self raising flour
2 tablespoons plain flour
1-2 tsps baking soda
1/2 tsp salt

3.5 ounces (100 grams) caster sugar
5 ounces (142 grams) butter/cooking margarine (6/7 ounces, you probably will get a slightly more moist cake)
1 tsp vanilla extract
4 eggs (at room temperature)

1-2 ripe bananas (mashed)
1/2 cup chopped walnuts (optional)

Method
1. Preheat oven to 180 C. Sift the self raising flour, plain flour, baking soda and salt and leave aside.
2. Cream the butter and sugar until light. You can add the vanilla extract when whisking or afterwards, it doesn’t really matter too much.
3. Add each egg one at a time until all is mixed through well.
4. Combine the sifted dry ingredients slowly to the wet batter.
5. Add the bananas and walnuts to the mixture and it’s done!.
6. Place the batter into muffin/cupcake pans. Then place in oven for 15-20 minutes/ until golden brown (or when the skewer comes out clean)

IMG_6957

I like this recipe, since you can adjust the sugar, butter to your liking. The banana adds to the sweetness so you don’t really need that much extra sugar to be honest. The banana makes the mixture quite wet, so you may need to add extra baking powder so that it rises properly and doesn’t sink afterwards! I’ll keep trying to find the perfect banana cake recipe.

Homemade Ice Cendol

IMG_3782

After holidaying in Malaysia for around three weeks late last year, and after eating Ice Cendol and Ice Kacang nearly every single day. I wanted to make these green jellies myself.

So my mother found a recipe she wanted to try and it was on this website that I am unable to find now. Luckily, I saved the recipe but I cannot give my thanks to the Indonesian site for their recipe.

It’s actually quite simple but pushing out the dough to make the worms is quite tough if you don’t have a cendol mold. We just used a strainer and it didn’t work out too well and took ages to push it all through the pasta strainer but we just had to use what we had in the kitchen. Might have to go buy the cendol mold when I get the chance to go back to Malaysia because it looks much easier with it.

Here is the recipe:

Green Jellies Ice (Cendol)

Ingredients:

For Jellies:
50g mung bean flour (hunkwee)
40g rice flour
10g tapioca flour
1/2 tsp salt
3 tbs sugar
625ml pandan / screw-pine leaves water (by blending 100 gr chopped pandan / screwpine leaves with 650 ml water)
Half basin iced water
Cendol mold

For the coconut milk:
1000 ml coconut milk
1/4 tsp salt
3 pandan leaves

For the palm sugar syrup:
250g palm sugar (or coconut sugar)
250ml water
3 pandan leaves

Directions:
For jellies:
1. Bring 425 ml of the pandan leaves water to boil.

2. Meanwhile, mix mung bean flour, rice flour, tapioca flour, salt, sugar, and the rest (200 ml) of the pandan leaves water in a bowl.

3. Pour the mixture into the boiling pandan leaves water. Keep stirring until the mixture co-mixtures with the pandan water. Turn the heat off when the liquid thickens and forms a transparent colour.

4. Prepare a basin filled with iced water (1/2 basin). Put the mold on top of the basin. It is easier when the diameter of the basin is more or less the same with of the basin’s.

5. Pour the jellies liquid in the mold, press it. The liquid soon becomes jellies when it gets into the iced water. Continue pressing until no liquid is left.

6. Set aside. Let it for some time to give a sufficient firmness. When it is firm enough, drain it.

For coconut milk:
1. Meanwhile, bring the coconut milk, salt and the pandan leaves into boil. Do not leave unattended as over heated coconut milk will be ruined.

2. Immediately turn off the heat once the surface is starting to raise.

For palm sugar syrup:
1. Boil the palm sugar, water, and pandan leaves. Strain if necessary; sometimes they are not well strained in the making.

How to serve:
1. Pour the palm sugar in the bottom (approx. 5 tbs)

2. Add the jellies (approx. 5 tbs)

3. Add the coconut milk

4. Add ice cubes if desired

IMG_3786IMG_3787IMG_3788

It was really tasty and you don’t really need shaved ice, ice cubes will do just fine. Homemade cendol is always nicer then those you can buy, they are usually a bit too sweet and too hard and stale. You can even have cendol warm since it’s getting colder and closer to winter.