Banana Cake

IMG_6956

Ba-na-na-na-na-na-na-na-nana-na. Make those bodies sing. I’m so glad bananas have dramatically dropped in price and no longer cost at least $10. Rejoice! To celebrate the comeback of Australian Banana’s here is a recipe for those with extra ripe bananas and don’t know what to do with them. It’s a quick and easy recipe, and very difficult to get wrong.

Banana Cake

Ingredients
8 ounces (228 grams) self raising flour
2 tablespoons plain flour
1-2 tsps baking soda
1/2 tsp salt

3.5 ounces (100 grams) caster sugar
5 ounces (142 grams) butter/cooking margarine (6/7 ounces, you probably will get a slightly more moist cake)
1 tsp vanilla extract
4 eggs (at room temperature)

1-2 ripe bananas (mashed)
1/2 cup chopped walnuts (optional)

Method
1. Preheat oven to 180 C. Sift the self raising flour, plain flour, baking soda and salt and leave aside.
2. Cream the butter and sugar until light. You can add the vanilla extract when whisking or afterwards, it doesn’t really matter too much.
3. Add each egg one at a time until all is mixed through well.
4. Combine the sifted dry ingredients slowly to the wet batter.
5. Add the bananas and walnuts to the mixture and it’s done!.
6. Place the batter into muffin/cupcake pans. Then place in oven for 15-20 minutes/ until golden brown (or when the skewer comes out clean)

IMG_6957

I like this recipe, since you can adjust the sugar, butter to your liking. The banana adds to the sweetness so you don’t really need that much extra sugar to be honest. The banana makes the mixture quite wet, so you may need to add extra baking powder so that it rises properly and doesn’t sink afterwards! I’ll keep trying to find the perfect banana cake recipe.

Homemade Sauté Apple Tart

IMG_6686

This Apple Tart is really quite delicious, I’ve taken it from this recipe book called Patisserie by Leonard J Hanneman. The shortcrust pastry is actually quite easy to make and comes out great too. The recipe is broken into three parts but all are manageable and not out of anyone’s experience.  I recommend baking the shortcrust pastry first, then Apple Saute, and lastly the almond filling because the filling doesn’t require it to be cooled to room temperature.

Checkout the recipe I’ve used below: (The changes I made to the recipe are in brackets and italics)

Sweet Shortcrust Dough (123 Pastry)
Yield: 650 g pastry

Ingredients
200 g unsalted butter
100 g caster sugar (50 g sugar)
50 g egg (1 x 55 g egg)
300 g plain flour
pinch of salt

Method
1. Cream the butter and sugar lightly, using the paddle attachment.
2. Add the egg and continue creaming until absorbed.
3. Carefully fold in the flour and salt, mixing only until combined. The dough will be very sticky, and more like a biscuit paste. Wrap in plastic and chill prior to use.
4. Cut the chilled dough into manageable sized pieces, knead lightly first to soften, then roll out using dusting flour.

How to Blind Bake
1. Take a chilled pastry case. For a quicker chill, the freezer works wonders.
2. Place a piece of non-stick baking paper into the pastry case, then line it with foil, pressing the foil flush with the base of the pastry case and up the sides.
3. Fill with baking weights of beans, ensuring that the weights press up along the sides to support the walls. There can be fewer weights over the centre of the pastry. It is important to have sufficient weights to support the sides as it is the sides that will slump as the pastry heats during the baking process.
4. Blind bake the pastry at 170°C for 30 to 60 minutes depending on the thickness and the size of the cases.

IMG_6696

Here is the apple tart recipe below (and a slice of the tart above):

Sauté Apple Tart

Yield: 1 x 28 cm tart lined with 123 pastry, prebaked

Ingredients
6 apples, Granny Smith or Golden Delicious
60 g unsalted butter (Cooking margarine)
1 x 28 x 2cm or 2 x 16 x 2cm tart cases lined with sweet shortcrust and blind baked
1 vanilla bean, split and scraped or 1 teaspoon of cinnamon (1/2 tsp cinnamon and 1/2 tsp of vanilla extract)
60 g sugar (30 g sugar)
almond filling (below)

Method
1. Peel and core the apples; cut into 8 wedges
2. Melt the unsalted butter and add the vanilla pod (or cinnamon). Over high heat saute the apples in the butter and sprinkle over the sugar. Toss as they cook to a golden brown, though still firm. Do not overcook. Set aside to cool.

Almond Filling

Ingredients
80 g unsalted butter
60 g sugar (30 g)
120 g almond meal
100 g egg (2 x 55 g eggs)

Method
1. Cream the butter, sugar and almond meal, add the eggs and continue mixing until absorbed and the mixture is light and pale.
2. Spread the almond filling into the pre-baked and cold shortcrust shell/s.
3. Nestle the cool saute apples into the almond filling, wedges facing upward rather than fanned, to create height.
4. Bake at 170C for 50 minutes. Serve hot or at room temperature.

Impressions

I like this recipe because the shortcrust is nicely short and has a nice bite to it but overall it melts in your mouth like it should. The almond meal adds this grainy texture to the overall tart, however if you don’t like this more ‘whole wheat’ kinda taste then you can try food processing the almond meal a few times, and maybe sieve it as well so it comes out much finer.

Overall it’s a good recipe that is easy enough to make, the only trouble you may have is with rolling out the pastry dough in a warm environment. It can get soft and unmanageable very easily. So if it does become too soft when you start rolling it flat and trying to place it into the case, either place it in the fridge or freezer to let it harden up a bit and try again.

Whole Wheat Ginger Snaps

DSC00160

Ginger snaps or even ginger cookies are one of my favourite little treats. It’s quite funny though since I have a strong dislike for ginger in general, whether it’s raw, in a stir fry, congee, steamed fish etc. I found this recipe on Allrecipes.com a few Christmas’s ago and have made it a couple times now and I like it because it feels ‘healthier’ even though wholemeal/wheat flour isn’t really all that much better for you considering the other ingredients in these cookies. I’ve made a few changes as I didn’t have a few of the ingredients and to make it less sugary sweet.

Whole Wheat Ginger Snaps (Allrecipes)

Prep Time: 10 Minutes

Cook Time: 15 Minutes

Makes: 5 dozen (60 cookies)

Ingredients

1 cup butter or margarine (Slightly less)
3/4 cup white sugar (Caster sugar)
2 eggs, beaten
1 cup molasses (Slightly less)
4 cups whole wheat flour (Wholemeal flour)
1/2 tablespoon baking soda
2 teaspoons baking powder
1 tablespoon ground ginger
1 1/2 teaspoons ground cinnamon
Extra sugar for the topping


Method

1. Preheat the oven to 175 degrees Celsius. Grease cookie sheets.

2. In a large bowl, cream together the butter and 1 1/2 cups of sugar until smooth. Mix in the eggs, and then the molasses. Combine the whole wheat flour, baking soda, baking powder, ginger, and  cinnamon. Stir the dry ingredients into the molasses mixture just until blended.

3. Roll the dough into small balls, and dip the top of each ball into the remaining white sugar. Place the cookies about 2 inches apart on the cookie sheets.

4. Bake for 10 to 15 minutes in the preheated oven, until the tops are cracked. Bake longer for crispy cookies, less time for chewy cookies. Cool on wire racks.


Impressions:

I like this recipe because these cookies are nice and crunchy and you get a nice cinnamon and ginger taste that isn’t particularly overpowering. These cookies aren’t like your usual ginger snaps that are wafer thin and ‘melts-in-the-mouth’ since it doesn’t contain icing sugar and it has wholemeal flour for that grainy texture.

Just a warning though, the cookie dough is extremely sticky because of the molasses so it’s quite difficult to shape but somehow they all turned out round.

Homemade Pizza

IMG_6652

One of things I’ve realised from making a nice tasty homemade pizza is that it doesn’t really come cheap! Unless you make huge batches it won’t necessarily be budget friendly but of course this depends on the ingredients you use. On the plus side these pizzas were worlds apart from the fast food pizzas such as Dominos. They really can’t compare to a homemade pizza at all.

IMG_6641

I’ve taken this recipe from Jamie Oliver‘s website, which I believe is in the Jamie At Home cookbook, and I have now made pizza a couple of times with this recipe so for me, it works quite well, and is very easy to do. Here is the recipe I’ve used below.

Makes 6 to 8 medium-sized thin pizza bases

Ingredients

1kg strong white bread flour or Tipo ‘00’ flour
or 800g strong white bread flour or Tipo ‘00’ flour, plus 200g finely ground semolina flour
1 level tablespoon fine sea salt
2 x 7g sachets of dried yeast
1 tablespoon golden caster sugar
4 tablespoons extra virgin olive oil
650ml lukewarm water

Method

1. Sieve the flour/s and salt on to a clean work surface and make a well in the middle.

2. In a jug, mix the yeast, sugar and olive oil into the water and leave for a few minutes, then pour into the well. Using a fork, bring the flour in gradually from the sides and swirl it into the liquid. Keep mixing, drawing larger amounts of flour in, and when it all starts to come together, work the rest of the flour in with your clean, flour-dusted hands. Knead until you have a smooth, springy dough.

3. Place the ball of dough in a large flour-dusted bowl and flour the top of it. Cover the bowl with a damp cloth and place in a warm room for about an hour until the dough has doubled in size.

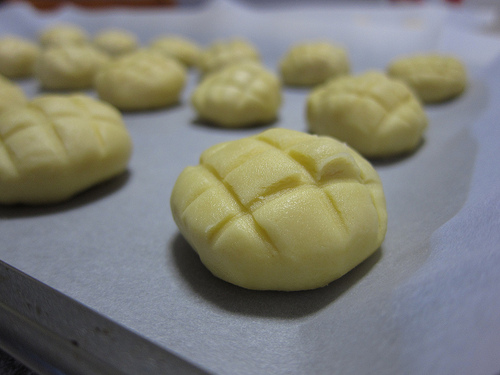
4. Now remove the dough to a flour-dusted surface and knead it around a bit to push the air out with your hands – this is called knocking back the dough. You can either use it immediately, or keep it, wrapped in clingfilm, in the fridge (or freezer) until required. If using straight away, divide the dough up into as many little balls as you want to make pizzas – this amount of dough is enough to make about six to eight medium pizzas.

5. Timing-wise, it’s a good idea to roll the pizzas out about 15 to 20 minutes before you want to cook them. Don’t roll them out and leave them hanging around for a few hours, though – if you are working in advance like this it’s better to leave your dough, covered with clingfilm, in the fridge. However, if you want to get them rolled out so there’s one less thing to do when your guests are round, simply roll the dough out into rough circles, about 0.5cm thick, and place them on slightly larger pieces of olive-oil-rubbed and flour-dusted tinfoil. You can then stack the pizzas, cover them with clingfilm, and pop them into the fridge. (I made the doughs in the morning and let them sit in a warm area for most of the day so it could rise to it’s maximum size)

IMG_6642

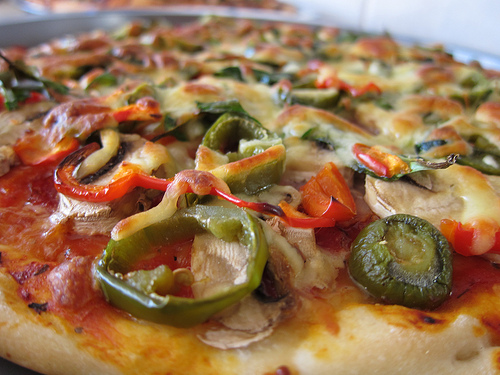
With these pizzas the toppings are all up to you and the beauty of it all is you can add as little or as much as your want!

I halved the above recipe and used semolina and it made two large(ish) sized pizzas so you can take that into consideration. I’ve listed the ingredients I’ve used below.

Pizza Tomato Base (I’ve used Leggos, but anything is fine)
Capsicum
Mushroom
Jalapenos (From Woolworths are absolutely amazing on a pizza – be warned though they are not that cheap!)
Pizza Cheese (Cheddar/Mozarella mix)
Chorizo
Pancetta
Hot Salami

Here is a recipe from Taste.com.au which you can use to go by for oven temperature and general how to.

Cooking Time
20 minutes

Ingredients (serves 4)

4 pita pockets
2 tbs tomato tapenade (see note)
125g chorizo sausage, thinly sliced
60g (1/3 cup) bought roasted capsicum, drained, thinly sliced
100g baby bocconcini, drained, halved
40g (1/2 cup) shredded parmesan
50g baby rocket leaves

Method

1. Preheat oven to 200°C.

2. Place the pita pockets on a large baking tray. Spread with the tomato tapenade. Top with the chorizo, capsicum and bocconcini. Sprinkle with the parmesan.
3. Bake in oven for 10 minutes or until the parmesan melts and the base is light brown and crisp.

Notes
If tomato tapenade is unavailable, use tomato paste. Shopping tip: Look for tomato tapenade and bottled roasted capsicum, sometimes called fire-roasted peeled peppers, in the antipasto section at Woolworths, near the olives. Swap it: For a different flavour, swap the tomato tapenade for bought basil pesto and swap the chorizo sausage for coarsely chopped ham slices.

IMG_6643
IMG_6647

Impressions

I really liked the Jamie Oliver pizza dough recipe, it works wonders. However to be honest, I haven’t tried any others when this one worked well for me. It has a nice crunch on the outside and it lovely and soft inside, plus if you cook it long enough the base crisps nicely and it is just fantastic.

Basically you leave it in the oven at roughly 200 degrees fan forced if you have ingredients that don’t need much cooking (or really none at all). If you do have toppings that may need to be cooked, please pre-cook them to be safe, and so the dough is well cooked while the toppings aren’t overly over cooked.

It’s a great recipe that I’ll be using more regularly from now on!

Pineapple Tarts

IMG_6557

Pineapple Tarts are one of my favourite Chinese New Year treats. That’s not to say you can’t have it any other time of year but these bite sized pieces are even more joyous in times of celebration. I’ve always loved the sweet and slightly sour pineapple filling with the buttery dough that melts in your mouth. Also these tarts come it various sizes or shapes that always makes it more appealing.

Probably every year we try those home made Pineapple Tarts sold in your typical local Asian Grocer and it’s always a tad too sweet and the tart isn’t as soft as I would have liked. So I have wanted to try to make my own tarts for ages but the thought of making the filling just seemed like too much effort.

However, It just so happened we ended up having large, old pineapples sitting around so what else could we use it for but pineapple jam? My mother was the one wh  actually  made the jam, just from adding pineapples into a pot and letting it dry up and adding sugar so I don’t know the exact quantities she used, I think just tasting as she went along and added sugar when needed. However, I’ve provided a recipe from one of my favourite Asian/Malaysian Food websites, Rasa Malaysia for the filling and pastry. We did use the pastry recipe from there and I think it worked out quite well, you can read my impressions further down.

Rasa Malaysia’s Pineapple Tart Recipe

Pineapple Filling

Ingredients:

4 large pineapples
300 g sugar
1 clove
1 inch cinnamon stick
1/2 star anise
250 g liquid glucose
2 Tbsp wheat flour or wheat starch (Tung Mein Fun)

Method:

1. Slice and grate pineapples till fine. You can use a food processor do grate it.
2. Strain the grated pineapple till dry.
3. Let it simmer in a wok toll the juice has dry up. Add sugar and, star anise, cinnamon stick and clove.
4. Stir till the pineapple has thickened and dry. Add maltose or liquid glucose.
5. Stir till the pineapple filling is thick, sticky and dry.
6. Add wheat flour. Continue to stir for about 10 minutes or until filling is dry.
7. Leave to cool and shape into small balls.

Note : You can make the filling in advance and refrigerate it.

Pastry

Ingredients:

500 g butter
140 g powdered sugar
4 egg yolks
650 g all purpose flour
1 Tbsp cornflour
2 tsp baking powder
1 tsp vanilla essence

Egg Brush

1 egg yolk plus 1Tbsp water

Method:

  1. Preheat oven at 150° C.
  2. Cream butter and sugar till white.
  3. Add in egg yolks and beat at low speed for 1 minute.
  4. Fold in flour gradually.
  5. Insert pastry into cookie press and press into strip of about 3 inch each. (Or just take a small spoonful of the pastry,  flatten it and take another spoonful of the jam and use your hands to shape it into a ball)
  6. Put the rolled pineapple filling onto the pastry and roll it up.
  7. Brush with egg brush.
  8. Bake for 30 minutes or when tarts is light golden brown in color.

IMG_6551

IMG_6556

You can shape these tarts any way you want, and as mentioned in the Rasa Malaysia recipe, they roll it up like a sausage roll of sorts. We stuck to the ball method and just used a fork or a toothpick to engrave the lines on to make it look more like a pineapple.

You can also use a mold designed for these tarts and they come in various shapes like a flower or hearts. I’ve purchase one from Brown Cookie but for since this particular dough is quite soft it gets quite difficult to remove from the mold.

Impressions

The pastry recipe is surprisingly very good as just how I like it! It’s soft and simply melts in your mouth as you take a bite. I’ve actually made this a number of times since my mother had made an enormous quantity of pineapple jam.

It really does depend on how you like your pineapple tarts, some like the shortbread style tarts that are slightly harder and crisper but I’m a big fan of these softer tarts. If you’re like me and prefer these ones, this is a great recipe to try.

Glick’s Bakery – Special Boiled Bagels

IMG_5616

After having my first taste experience of bagels in New York (Ess-a-Bagel), I’ve been on a search to find some delicious Bagels down here in Melbourne. One of the best ones I’ve tasted are Glick’s Special Boiled Bagels, I don’t know what’s special with their boiling but whatever they do it’s working a treat.

Glick’s have a few locations, the one I frequent is in Elsternwick, down on Glenhuntly road, just a few minutes from Elsternwick station so it’s quite convenient if you want a Bagel fix!

IMG_5615

Their store also sells a variety of sweets and savoury items which I haven’t had the chance to try but they look tasty.
IMG_5612

Of course, being a bakery and all, it serves breads and sandwiches and snacks.
IMG_5611

Glick’s is great because they have a large variety of choices. On the top of my head they have plain, herb, poppyseed, wholemeal, the lot (everything), and berry. Aside from their fresh Bagels, you can buy their fridge/frozen selection of plain, poppy seed or sesame which taste as good as the fresh ones. So if you ever have a craving you can just defrost a few and off you go!
IMG_5614
IMG_5402

We always try one of each and the everything Bagel is packed full of flavour, and when lightly toasted it gives out a very aromatic smell.
IMG_5406
IMG_5403

I probably could go on about their Bagels but I’ll stop now. If you liked Ess-A-Bagels in NY, these will more than satisfy your cravings. Glick’s Bagels are dense, chewy and slightly doughy. So you can’t go wrong. As they have stores in the CBD, South Melbourne, Balaclava, Bentleigh, Malvern and of course Elsternwick. You’d bound to run into one so I definitely recommend you check it out.

Glicks on Urbanspoon

Glick’s Elsternwick
362 Glenhuntly Rd
Melbourne, VIC 3184

Red Velvet Cupcakes

IMG_6457

My sister gave me a link to a Red Velvet Cupcake recipe from Amy’s Food Adventures, in which she has adapted her recipe from the Food Network Canada. Apparently, I’m her guinea pig for recipes she finds. We had a gathering coming up and I thought, why the hey.

I had Red Velvet cupcakes a couple of times, the most famous one being Magnolia’s in New York and that was pretty darn good actually.

I was pretty interested in this recipe because it lacks butter, I’m assuming that’s the case with all Red Velvet cupcakes but I was keen to try it out after I realised that.

IMG_6338

This recipe uses a lot of red food colouring. A bit more than half of the food colouring bottle to give it that vibrant red colour.IMG_6455


I made a couple of tweaks to the recipe to my liking, with **. With the icing, I found it to bit a tad plain, so I added more lemon juice and zest to it to give it a really nice freshness to the whole cupcake and icing. The icing was pretty much a trial and error so I can’t remember the exact measurements, but if you want it slightly more lemony just keep adding some more juice until you feel it’s right.

Preparation time: 15 minutes

Cooking time: 25 minutes
Yield: 24

Ingredients
Red Velvet Cupcakes
2 eggs
1 1/2 cups of sugar (375 ml) *3/4 cup to 1 cup*
1 1/2 cups canola oil (375 ml)
1 cup of plain yogurt (250 ml)
2 tablespoons red food coloring (30 ml)
1 teaspoon vinegar (5 ml)
1 teaspoon vanilla extract (5 ml)
2 1/2 cups of flour (625 ml) *plain flour for cakes*
1 tablespoon cocoa (15 ml)
1 teaspoon baking soda (5 ml)
1 teaspoon salt (5 ml)
Icing
2 cups mascarpone (500 ml) *can use cream cheese too*
1 cup icing sugar, sifted (250 ml) *1/2 cup to 3/4 cup*
1/2 cup 35% cream (125 ml)
Zest of 1 lemon and *lemon juice*

Directions

Red Velvet Cupcakes
Preheat oven to 350 °F (180 °C).
In a food processor, mix the eggs with the sugar, oil, yoghurt, food coloring, vinegar and vanilla. Add flour, cocoa, baking soda and salt. Blend until just incorporated.
Place cupcake papers into a muffin pan, divide the batter in the cupcake papers, pour only halfway so batter doesn’t overflow, and bake, rotating half way through, for 25 to 30 minutes. Remove and let cool.
Icing
In a bowl, beat the mascarpone, icing sugar, cream and lemon zests together until the mixture is smooth.
Spoon a dollop of mascarpone cream on the cupcakes. *I piped mine onto the cupcakes so if the icing mixture is a bit too running or soft to pipe, just place it in the freezer or fridge until it hardens up a bit.*


IMG_6404
IMG_6407
IMG_6451I was extremely happy with this recipe. The cake was so moist. My first batch of small ones were a bit undercooked so it was a bit more ‘redder’ then I would have liked, but it tasted great. My second batch in the oven was slightly darker and looked great. This recipe is definitely a keeper.


Mocha Nut Cookies

IMG_3835

I was given this recipe from my sister who bought an entire book dedicated to cookies called The Golden Book of Cookies. Nuts, coffee and chocolate were an appealing combination so I asked her to send me the recipe so I could try it out.

We had to make some alterations to the recipe. One: all cookie recipes appear to be ridiculously sweet so we cut down on sugar and chocolate. My mother’s love of nuts and something crunchy knows no bounds, so of course extra nuts were added.

Makes: around 20 cookies

Preparation: 20 minutes

Cooking: 20-25 minutes


Original Recipe:

2/3 cup (100g) all-purpose (plain) flour

1/2 teaspoon baking powder

1/8 teaspoon salt

12 oz (350g)  biitersweet (dark) chocolate, coarsely chopped

1/2 cup (125g) butter

3 large eggs

1 cup (200g) granulated sugar

1 tablespoon instant coffee granules

1 teaspoon vanilla extract (essence)

1 1/2 cups (150g) coarsely chopped pecans

1 1/2 cups (150g) coarsely chopped hazelnuts

1 cup (180g) semisweet (dark) chocolate chips

IMG_3839

Altered Recipe:

2/3 cup (100g) all-purpose (plain) flour

1/2 teaspoon baking powder

1/8 teaspoon salt

300g  biitersweet (dark) chocolate, coarsely chopped

1/2 cup (125g) butter

3 large eggs

1/2 cup (100g) granulated sugar

1 tablespoon instant coffee granules

1 teaspoon vanilla extract (essence)

1 1/2 cups (150g) coarsely chopped pecans

1 1/2 cups (150g) coarsely chopped hazelnuts

+ extra chopped nuts ~ 50g more


Method

1. Preheat oven to 325 Fahrenheight (170 degrees Celsius)

2. Set out two baking trays

3. Mix flour, baking powder, and salt in a large bowl

4. Melt butter and chocolate in a double boiler over barely simmering water

5. Beat the eggs and sugar in a large bowl with an electric mixer at high speed until pale and thick

6. Beat in the chocolate mixture, coffee granules and vanilla

7. Mix in the dry ingredients, pecans, hazelnuts and chocolate chips (if you want an extra chocolate kick)

8. Drop tablespoons of the dough 3 inches (8cm) apart onto the trays

9. Bake until lightly cracked on top, 20-25 minutes. Transfer to cool racks


Impressions:

I found these to be quite good if you like crunchy chocolate and nuts cookies, with a hint of coffee. With less chocolates added, it still has a great chocolate flavour but it doesn’t overpower the whole cookie. Quite an easy recipe to follow too.

I only had a horrible time trying to make them look nice and round, and with all the nuts it was quite a challenge. As you can see, I didn’t seem to fulfill my goal but they taste great nonetheless.


Chocolate Souffle

DSC00372

I’ve always wanted to eat souffle, and when we went to the Conservatory at Crown, their chocolate souffles were quite the popular dessert so I didn’t have a chance to taste it.

So at last, I tried making it myself. I found this recipe on Taste.com.au, and it’s the basic run of the mill type of recipe but since I had never made it before and it didn’t require that many eggs I chose this one

Chocolate Souffle (Taste.com.au)
Preparation Time
20 minutes

Cooking Time
20 minutes

Ingredients (serves 6)
Melted butter, to grease
4 1/2 tbscaster sugar
60g butter
2 tbs plain flour
160ml (2/3 cup) milk
210g good-quality dark chocolate, chopped
3 eggs, separated
125ml (1/2 cup) thin cream
2 tbs brown sugar
1 tsp vanilla essence
Icing sugar, to dust

Method
1. Preheat oven to 180°C. Brush six 160ml (2/3-cup) ovenproof souffle dishes with melted butter to grease (using upward strokes on side). Sprinkle the inside with 1 1/2 tablespoons of caster sugar, shake out any excess.

2. Melt 30g of the butter in a saucepan over medium heat. Add flour and use a wooden spoon to stir for 1 minute or until mixture is smooth and begins to bubble. Remove from heat, gradually add milk, stirring until smooth and combined. Return to medium heat, stir until mixture thickens and comes to the boil. Boil for 1 minute, stirring. Remove from heat.

3. Stir in 125g of the chocolate and remaining caster sugar until combined. Transfer to a bowl. Add egg yolks and stir until well combined.

4. Use an electric beater to whisk egg whites in a clean, dry bowl until firm peaks form. Use a metal spoon to fold one-third of the egg whites into chocolate mixture. Fold in remaining egg whites until just combined.

5. Spoon the mixture evenly into prepared dishes. Place on a baking tray. Bake in preheated oven for 15-20 minutes or until well risen.

6. Meanwhile: combine remaining chocolate, remaining butter, brown sugar, cream and vanilla essence in a saucepan over low heat. Cook, stirring, for 2 minutes or until chocolate melts and mixture is well combined. Simmer, uncovered, for 1 minute. Remove from heat. Place in a jug.

7. To serve, place ramekins on plates. Dust with icing sugar. Use a spoon to make a hole in top of each souffle, pour in a little chocolate sauce.

Impressions:
I found it to be quite nice and moist on my first tasting, but I wasn’t too sure if I was doing it right since they seemed to sink after taking it out of the oven. You also kinda need to serve them all hot and fresh out of the oven otherwise it just doesn’t retain that moistness. Unless I was just doing it all wrong. I don’t know

Little Cupcakes

IMG_5365

Little Cupcakes is a famous Melbourne bakery, dedicated to cupcakes, as expected by its name. It’s been on Postcards, and it definitely has gathered quite a following for those wanting a cute and celebratory birthday cake in the form of cupcakes. Located in one of Melbourne’s most popular laneways, Degraves St, and close to Flinders St station, it is conveniently located and that just might be a bad thing as you’ll definitely be coming back for more.

One of the best things about Little Cupcakes, is its tiny bite sized cupcakes, that are almost too pretty to eat. Almost.

This bakery has a wide selection of flavours, ranging from the decadent chocolate cakes, to the lighter lemon and vanilla cupcakes, and for those veggie lovers, a carrot cake.
IMG_5373
IMG_5396
IMG_5385

This one above was the Mocha (I believe), and I must say I was pleasantly surprised by the cupcake itself. The icing on top for me anyway was a tad too sweet but it had had a nice hint of coffee, I would have liked it to have a bigger punch though. What I absolutely loved about the chocolate mud cake cupcakes, is how moist they are. It’s not too heavy, it’s fluffy and just nicely melts in your mouth without the dryness of most mud cakes I’ve eaten.
IMG_5386

The Lemon cupcake, is a classic butter cake with a lemon frosting. I must admit, I’m a fan of all things lemon flavoured, but it has to taste like a lemon with the sweet, acidity and sourness that a lemon is. So it’s always disappointing to have a lemon frosting reduced to pure sugary sweetness, and makes the lemon taste almost fake. Unfortunately, this was what it was like, and the butter cake was quite dry too so it wasn’t a great one to be honest. I do hope I just got a bad egg.
IMG_5387

The Cream Latte one is quite similar to the Mocha cupcake, and again the cake is just so moist. It’s really quite the delicious tasting experience, topped with a nice coffe and cream frosting. It’s just a pleasant cupcake to eat.
IMG_5388

I love my cookies and cream ice cream, and so I was hoping the taste of that would translate into a nice frosting. Was slightly disappointed it lacked the creaminess and cookie crunch of cookies and cream, and lacked a bit of that flavour too. It was mostly sweet, but again the cake was deliciously moist.
IMG_5389

This buttercake may have been from the same batch as the lemon one, the strawberry frosting on the other hand, was quite pleasant and you could taste an authentic strawberry flavour so even if the cake was dry, it was made up nicely by the sugary creaminess of the frosting.
IMG_5391

This was a Belgian Chocolate cupcake, with a moist chocolate cake and topped with a dark belgian chocolate frosting. It was quite good to be honest. Usually I’m not a fan of chocolate on chocolate desserts as it’s just a chocolate overload but the frosting wasn’t overly sweet, it had a nice smooth and silky texture and taste to it. Plus it had an excellent moist cake base, so it was a real winner.
IMG_5393

I saved the best for last. This Red Velvet cupcake, consists of a cocoa butter cake with a cream cheese frosting, and my oh my was this good. As you probably noticed, I’m not a real fan of just sugar overload, I do like balance and this Red Velvet little cupcake delivers.

The cake itself was moist, maybe not as moist as the chocolate counterparts but definitely nicer then the butter cakes on offer. It wasn’t too sweet either, and the cream cheese frosting was just pure goodness. It also wasn’t half as sweet as the frostings on the other cupcakes I tried, it had a nice creaminess to it and was just what I wanted in a cupcake. A cupcake that isn’t too sweet, moist, and has a nice texture and taste to boot. It also looked great. I definitely would go back for these, and they seemed quite popular too as when we went there, we took the last one available.

Little Cupcakes on Urbanspoon
Little Cupcakes

Shop 7 Degraves St
Melbourne
VIC 3000
03 9077 0413

Mon-Fri 8.30am – 5.30pm
Sat-Sun 9.30am – 5.30pm

There are also stores on William St and Queen St (Closed on weekends), check out their website for further details.