White Chocolate Panna Cotta with Espresso Coffee Syrup and Toffee

IMG_4849E

 Wanting to make a Panna Cotta but without the trouble of pureeing fruits like mangos to make the Panna Cotta, I found this white chocolate recipe on Taste.com.au. The addition of the coffee syrup intrigued me as it seemed too delicious not to give it a try. I’ve made this a couple times already and have made a few changes to the recipe to my liking. As something extra, I tried to add some toffee on top just to make it look nicer.

White Chocolate Panna Cotta with Espresso Coffee Syrup (Taste.com.au)

Equipment
You will need eight 150ml capacity dariole moulds for this recipe. If you like to serve it in bowls, just any small bowls will do.

Ingredients
Panna Cotta
600ml thickened cream
1 x 180g pkt white chocolate, broken into small pieces
160ml (2/3 cup) milk (can use light milk)
70g (1/3 cup) caster sugar
2 tbs boiling water
3 tsp powdered gelatine

Coffee Syrup (Version 1)
100ml freshly brewed strong espresso coffee or 3 Nespresso capsules using the espresso function
3 or 4 tsp white sugar

Coffee Syrup (Version 2)
100ml freshly brewed espresso coffee (3 Nespresso capsules using the espresso function – froth skimmed off)
100g raw sugar/caster sugar

Toffee (Taste.com.au)
215g (1 cup) caster sugar
60ml (1/4 cup) water

Panna Cotta
Method
1. Heat water in a small saucepan over medium/high heat until it starts to boil. In a separate heat-proof bowl place the cream, chocolate, milk and caster sugar in the bowl and over the saucepan over medium/low heat.   Cook, stirring, for 3-4 minutes or until chocolate melts and mixture is smooth.
IMG_4807EIMG_4808E

2. Place the boiling water in a heatproof bowl. Sprinkle with gelatine and whisk with a fork to remove any lumps. Set aside for 3 minutes or until gelatine dissolves. (I also just place the bowl of gelatine on top of my bowl of boiling water which helps keep it warm/dissolve any extra gelatine powder)
IMG_4810E

3. Add gelatine to cream mixture and whisk to combine.

4. Pour among eight 150ml capacity dariole moulds. Place on a baking tray. Cover with plastic wrap and place in the fridge for 6 hours to set. Or overnight. Make sure the plastic wrap is tight as some of the heat from the mixture may create water droplets and affect the consistency on the top layer of the panna cotta (Although not an issue if using dariole moulds and turning them upside down)

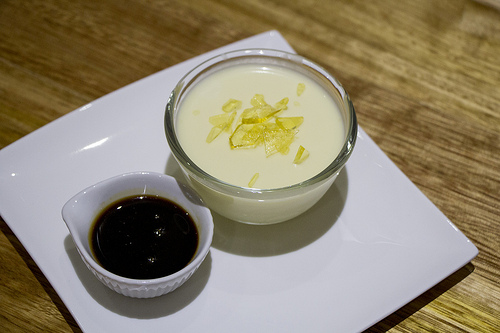
5. Dip moulds, 1 at a time, into hot water for 1-2 seconds, then turn onto serving plates. Drizzle with coffee syrup (steps below) to serve.

IMG_4852E

Coffee Syrup (Version 1)

1. Place the coffee and white sugar in a small saucepan over medium heat. Cook, stirring, for 3 minutes or until sugar dissolves. Set aside to cool.

Note: You may not even need to heat it over a saucepan if you can dissolve the sugar in the hot coffee/espresso. If using Nespresso capsules, just skim off the froth before serving.

IMG_4809E

Coffee Syrup (Version 2)
1. Place the coffee and sugar in a small saucepan over medium/high heat until it starts to boil. Reduce down to a medium/low heat and stir until the syrup coats the back of the spoon or until the consistency desired. Please note that if you place the syrup in the fridge (or when cooled down) the syrup will be slightly more thicker and viscous than when it was cooking. Set aside to cool and then place into the fridge if you prefer it to be a thicker consistency.

IMG_4838E

Toffee
1. Stir water and sugar in a saucepan over low heat until the sugar dissolves. Don’t bring it to the boil until all the sugar is dissolved.
IMG_4820E
2. Increase heat to high. To dissolve any sugar left on the side of the pan, brush down with a wet pastry brush. Bring to boil.
3. Cook until the mixture is a rich golden colour – don’t let it burn. Remove from heat – the residual heat continues to colour toffee.

4. Allow to cool and break into pieces to decorate. Please only add the toffee when wanting to serve, otherwise the moisture from the panna cotta will result in the toffee to turn to liquid.
IMG_4825EIMG_4826E

Notes:

  • Toffee troubleshooting: A common problem when making toffee is crystallisation. The sugar clumps together into a white and grainy syrup that turns into a messy solid mass. To avoid starting again, try these tips.
  • Dissolve the sugar completely before increasing the heat and bringing the mixture to the boil. You’ll know when it’s dissolved – there won’t be any crystals on your spoon.
  • Brush any sugar crystals from the side of the pan with a wet pastry brush during the toffee-making process. Undissolved sugar on the side of the pan causes crystallisation.
  • Don’t stir the toffee mixture once it comes to the boil – this also leads to crystallisation.

Impressions

I reduced the sugar from the original recipe as I find the white chocolate already adds a significant amount of sugar to the panna cotta. The panna cotta here is smooth and creamy but slightly denser due to the larger quantity of thickened cream used. Some may prefer a lighter panna cotta (I actually do) but due to the amount of cream used and in the white chocolate too, it really can’t be helped. I’m not sure if increasing the milk quantity and lowering the cream would result in a panna cotta that sets properly but certainly I’ll keep you updated to see if that does work.

The coffee syrup (Number 1) is a more liquid syrup with less sugar. It allows the bitterness and strong espresso flavour to come out and since the panna cotta has enough sweetness, the contrast makes an excellent combination.

Version 2 of the coffee syrup is sweeter due to the requirement to make it more viscous and thicker. You don’t know how many times I tried reducing the first version into a thicker syrup when it couldn’t possibly do so with the minimal sugar added. The consistency of version 2 is lovely though.

As mentioned above, the toffee should only be added at the very last minute, as it will start to turn to liquid when either in contact with the panna cotta or coffee syrup slowly.

This recipe was a crowd pleaser so I definitely can recommend giving it a try and it’s very easy to make as well.


Pandan Snow Skin Mini Mooncakes with Peppermint Lotus Paste and Pumpkin Seeds

IMG_0585


Mooncake Festival is one of those Chinese traditions, where you eat a considerable amount of mooncake to celebrate well, a full moon. There are a number of Chinese festivals and it’s hard to keep track of them all but the Mooncake festival is one of those bigger occasions other than Chinese New Year. Lately I’ve become fond of the “snow skin” mooncakes and staying away from those traditional mooncakes which are golden brown in colour and have a wonderful fragrance to it. It’s probably due to my affection for mochi. We decided to give this a try using Christine’s Recipe. Check it out below

Pandan Snow Skin Mooncakes with Coconut Mung Bean Filling (Christine’s Recipes)
Prep time: 15 mins
Cook time: 60 mins
Yield: 16 mini mooncakes (50 grams each)

Ingredients
55 gm glutinous rice flour
45 gm rice flour
25 gm wheat flour / wheat starch
60 gm caster sugar
190 ml milk
30 ml condensed milk
25 ml vegetable oil (such as sunflower oil or canola oil)
40 ml pandan juice
2 to 3 drops of pandan paste / pandan essence, optional
320 gm peppermint lotus paste (or any other filling you like!)
2 Tbsp cooked glutinous rice flour, for coating

Method
1. In a large mixing bowl, combine glutinous rice flour, rice flour, wheat flour and sugar well.

IMG_9228

2. Mix milk, condensed milk, pandan juice and oil together. Pour into the flour mixture and stir to combine. Drain through a fine sieve into a large and shallow pan.

IMG_9229
3. Steam the batter in a wok over medium-high heat, for about 15 to 20 minutes. Try a bit of the dough. If it doesn’t have any raw flour taste, it’s cooked through. Remove from wok and let it cool down.

IMG_9230
4. Scrape the dough out onto a plastic board or a kitchen benchtop lined with plastic film. Lightly knead by hand until smooth. Cut dough into 16 portions, 30 grams of each.

5. Divide mung bean filling into 16 portions, 20 grams of each. Roll each into a round shape.

6. Wrap each filling ball with a dough portion. Roll with your palms and lightly coat with cooked glutinous rice flour. Shake off any excess flour. Place into a mooncake mould. Press to print the pattern. Repeat this step until finish all the dough and fillings. Store the mooncakes into an air-tight container. Put kitchen paper on top to prevent any condensed water dropped on the mooncake surface. Refrigerate overnight. Enjoy.

IMG_0586

Notes (Christine’s)
– How to prepare cooked glutinous rice flour: Simply cook the flour in a frypan without any oil over medium-low heat, stirring occasionally. When smoke releases and the flour turns light yellow, it’s cooked. Remove from the heat and let it cool down completely. Then you can use it to coat your mooncakes.

– When the dough is still hot, it seems to be quite oily. Don’t worry. It won’t be greasy at all, when it cools down completely.

– The snow skin mooncakes can be stored in freezer up to a few weeks. Before serving, just transfer the mooncakes to fridge for about 3 hours, until they become soften a bit.

IMG_0587

Impressions

I used a peppermint lotus paste for this recipe which I kindly received from a family friend in Malaysia. It had quite an interesting flavour to it but I’m not quite sure if it would be too many peoples’ liking.

For this recipe I used a bit more pandan essence as when I tasted the mixture, it was almost non existant but YMMV. I found I could only make 10 mooncakes with this recipe, I’m uncertain if it’s because the mixture evaporated or Christine used smaller moulds. I thought these were quite small anyway.

Eaten fresh, these mooncakes are soft with a bit of bite to them but once left out in the open for sometime they seem to harden up. I’m unsure if that’s just normal with these snow skin mooncakes because I’ve tried a Hong Kong variation which is stored in the fridge that was very soft to the touch and absolutely delicious (Mango flavoured).  I’ll probably try a different recipe next time but these turned out relatively so it’s not a bad recipe by any means.

La Belle Miette Macarons

IMG_0593


I never actually got a chance to visit La Belle Miette on Hardware Lane in the city since my work place is so far out. Luckily, they had a pop-up store in Chadstone Shopping Centre before Christmas. I believe it’s still there but I’m unsure as I haven’t ventured to Chadstone SC for a few months.

I’ve heard good reviews about their macarons so it seemed like a great opportunity to give these ones a try. At the pop-up store, they had quite a number of flavours, I think around 15. Some of your standard like Vanilla and Hazelnut but some very interesting ones which you’ll see below.

IMG_9239


Here we have the Raspberry flavoured macaron, it was pleasant tasting as it had a slight tanginess to the filling with a crispy and soft inside. Nothing too out of the ordinary though. Luxbites Raspberry macaron I felt was way more flavourful and had a very nice zing (probably due to the fresh raspberries).

IMG_9237


Here’s where it gets interesting, La Belle Miette’s Bastille has a  Moet et Chandon and Blackcurrant filling which was absolutely delicious. You can really taste the champagne in the cream, and my golly do I love it. The blackcurrant jelly adds texture and berry sweetness which is delightful to eat.

IMG_9236


La Belle Miette calls this one the Mariage Freres Earl Grey Chocolate and the tea flavour is strong in this one. If you like that slightly musty tea leaves taste (Earl Grey basically) you will definitely like this one. The chocolate isn’t too sweetness, I think they use dark chocolate or a higher percentage cocoa which in my opinion is preferable. I never really like milk chocolate all that much.

IMG_9235


For something a little more tropical, they have a Mango and Coconut macaron, I found the mango tasted a bit artificial but I would think they would use real mangos to make the filling. So I’m not sure why it tasted a a bit off. This coconut flavour was quite nice, it complements the mango well. A tad pina colada so it’s not really to my liking.

IMG_9234


While I was tasting this I was like what am I eating? Several minutes later, ding! POMEGRANATE. They call this Pimm’s & Pomegranate and I don’t really know what to think of it. It certainly isn’t too sweet, it has that fruity flavour but over than that I wasn’t too overly excited by it.

Impressions

I say La Belle Miette macarons are one of the better ones around. I do really enjoy the variety of macarons and that Moet macaron, although is pricier then the rest is one of my favourite macarons ever. Give them a try because they are bite sized punches of flavour.

La Belle Miette on Urbanspoon

La Belle Miette

Melbourne CBD

30 Hardware Lane
Melbourne VIC 3000

Chadstone Shopping Centre

Malvern East VIC 3145 (Next to Seed/Sass & Bide)

Luxbites

IMG_0557

I heard so many good things about LuxBite that I had to force myself (not too hard, obviously) to make my way to their South Yarra location. LuxBite serves primarily sweet desserts and confectionary, but they also serve coffee, breakfast and lunch too! What makes LuxBite slightly different is that they have a slight Asian influenced to some of their desserts, for example one of their macarons has a Kaya filling. Kaya is a Malaysian term for Coconut Jam and homemade Kaya is absolutely delicious.

Their store is quite close by to South Yarra station, so it makes it convenient for those without cars or car-averse.

IMG_9164

In the above picture, hopefully you can see their selection of macaron flavours. There are your popular flavours such as Salted Caramel and Hazelnut have more interesting flavours like Rose and Ribena Lemonade.

IMG_9166

Their store has quite a number of sweet delights to choose from, with many having that French flair ala Elcairs as shown at the bottom of the image.

IMG_9165

It was really hard to choose a couple of desserts to try because they have so many on offer! We were still heading towards the city for the day so I couldn’t choose anything that needed to go to the fridge quickly so that helped.

As shown above, we chose the Chocolate Hazelnut Macaron. It’s this plus sized macaron with chunks of hazelnut pieces and a hazelnut and chocolate ganache. I quite enjoyed the macaron, it’s as you would want from a macaron. Crispy, slightly chewy and sweet. The hazelnut flavour of the chocolate and nuts really helped blend everything together. A real treat.

IMG_0559

We chose the interesting Lemonade Ribeena and Kaya Toast macarons. The Kaya Toast macaron has kaya as it’s filling. I think it’s homemade, but their kaya was unfortunately too sweet for my liking. I would even have preferred the Kaya jam jars you can buy from an Asian grocer with pandan. Even that jam is less sweet. For those that haven’t tried Kaya before may like it though but for me it lacked the coconut flavour and was way too sweet to be enjoyable.

The Lemonade Ribena on the otherhand was very interesting. It has this cream based lemonade flavour filling but inside there is what I believe (or remember) a small Ribena jelly cube. The Ribena jelly was delicious and made that macaron one of my favourites because it had such a pleasant flavour and was different to things I’ve tried before.

IMG_0554

Last on my list was LuxBite’s Lychee Raspberry Macaron. I love all things Lychee too so I couldn’t help to be intrigued by a Lychee and Raspberry Macaron, plus it looked amazing.

Inside this macaron, there is a whole lychee, but the salmon pink filling as you can see in the image was also slightly Lychee flavoured. The combination of the sweetness of Lychee along with the sourness of the icing sugar dusted Raspberries worked a treat. It melded together really well as the freshness of the Raspberries cut through that sweetness of basically everything else. A joy to eat.

Impressions

LuxBite impresses with its well crafted pieces that look amazing and taste great too. It’s no wonder people keep coming back for more. I really do recommend giving LuxBite a try.

LuxBite on Urbanspoon

LuxBite (Menu)

38 Toorak Road
South Yarra VIC 3141

Lemon Macarons

DSC00309

 I love lemons and when I make something new, if there is a way to add lemons to it I will. I made Lemon Macarons with Lemon Curd and they turned out quite well if I don’t say so myself. I remember making macarons again and again but never could get those damned feet until I switched to the Italian Meringue method. This was my only success with French Meringue. Check out the recipe from Tartelette Blog with the Lemon Curd recipe from Taste.com.au.

Lemon Macarons (Tartelette Blog) with Lemon Curd

French Meringue Macarons

Ingredients

Makes 50 to 60 shells, for 25 to 30 filled macarons.
2¾ cups (8.8 ounces/250 grams) almond flour
2¾ cups (12.4 ounces/350 grams)
powdered sugar
1 cup egg whites (from 7 or 8 eggs),
at room temperature
Pinch of salt
2 teaspoons powdered egg whites, if weather is humid
¾ cup (5.3 ounces/150 grams) superfine granulated sugar
5 to 7 drops gel paste food coloring (optional) (I used 2 teaspoons lemon zest instead)

Method

1. Preheat the oven to 300°F (325°F for a non-convection oven) 150°C, and line your baking sheets with parchment paper.

2. Blend the almond flour with the powdered sugar in your food processor to make a fine powder (or sift together, discarding any large crumbs and adding a bit more almond flour and powdered sugar as needed to compensate). Then sift the mixture through a strainer until it is as fine as you can get it. This keeps crumbs from forming on the macaron tops as they bake.

3. With the wire whip attachment on the electric mixer, beat the egg whites with the salt and the powdered egg whites (if you are using them), starting slowly and then increasing speed as the whites start to rise. Add the granulated sugar and the food coloring. Beat until the egg whites form stiff peaks and your meringue is firm and shiny.

4. Pour the beaten egg whites onto your almond flour mixture and gently fold them in, using a rubber spatula. Move your spatula from the bottom of the bowl to the edges with one hand, using your other hand to rotate the bowl. Now slap the sides of the bowl until the batter falls in a wide ribbon when you raise your spatula. When you can’t see any crumbs of almond flour and the mixture is shiny and flowing, you are ready to start piping.
The French have a special word—macaronner—to describe the physical action of mixing all the ingredients for macarons. This has to be done by hand. You cannot do it with your mixer—you must be able to feel the consistency of the macaron batter.

5.  Fit your pastry bag with a number 8 tip and fill with batter. Start by squeezing out a small amount of mix onto a parchment-lined baking sheet to form a 2½-inch circle. Be sure to leave 1 inch of space between macarons so they will not touch each other while they bake.
If the peak that forms on the top of the macaron does not disappear after piping, it means the batter could have been beaten a little more. Tap the baking sheet on the tabletop, making sure to hold the parchment paper in place with your thumbs.
Let the piped macarons rest for 15 minutes.

6. Bake for 14 minutes at 300°F/ 150°C. After the first 5 minutes, open the oven door briefly to let the steam out.
Let the macarons cool completely on a rack before taking them off the parchment paper. Press the bottom of a cooled baked macaron shell with your finger; it should be soft. If the bottom of the shell is hard, reduce the baking time for the rest of your macarons from 14 minutes to 13 minutes.
Using a pastry bag requires some practice. It may seem awkward at first, but you’ll soon get the hang of it.

Prepare the bag (if it hasn’t been used before) by cutting about 2 inches off the narrow end—just enough so that when you insert a number 8 decorating tip, about a third of the tip extends outside the bag. Push the tip firmly in place and spoon in your filling, leaving enough room at the top to twist the bag shut. It is best to fill the bag with half of the batter at a time, that way it is not too heavy. To make it easier to fill your pastry bag, place it upright in an empty jar or other straight-sided container. This will help steady the bag while you fill it with batter.
Squeezing the bag slowly, pipe each macaron shell out in a single dollop. Lift the bag quickly to finish.

Lemon Curd (Taste.com.au)
Ingredients
2 eggs, plus 2 egg yolks
3/4 cup (165g) caster sugar (Half sugar to 80g)
1/3 cup (80g) chilled unsalted butter
Zest and juice of 2 lemons

Method
1. Whisk whole eggs, yolks and sugar in a saucepan until smooth, then place pan over a low heat.
2. Add the butter, juice and zest and whisk continuously until thickened. Strain through a sieve into a sterilised jar. Lemon curd keeps, covered, in the fridge for 2 weeks.

Impressions

This was the first time I made macarons and they came out with feet! I don’t know what happened with the proportions for the shell because I recall reducing the icing sugar to half but it ended up extremely sweet anyway! Maybe I didn’t reduce the sugar at all haha. I loved the lemon curd, it was perfectly sweet and sour with that lemon aftertaste tang. Lovely.

Ganache Chocolate – Hazelnut Fan Slice

IMG_0552

I’ve already reviewed Gânache Chocolate Macarons, now it’s time to try their cakes. Well… cake (no s) for the time being. One step at a time!

I bought the above pictured cake at their Collins Street, Melbourne CBD store. I heard from a few friends that their Passionfruit cake is pretty darn good but I was instantly drawn to their Hazelnut Fan Slice aka Hazelnut Mousse Cake. Being a fan of both Hazelnut for its tasty nutty flavour, and mousse as it’s so soft, light and delicate it seemed like a fantastic combination with chocolate.

Their mousse cake has a couple of layers as your can see. The bottom layer is this biscuit base that has elements of nuts mixed through it, I found it to be absolutely delicious. They call it a sponge but I usually identify sponge as light and fluffy, but this seemed more like biscuit to me.

The next layer is a hazelnut praline, which is basically soft hazelnut chocolate that’s similar in texture to Nutella. Hazelnut overload yet? I think not!

Apparently there is a layer of Paillete feuilletine, which I have had no experience in tasting nor could I recall eating it but it was there…I think.

The next layer, more like huge chunk, is the chocolate mousse which was beautifully light and melts in your mouth instantly. It’s what I’d call a perfect mousse.

The top layer is a chocolate glaze that is so soft and tasty, it really just blends well altogether. As edible decoration on top, we have a tempered chocolate curl that has that fantastic snap required. To finish the whole dessert off, there is hazelnut pieces to complete the Hazelnut cake.

Impressions

I’ve got to hand it to them, they really know how to create a cake for Hazelnut and Chocolate lovers. It’s almost as if this dessert was made just for me!

The mousse along with that strong hazelnut flavour really creates this pleasant not too overly sweet treat. Of course it’s sweet, but it’s not sickly sweet. Now I’m really tempted to try their Mango/Passionfruit cake for a less rich option.

Ganache Chocolate on Urbanspoon

Gânache Chocolate

245 Collins St
Melbourne VIC 3000

Vulcano Gelato

IMG_0128

In Rye, across from the pier, there are a couple of ice-cream stores ready to fulfil your sweet desires. Cold Rock Ice-Creamery is one of the notable stores, but appears Vulcano Gelato has won the hearts (and mouths) of many visitors and locals alike.

You can see droves of people entering this very pink store but when looking in the other ice-cream stores, they are almost bare. I’ve taken some pics of the range of flavours below. Take a look!

IMG_0130

Vulcano Gelato serves a great variety of gelato and ice-cream flavours, most are your standard flavours you’ll find amongst most gelato stores.

IMG_0129

IMG_0132

In this picture, you can see their own flavour, aptly called Vulcano. I didn’t get a chance to try it but it appears to be a choc full and looks likes devilishly rich.

IMG_0131

As you can see there are your nice chocolate flavours, yogurt, mango, coffee etc.

IMG_0133

I tried their Hazelnut and Pistachio flavours, being a nut flavoured ice-cream fan myself. Their Hazelnut one was quite nice, it definitely reminds me of Ferroro Rocher flavours like you’ll find in Il Dolce Freddo in Carlton.

To be honest it was nice, but really nothing too special about it. I’ve read reviews of Vulcano Gelato and it definitely is a favourite for most. Maybe I chose the wrong flavours. I’ll definitely give it another try if I’m ever in Rye again. Of course, any ice-cream is fantastic in a warm day. Well, even in cold weather gelato works a treat to brighten any day!

Vulcano Gelato on Urbanspoon

Vulcano Gelato
2387 Point Nepean Road
Rye Vic 3941
T: 03 5985 1800

Queen Vic Market Cake Shop – Macarons

IMG_5651

If you have ever visited Queen Victoria Market’s Food Hall, I bet you would have come across this store. They have a wide selection of colourful macarons that definitely look enticing enough to eat.

This Cake Store also has a variety of other sweet snacks and desserts to satisfy those sweet tooth cravings.
IMG_5658

I tried their Chocolate Macaron, and shell is slightly too crunchy without that nice chew that Macarons usually have. The filling was quite nice though, but Chocolate anything is usually good.
IMG_5659

I really can’t remember what this one was but the Chocolate Ganache filling was probably a bit too sweet for my liking.
IMG_5657

This Vanilla Macaron was actually pretty nice. Again the shells aren’t really my favourite as they are slightly too high and airy.
IMG_5656

I think this one was Coffee, and that was probably one of my favourite one. The coffee flavour had a good bitterness to it which offset some of the sweetness so it makes it much more pleasant to eat.

Overall, their macarons were a slight letdown. I much prefer Le Petit Gateau’s Macarons to be honest even though they don’t have a wide variety of macarons.

I haven’t tried any of the other Cake Shop offerings but they do seem tempting!

Queen Victoria Market Cake Shop

155 Victoria St
Melbourne Victoria 3000

Gânache Chocolate Macarons

IMG_5368

I’m just such a sucker for macarons. I just love how creative people can be with them and the many different flavours and combinations that can be made with them. I recently came across Gânache Chocolate on Collins St, close to the corner of Collins and Swanston. I didn’t get to try their chocolates, and their cakes look really appetising but I wasn’t in the mood at the time. I think they only recently opened and by recently as in within a year but I can’t be too sure.

Macarons, however, I will always snap up that opportunity. There were 6 flavours to choose from but I can’t really remember them all that well. From memory, there was Passionfruit, Hazelnut, Coffee, Chocolate, Vanilla and Blueberry variations.

IMG_5369

IMG_5371

I picked up the Passionfruit, Hazelnut and Coffee and they all had quite a good taste and texture and just how I like them to be.

The Passionfruit Macaron, I’d prefer a jam of sorts for the filling but of course, I was at a chocolatier, and what else are they famous for? It was still really fresh and just had a nice balance between the creamy texture of the chocolate with the crunch and chewiness of the shell.

Similarly, the hazelnut and coffee ones were just as good and being know for their chocolates, of course the chocolate taste would stand out! Definitely one of the better servings in the CBD.

I’m going to go see their cakes and chocolates next time I’m around there so be on the look out for that post in the future.

Ganache Chocolate on Urbanspoon
Gânache Chocolate

245 Collins St,
Melbourne, VIC 3000
Tel/Fax: 03 9650 8388

Mon – Thurs: 8am – 8pm
Fri: 8am – 10pm
Sat: 9am – 10pm
Sun: 9am – 6pm

They also have a store in South Yarra, check out their website for details on the address of that one.

Little Cupcakes

IMG_5365

Little Cupcakes is a famous Melbourne bakery, dedicated to cupcakes, as expected by its name. It’s been on Postcards, and it definitely has gathered quite a following for those wanting a cute and celebratory birthday cake in the form of cupcakes. Located in one of Melbourne’s most popular laneways, Degraves St, and close to Flinders St station, it is conveniently located and that just might be a bad thing as you’ll definitely be coming back for more.

One of the best things about Little Cupcakes, is its tiny bite sized cupcakes, that are almost too pretty to eat. Almost.

This bakery has a wide selection of flavours, ranging from the decadent chocolate cakes, to the lighter lemon and vanilla cupcakes, and for those veggie lovers, a carrot cake.
IMG_5373
IMG_5396
IMG_5385

This one above was the Mocha (I believe), and I must say I was pleasantly surprised by the cupcake itself. The icing on top for me anyway was a tad too sweet but it had had a nice hint of coffee, I would have liked it to have a bigger punch though. What I absolutely loved about the chocolate mud cake cupcakes, is how moist they are. It’s not too heavy, it’s fluffy and just nicely melts in your mouth without the dryness of most mud cakes I’ve eaten.
IMG_5386

The Lemon cupcake, is a classic butter cake with a lemon frosting. I must admit, I’m a fan of all things lemon flavoured, but it has to taste like a lemon with the sweet, acidity and sourness that a lemon is. So it’s always disappointing to have a lemon frosting reduced to pure sugary sweetness, and makes the lemon taste almost fake. Unfortunately, this was what it was like, and the butter cake was quite dry too so it wasn’t a great one to be honest. I do hope I just got a bad egg.
IMG_5387

The Cream Latte one is quite similar to the Mocha cupcake, and again the cake is just so moist. It’s really quite the delicious tasting experience, topped with a nice coffe and cream frosting. It’s just a pleasant cupcake to eat.
IMG_5388

I love my cookies and cream ice cream, and so I was hoping the taste of that would translate into a nice frosting. Was slightly disappointed it lacked the creaminess and cookie crunch of cookies and cream, and lacked a bit of that flavour too. It was mostly sweet, but again the cake was deliciously moist.
IMG_5389

This buttercake may have been from the same batch as the lemon one, the strawberry frosting on the other hand, was quite pleasant and you could taste an authentic strawberry flavour so even if the cake was dry, it was made up nicely by the sugary creaminess of the frosting.
IMG_5391

This was a Belgian Chocolate cupcake, with a moist chocolate cake and topped with a dark belgian chocolate frosting. It was quite good to be honest. Usually I’m not a fan of chocolate on chocolate desserts as it’s just a chocolate overload but the frosting wasn’t overly sweet, it had a nice smooth and silky texture and taste to it. Plus it had an excellent moist cake base, so it was a real winner.
IMG_5393

I saved the best for last. This Red Velvet cupcake, consists of a cocoa butter cake with a cream cheese frosting, and my oh my was this good. As you probably noticed, I’m not a real fan of just sugar overload, I do like balance and this Red Velvet little cupcake delivers.

The cake itself was moist, maybe not as moist as the chocolate counterparts but definitely nicer then the butter cakes on offer. It wasn’t too sweet either, and the cream cheese frosting was just pure goodness. It also wasn’t half as sweet as the frostings on the other cupcakes I tried, it had a nice creaminess to it and was just what I wanted in a cupcake. A cupcake that isn’t too sweet, moist, and has a nice texture and taste to boot. It also looked great. I definitely would go back for these, and they seemed quite popular too as when we went there, we took the last one available.

Little Cupcakes on Urbanspoon
Little Cupcakes

Shop 7 Degraves St
Melbourne
VIC 3000
03 9077 0413

Mon-Fri 8.30am – 5.30pm
Sat-Sun 9.30am – 5.30pm

There are also stores on William St and Queen St (Closed on weekends), check out their website for further details.