Orange Chiffon Cake

IMG_5914

After baking my first Pandan Chiffon Cake, we decided to try baking the Orange Chiffon Cake. Usually Pandan and Orange and they two popular versions in Melbourne. I’m really not sure of many other versions, I’ve seen someone do a Black Sesame one but haven’t had a chance to try that yet.

The difference between the Pandan and Orange Chiffon Cake recipes is the Orange version tastes much lighter because  of the use of coconut milk in the Pandan recipe which makes it slightly more dense. Without further adieu here is my mother’s recipe which works a treat!

Orange Chiffon Cake
Ingredients

8 egg whites
100 g sugar
1/2 tsp cream of tartar

8 egg yolks
60 g sugar

180 g self-raising flour (or 160 g plain flour and 20g cornflour)

1/2 tsp salt
1 1/4 tsp baking powder

120ml vegetable oil/corn oil
80ml orange juice

1 tsp orange extract

Method
1. Preheat oven to 160/170 degrees Celsius.
2. Sieve the flour, salt and baking powder into a medium sized bowl.
3. Add the vegetable oil, orange juice, orange extract, egg yolks and sugar into the dry ingredients and mix until just combined.
4. Whip the egg whites and once it starts to bubble add the cream of tartar.
5. Keep whipping until the mixture is nearing soft peaks, then slowly add the sugar with the electric mixer is still running and until hard peaks form.

IMG_5891
6. Add 1/3 of the meringue into the wet mixture until the thick mixture softens. Then slowly add in the rest of the meringue until just combined. Do not overmix!
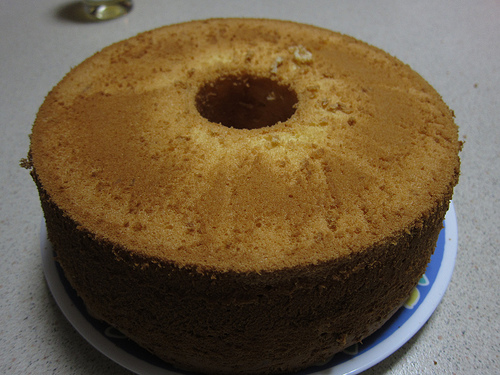
7. Pour into the cake pan (one made for upside down cakes – it has a hole in the middle)
8. Place in the oven for 30/40 minutes. If the top of your cake gets brown too quickly, lower the oven temperature to around 150. To see if it’s done, you can use a skewer and poke it through the middle. If it comes out clean, it’s done.

IMG_5898
9. Remove from the oven when done, and flip it upside. If the cake as risen higher than the cake pan’s height, use a mug and rest the middle cylinder on top.

IMG_5940
IMG_5904
10. Allow the cake to cool until room temperature.

IMG_5916

Here’s how it looks inside!

IMG_5951

I find that you’ll always have a slight depression and density at the bottom because of the meringue cooling. You’ll be hard pressed to find a Chiffon cake that doesn’t sink a bit so don’t worry if yours does. It’s fine!

IMG_5949

Impressions

I find the Orange Chiffon Cake to be extremely light, but full of orange flavour. The orange juice really adds the much needed freshness and flavour. It really will depend on the oranges and how ripe they are but a little bit of orange extract is good just in case the orange juice doesn’t do its job.

Using a stand mixer really makes a difference to a hand mixer. I find the hand mixer either overbeats the meringue, or doesn’t evenly beat the egg whites. Maybe it’s just my poor hand mixing but with a stand mixer and especially a planetary mixer, you get hard peaks extremely quickly and without much fuss. The key in making a good Chiffon Cake is obtain hard peaks and carefully mix it in with the batter but just enough. Once you’ve tried it a couple of times, you’ll know how hard/gentle to mix and after that it really does become easy to make.

If you love light, fluffy cakes  and you don’t want a buttery aftertaste, Chiffon Cakes are excellent for your cake fix.

Homemade Sauté Apple Tart

IMG_6686

This Apple Tart is really quite delicious, I’ve taken it from this recipe book called Patisserie by Leonard J Hanneman. The shortcrust pastry is actually quite easy to make and comes out great too. The recipe is broken into three parts but all are manageable and not out of anyone’s experience.  I recommend baking the shortcrust pastry first, then Apple Saute, and lastly the almond filling because the filling doesn’t require it to be cooled to room temperature.

Checkout the recipe I’ve used below: (The changes I made to the recipe are in brackets and italics)

Sweet Shortcrust Dough (123 Pastry)
Yield: 650 g pastry

Ingredients
200 g unsalted butter
100 g caster sugar (50 g sugar)
50 g egg (1 x 55 g egg)
300 g plain flour
pinch of salt

Method
1. Cream the butter and sugar lightly, using the paddle attachment.
2. Add the egg and continue creaming until absorbed.
3. Carefully fold in the flour and salt, mixing only until combined. The dough will be very sticky, and more like a biscuit paste. Wrap in plastic and chill prior to use.
4. Cut the chilled dough into manageable sized pieces, knead lightly first to soften, then roll out using dusting flour.

How to Blind Bake
1. Take a chilled pastry case. For a quicker chill, the freezer works wonders.
2. Place a piece of non-stick baking paper into the pastry case, then line it with foil, pressing the foil flush with the base of the pastry case and up the sides.
3. Fill with baking weights of beans, ensuring that the weights press up along the sides to support the walls. There can be fewer weights over the centre of the pastry. It is important to have sufficient weights to support the sides as it is the sides that will slump as the pastry heats during the baking process.
4. Blind bake the pastry at 170°C for 30 to 60 minutes depending on the thickness and the size of the cases.

IMG_6696

Here is the apple tart recipe below (and a slice of the tart above):

Sauté Apple Tart

Yield: 1 x 28 cm tart lined with 123 pastry, prebaked

Ingredients
6 apples, Granny Smith or Golden Delicious
60 g unsalted butter (Cooking margarine)
1 x 28 x 2cm or 2 x 16 x 2cm tart cases lined with sweet shortcrust and blind baked
1 vanilla bean, split and scraped or 1 teaspoon of cinnamon (1/2 tsp cinnamon and 1/2 tsp of vanilla extract)
60 g sugar (30 g sugar)
almond filling (below)

Method
1. Peel and core the apples; cut into 8 wedges
2. Melt the unsalted butter and add the vanilla pod (or cinnamon). Over high heat saute the apples in the butter and sprinkle over the sugar. Toss as they cook to a golden brown, though still firm. Do not overcook. Set aside to cool.

Almond Filling

Ingredients
80 g unsalted butter
60 g sugar (30 g)
120 g almond meal
100 g egg (2 x 55 g eggs)

Method
1. Cream the butter, sugar and almond meal, add the eggs and continue mixing until absorbed and the mixture is light and pale.
2. Spread the almond filling into the pre-baked and cold shortcrust shell/s.
3. Nestle the cool saute apples into the almond filling, wedges facing upward rather than fanned, to create height.
4. Bake at 170C for 50 minutes. Serve hot or at room temperature.

Impressions

I like this recipe because the shortcrust is nicely short and has a nice bite to it but overall it melts in your mouth like it should. The almond meal adds this grainy texture to the overall tart, however if you don’t like this more ‘whole wheat’ kinda taste then you can try food processing the almond meal a few times, and maybe sieve it as well so it comes out much finer.

Overall it’s a good recipe that is easy enough to make, the only trouble you may have is with rolling out the pastry dough in a warm environment. It can get soft and unmanageable very easily. So if it does become too soft when you start rolling it flat and trying to place it into the case, either place it in the fridge or freezer to let it harden up a bit and try again.

Whole Wheat Ginger Snaps

DSC00160

Ginger snaps or even ginger cookies are one of my favourite little treats. It’s quite funny though since I have a strong dislike for ginger in general, whether it’s raw, in a stir fry, congee, steamed fish etc. I found this recipe on Allrecipes.com a few Christmas’s ago and have made it a couple times now and I like it because it feels ‘healthier’ even though wholemeal/wheat flour isn’t really all that much better for you considering the other ingredients in these cookies. I’ve made a few changes as I didn’t have a few of the ingredients and to make it less sugary sweet.

Whole Wheat Ginger Snaps (Allrecipes)

Prep Time: 10 Minutes

Cook Time: 15 Minutes

Makes: 5 dozen (60 cookies)

Ingredients

1 cup butter or margarine (Slightly less)
3/4 cup white sugar (Caster sugar)
2 eggs, beaten
1 cup molasses (Slightly less)
4 cups whole wheat flour (Wholemeal flour)
1/2 tablespoon baking soda
2 teaspoons baking powder
1 tablespoon ground ginger
1 1/2 teaspoons ground cinnamon
Extra sugar for the topping


Method

1. Preheat the oven to 175 degrees Celsius. Grease cookie sheets.

2. In a large bowl, cream together the butter and 1 1/2 cups of sugar until smooth. Mix in the eggs, and then the molasses. Combine the whole wheat flour, baking soda, baking powder, ginger, and  cinnamon. Stir the dry ingredients into the molasses mixture just until blended.

3. Roll the dough into small balls, and dip the top of each ball into the remaining white sugar. Place the cookies about 2 inches apart on the cookie sheets.

4. Bake for 10 to 15 minutes in the preheated oven, until the tops are cracked. Bake longer for crispy cookies, less time for chewy cookies. Cool on wire racks.


Impressions:

I like this recipe because these cookies are nice and crunchy and you get a nice cinnamon and ginger taste that isn’t particularly overpowering. These cookies aren’t like your usual ginger snaps that are wafer thin and ‘melts-in-the-mouth’ since it doesn’t contain icing sugar and it has wholemeal flour for that grainy texture.

Just a warning though, the cookie dough is extremely sticky because of the molasses so it’s quite difficult to shape but somehow they all turned out round.

Homemade Pizza

IMG_6652

One of things I’ve realised from making a nice tasty homemade pizza is that it doesn’t really come cheap! Unless you make huge batches it won’t necessarily be budget friendly but of course this depends on the ingredients you use. On the plus side these pizzas were worlds apart from the fast food pizzas such as Dominos. They really can’t compare to a homemade pizza at all.

IMG_6641

I’ve taken this recipe from Jamie Oliver‘s website, which I believe is in the Jamie At Home cookbook, and I have now made pizza a couple of times with this recipe so for me, it works quite well, and is very easy to do. Here is the recipe I’ve used below.

Makes 6 to 8 medium-sized thin pizza bases

Ingredients

1kg strong white bread flour or Tipo ‘00’ flour
or 800g strong white bread flour or Tipo ‘00’ flour, plus 200g finely ground semolina flour
1 level tablespoon fine sea salt
2 x 7g sachets of dried yeast
1 tablespoon golden caster sugar
4 tablespoons extra virgin olive oil
650ml lukewarm water

Method

1. Sieve the flour/s and salt on to a clean work surface and make a well in the middle.

2. In a jug, mix the yeast, sugar and olive oil into the water and leave for a few minutes, then pour into the well. Using a fork, bring the flour in gradually from the sides and swirl it into the liquid. Keep mixing, drawing larger amounts of flour in, and when it all starts to come together, work the rest of the flour in with your clean, flour-dusted hands. Knead until you have a smooth, springy dough.

3. Place the ball of dough in a large flour-dusted bowl and flour the top of it. Cover the bowl with a damp cloth and place in a warm room for about an hour until the dough has doubled in size.

4. Now remove the dough to a flour-dusted surface and knead it around a bit to push the air out with your hands – this is called knocking back the dough. You can either use it immediately, or keep it, wrapped in clingfilm, in the fridge (or freezer) until required. If using straight away, divide the dough up into as many little balls as you want to make pizzas – this amount of dough is enough to make about six to eight medium pizzas.

5. Timing-wise, it’s a good idea to roll the pizzas out about 15 to 20 minutes before you want to cook them. Don’t roll them out and leave them hanging around for a few hours, though – if you are working in advance like this it’s better to leave your dough, covered with clingfilm, in the fridge. However, if you want to get them rolled out so there’s one less thing to do when your guests are round, simply roll the dough out into rough circles, about 0.5cm thick, and place them on slightly larger pieces of olive-oil-rubbed and flour-dusted tinfoil. You can then stack the pizzas, cover them with clingfilm, and pop them into the fridge. (I made the doughs in the morning and let them sit in a warm area for most of the day so it could rise to it’s maximum size)

IMG_6642

With these pizzas the toppings are all up to you and the beauty of it all is you can add as little or as much as your want!

I halved the above recipe and used semolina and it made two large(ish) sized pizzas so you can take that into consideration. I’ve listed the ingredients I’ve used below.

Pizza Tomato Base (I’ve used Leggos, but anything is fine)
Capsicum
Mushroom
Jalapenos (From Woolworths are absolutely amazing on a pizza – be warned though they are not that cheap!)
Pizza Cheese (Cheddar/Mozarella mix)
Chorizo
Pancetta
Hot Salami

Here is a recipe from Taste.com.au which you can use to go by for oven temperature and general how to.

Cooking Time
20 minutes

Ingredients (serves 4)

4 pita pockets
2 tbs tomato tapenade (see note)
125g chorizo sausage, thinly sliced
60g (1/3 cup) bought roasted capsicum, drained, thinly sliced
100g baby bocconcini, drained, halved
40g (1/2 cup) shredded parmesan
50g baby rocket leaves

Method

1. Preheat oven to 200°C.

2. Place the pita pockets on a large baking tray. Spread with the tomato tapenade. Top with the chorizo, capsicum and bocconcini. Sprinkle with the parmesan.
3. Bake in oven for 10 minutes or until the parmesan melts and the base is light brown and crisp.

Notes
If tomato tapenade is unavailable, use tomato paste. Shopping tip: Look for tomato tapenade and bottled roasted capsicum, sometimes called fire-roasted peeled peppers, in the antipasto section at Woolworths, near the olives. Swap it: For a different flavour, swap the tomato tapenade for bought basil pesto and swap the chorizo sausage for coarsely chopped ham slices.

IMG_6643
IMG_6647

Impressions

I really liked the Jamie Oliver pizza dough recipe, it works wonders. However to be honest, I haven’t tried any others when this one worked well for me. It has a nice crunch on the outside and it lovely and soft inside, plus if you cook it long enough the base crisps nicely and it is just fantastic.

Basically you leave it in the oven at roughly 200 degrees fan forced if you have ingredients that don’t need much cooking (or really none at all). If you do have toppings that may need to be cooked, please pre-cook them to be safe, and so the dough is well cooked while the toppings aren’t overly over cooked.

It’s a great recipe that I’ll be using more regularly from now on!

Pad Thai

IMG_5474

There is just something about Thai food that I love. I think it’s probably how well balanced their food seems to be. It has this perfect blend of sweet, sour, salt and spice. Pad Thai is a rice noodles stir fry that incorporates the many commonly used Thai ingredients such as tamarind paste, fish sauce and chilli along with a mix of eggs, preserved turnip, nuts, tofu and shrimp.

I’ve used the SBS Food’s Pad Thai Recipe and made slight changes to my preferences.

Pad Thai

Ingredients

Sauce
100g tamarind in block form
300ml warm water
200g palm sugar
50g caster sugar
150ml Thai seasoning sauce

Other ingredients 
Large green prawns, heads and shells removed (allow 2-3 per person)
10g dried shrimp
¼ red onion, sliced
40g hard tofu, sliced
40g preserved turnip
2 eggs
200g rice noodles, soaked in warm water for 30 minutes
Garlic chives
Bean sprouts
Fried shallots
Roasted peanuts, chopped
Dried chilli
Lime wedges

Preparation

1. Soak the tamarind in warm water, kneading with your fingers to separate the pulp from the seeds. Squeeze out liquid, strain and pour into a frying pan or wok. Add palm sugar, caster sugar and seasoning sauce. Bring to the boil and boil until it has reduced and is syrupy.

2. Fry prawns until they curl and change colour. Add dried shrimp, red onion, tofu and preserved turnip. Push contents of pan to one side and add egg, breaking up just a little as it cooks.

3. Add drained noodles, 2 tablespoon of water, the tamarind sauce, garlic chives and a few bean sprouts, fried shallots, chopped peanuts and chilli.

4. Pile into a serving bowl and garnish with more fried shallots, bean sprouts, a wedge of lime, garlic chives and crushed peanuts.

Note:
The amount of sauce added to the Pad Thai can be adjusted according to how strong a flavour you like. Usually this quantity of sauce is fine for 4 people. Any unused sauce can be kept in a clean jar in the refrigerator.

Impressions:
I quite liked this recipe, it’s quite easy to make actually, and I actually used a lot of the sauce because we used the whole packet of rice noodles (Much larger than 200g). I have a slight dislike of all things coriander so I’ve neglected to add it here, but I can see how it can make this dish a bit more refreshing with coriander added to it.
I think I also may have added too much dried shrimp so the Pad Thai ended up having a strong shrimp taste, but it still tasted nice and light. It tasted similar to what I’ve eaten at Thai restaurants but I can’t really tell whether or not it’s truly authentic or not but it tastes great so that’s all that matters to me!


Pineapple Tarts

IMG_6557

Pineapple Tarts are one of my favourite Chinese New Year treats. That’s not to say you can’t have it any other time of year but these bite sized pieces are even more joyous in times of celebration. I’ve always loved the sweet and slightly sour pineapple filling with the buttery dough that melts in your mouth. Also these tarts come it various sizes or shapes that always makes it more appealing.

Probably every year we try those home made Pineapple Tarts sold in your typical local Asian Grocer and it’s always a tad too sweet and the tart isn’t as soft as I would have liked. So I have wanted to try to make my own tarts for ages but the thought of making the filling just seemed like too much effort.

However, It just so happened we ended up having large, old pineapples sitting around so what else could we use it for but pineapple jam? My mother was the one wh  actually  made the jam, just from adding pineapples into a pot and letting it dry up and adding sugar so I don’t know the exact quantities she used, I think just tasting as she went along and added sugar when needed. However, I’ve provided a recipe from one of my favourite Asian/Malaysian Food websites, Rasa Malaysia for the filling and pastry. We did use the pastry recipe from there and I think it worked out quite well, you can read my impressions further down.

Rasa Malaysia’s Pineapple Tart Recipe

Pineapple Filling

Ingredients:

4 large pineapples
300 g sugar
1 clove
1 inch cinnamon stick
1/2 star anise
250 g liquid glucose
2 Tbsp wheat flour or wheat starch (Tung Mein Fun)

Method:

1. Slice and grate pineapples till fine. You can use a food processor do grate it.
2. Strain the grated pineapple till dry.
3. Let it simmer in a wok toll the juice has dry up. Add sugar and, star anise, cinnamon stick and clove.
4. Stir till the pineapple has thickened and dry. Add maltose or liquid glucose.
5. Stir till the pineapple filling is thick, sticky and dry.
6. Add wheat flour. Continue to stir for about 10 minutes or until filling is dry.
7. Leave to cool and shape into small balls.

Note : You can make the filling in advance and refrigerate it.

Pastry

Ingredients:

500 g butter
140 g powdered sugar
4 egg yolks
650 g all purpose flour
1 Tbsp cornflour
2 tsp baking powder
1 tsp vanilla essence

Egg Brush

1 egg yolk plus 1Tbsp water

Method:

  1. Preheat oven at 150° C.
  2. Cream butter and sugar till white.
  3. Add in egg yolks and beat at low speed for 1 minute.
  4. Fold in flour gradually.
  5. Insert pastry into cookie press and press into strip of about 3 inch each. (Or just take a small spoonful of the pastry,  flatten it and take another spoonful of the jam and use your hands to shape it into a ball)
  6. Put the rolled pineapple filling onto the pastry and roll it up.
  7. Brush with egg brush.
  8. Bake for 30 minutes or when tarts is light golden brown in color.

IMG_6551

IMG_6556

You can shape these tarts any way you want, and as mentioned in the Rasa Malaysia recipe, they roll it up like a sausage roll of sorts. We stuck to the ball method and just used a fork or a toothpick to engrave the lines on to make it look more like a pineapple.

You can also use a mold designed for these tarts and they come in various shapes like a flower or hearts. I’ve purchase one from Brown Cookie but for since this particular dough is quite soft it gets quite difficult to remove from the mold.

Impressions

The pastry recipe is surprisingly very good as just how I like it! It’s soft and simply melts in your mouth as you take a bite. I’ve actually made this a number of times since my mother had made an enormous quantity of pineapple jam.

It really does depend on how you like your pineapple tarts, some like the shortbread style tarts that are slightly harder and crisper but I’m a big fan of these softer tarts. If you’re like me and prefer these ones, this is a great recipe to try.

Marion’s Kitchen Thai Green Curry

IMG_5834

Masterchef’s Marion has her own selection of Thai meals you can cook up easily.

The one I attempted to cook was her Thai Green Curry. What I liked about what’s in the box, is how much is packed in!

1 x Marion’s Kitchen Thai Green Curry pack, includes:

  • Green Curry Paste
  • Coconut Milk
  • Dried Thai Herbs & Chilli
  • Fish Sauce
  • Bamboo Shoots

IMG_5827

You basically just need your choice of protein and whatever vegetables you like! I’ve added chicken, eggplant and long beans. I also love that it comes with delicious bamboo shoots which are one of my favourite things to add to a Thai Green Curry, and to any stir fry. It’s just that good.

Method (from Marion’s Kitchen, and on the box)

1. Heat oil over medium heat and fry the Green Curry Paste for about a minute

2. Now’s the time to pour in the creamy Coconut Milk and 1 cup of water.  Tip – if you want to make your curry less spicy, you can add an extra ½ cup water here.

3. Then add  the packet of Dried Herbs & Chilli (leave the chilli out if you want a mild curry or chop it up if you want a spicier curry).  Now add the fish sauce and wait for the curry to start simmering again.

4. Open up those tasty Bamboo Shoots, drain away the liquid and add the shoots into the curry.  Now add your chicken (substitute your protein) and vegetables and simmer for about 2 minutes or until the chicken is just cooked through.  Serve with steamed rice.
IMG_5840I’ve got to say it tasted pretty darn good, not too creamy, just enough spice and packed full of flavour. Although their pack is kinda on the pricier side compared to those Malaysian/Singaporean Prima packs.

It has it’s own coconut milk, herbs and bamboo shoots (which are quite expensive all things considering) so it still is value for money.

I would definitely use this if I wanted to cook up a quick and easy Thai Green Curry, and it basically has everything you need!


Red Velvet Cupcakes

IMG_6457

My sister gave me a link to a Red Velvet Cupcake recipe from Amy’s Food Adventures, in which she has adapted her recipe from the Food Network Canada. Apparently, I’m her guinea pig for recipes she finds. We had a gathering coming up and I thought, why the hey.

I had Red Velvet cupcakes a couple of times, the most famous one being Magnolia’s in New York and that was pretty darn good actually.

I was pretty interested in this recipe because it lacks butter, I’m assuming that’s the case with all Red Velvet cupcakes but I was keen to try it out after I realised that.

IMG_6338

This recipe uses a lot of red food colouring. A bit more than half of the food colouring bottle to give it that vibrant red colour.IMG_6455


I made a couple of tweaks to the recipe to my liking, with **. With the icing, I found it to bit a tad plain, so I added more lemon juice and zest to it to give it a really nice freshness to the whole cupcake and icing. The icing was pretty much a trial and error so I can’t remember the exact measurements, but if you want it slightly more lemony just keep adding some more juice until you feel it’s right.

Preparation time: 15 minutes

Cooking time: 25 minutes
Yield: 24

Ingredients
Red Velvet Cupcakes
2 eggs
1 1/2 cups of sugar (375 ml) *3/4 cup to 1 cup*
1 1/2 cups canola oil (375 ml)
1 cup of plain yogurt (250 ml)
2 tablespoons red food coloring (30 ml)
1 teaspoon vinegar (5 ml)
1 teaspoon vanilla extract (5 ml)
2 1/2 cups of flour (625 ml) *plain flour for cakes*
1 tablespoon cocoa (15 ml)
1 teaspoon baking soda (5 ml)
1 teaspoon salt (5 ml)
Icing
2 cups mascarpone (500 ml) *can use cream cheese too*
1 cup icing sugar, sifted (250 ml) *1/2 cup to 3/4 cup*
1/2 cup 35% cream (125 ml)
Zest of 1 lemon and *lemon juice*

Directions

Red Velvet Cupcakes
Preheat oven to 350 °F (180 °C).
In a food processor, mix the eggs with the sugar, oil, yoghurt, food coloring, vinegar and vanilla. Add flour, cocoa, baking soda and salt. Blend until just incorporated.
Place cupcake papers into a muffin pan, divide the batter in the cupcake papers, pour only halfway so batter doesn’t overflow, and bake, rotating half way through, for 25 to 30 minutes. Remove and let cool.
Icing
In a bowl, beat the mascarpone, icing sugar, cream and lemon zests together until the mixture is smooth.
Spoon a dollop of mascarpone cream on the cupcakes. *I piped mine onto the cupcakes so if the icing mixture is a bit too running or soft to pipe, just place it in the freezer or fridge until it hardens up a bit.*


IMG_6404
IMG_6407
IMG_6451I was extremely happy with this recipe. The cake was so moist. My first batch of small ones were a bit undercooked so it was a bit more ‘redder’ then I would have liked, but it tasted great. My second batch in the oven was slightly darker and looked great. This recipe is definitely a keeper.


Chocolate Souffle

DSC00372

I’ve always wanted to eat souffle, and when we went to the Conservatory at Crown, their chocolate souffles were quite the popular dessert so I didn’t have a chance to taste it.

So at last, I tried making it myself. I found this recipe on Taste.com.au, and it’s the basic run of the mill type of recipe but since I had never made it before and it didn’t require that many eggs I chose this one

Chocolate Souffle (Taste.com.au)
Preparation Time
20 minutes

Cooking Time
20 minutes

Ingredients (serves 6)
Melted butter, to grease
4 1/2 tbscaster sugar
60g butter
2 tbs plain flour
160ml (2/3 cup) milk
210g good-quality dark chocolate, chopped
3 eggs, separated
125ml (1/2 cup) thin cream
2 tbs brown sugar
1 tsp vanilla essence
Icing sugar, to dust

Method
1. Preheat oven to 180°C. Brush six 160ml (2/3-cup) ovenproof souffle dishes with melted butter to grease (using upward strokes on side). Sprinkle the inside with 1 1/2 tablespoons of caster sugar, shake out any excess.

2. Melt 30g of the butter in a saucepan over medium heat. Add flour and use a wooden spoon to stir for 1 minute or until mixture is smooth and begins to bubble. Remove from heat, gradually add milk, stirring until smooth and combined. Return to medium heat, stir until mixture thickens and comes to the boil. Boil for 1 minute, stirring. Remove from heat.

3. Stir in 125g of the chocolate and remaining caster sugar until combined. Transfer to a bowl. Add egg yolks and stir until well combined.

4. Use an electric beater to whisk egg whites in a clean, dry bowl until firm peaks form. Use a metal spoon to fold one-third of the egg whites into chocolate mixture. Fold in remaining egg whites until just combined.

5. Spoon the mixture evenly into prepared dishes. Place on a baking tray. Bake in preheated oven for 15-20 minutes or until well risen.

6. Meanwhile: combine remaining chocolate, remaining butter, brown sugar, cream and vanilla essence in a saucepan over low heat. Cook, stirring, for 2 minutes or until chocolate melts and mixture is well combined. Simmer, uncovered, for 1 minute. Remove from heat. Place in a jug.

7. To serve, place ramekins on plates. Dust with icing sugar. Use a spoon to make a hole in top of each souffle, pour in a little chocolate sauce.

Impressions:
I found it to be quite nice and moist on my first tasting, but I wasn’t too sure if I was doing it right since they seemed to sink after taking it out of the oven. You also kinda need to serve them all hot and fresh out of the oven otherwise it just doesn’t retain that moistness. Unless I was just doing it all wrong. I don’t know

Chocolate Mousse Torte

IMG_5309

I found this recipe in one of Coles free food magazines. It looked like a really nice mousse and I guess that’s how they get you! By having attractive and delicious looking pictures. I commend their photographer for making it look delectable.

I made a couple of alterations to the recipe. I substituted the Oreo cookies with just a packet of Arnott’s Chocolate cookies and 250g of Dark Chocolate. I also reduced the sugar to around half as well, and with the top layer I reduced the butter by just half and I used Crunchy Peanut Butter.

IMG_5306

Here is the recipe below;
Chocolate Mousse Torte
Prep Time: 40 minutes
Cook Time: 10 minutes
Serves 10

Chilling Overnight
150 g Oreo Cookies
40 g butter melted
250 g Coles Milk Chocolate chopped
50 g dark chocolate chopped
½ cup thickened cream

Chilling Overnight
4 Coles Free Range Eggs separated
10 g sachet powdered gelatine
¼ cup boiling water

Chilling Overnight
¾ cup caster sugar
small Easter eggs and white chocolate curls to decorate

Ganache Topping
¾ cup dark chocolate melts
½ cup Coles Smooth Peanut Butter (see tip)
40 g butter chopped

Method
1. Line base of 20cm springform pan with plastic wrap. Spray sides of pan with cooking oil and line with baking paper.

2. Place cookies in a food processor. Process until crushed. Add butter and process until combined. Press into base of prepared pan and refrigerate while preparing filling.

3. Melt milk and dark chocolate in a heatproof bowl over a pan of gently simmering water until smooth. Remove from heat and stir in cream. Whisk in egg yolks. Whisk together gelatine and boiling water until gelatine dissolves. Add to chocolate mixture and mix to combine.

4. Using an electric mixer, beat egg whites until soft peaks form. Add sugar, 1 tbsp at a time, beating constantly until thick and glossy. Carefully fold into chocolate mixture until just combined. Pour over biscuit base. Refrigerate overnight until firm.

5. To make ganache topping, combine chocolate, peanut butter, butter and ½ cup of water in a small saucepan. Stir on low heat until chocolate has melted and mixture is smooth. Set aside to cool completely.

6. Pour ganache evenly over top of mousse and refrigerate for 2 hrs, or until ganache is firm. Unmould cake and place on a serving plate. Decorate with Easter eggs and choc curls.

Tip: You can replace the peanut butter in the Ganache ingredients with ½ cup cream and then omit the water added in the method.

IMG_5317
IMG_5315
Impressions
While the torte was pretty easy to make, I wasn’t too fond of the top layer. Either I over heated the chocolate or I probably should have used the correct amount of butter because it wasn’t as smooth as I would have liked. Also the nuts probably may have made a slight impact on the texture too.

The bottom layer wasn’t as rich and tasty as a Oreo base would have been, it didn’t taste like those cookies you find in a Cookies & Cream ice-cream or the bottom of ice-cream cakes. I was just confused on whether the filling of those Oreos were to be processed too so I opted for a different brand.

The mousse of the other hand, was light and fluffy. It was moist and smooth, and nicely aerated. So I deemed the whole cake a success because the mousse was just how I wanted it. Maybe my cake base was too big for the mixture, but I’d also prefer a higher mousse filling so maybe If were to make it another time, I’d use a smaller base.