Mango and Vanilla Pannacotta

IMG_0206

I’m not sure how I came around to liking Panna Cotta’s, it’s probably Masterchef Australia but making a great Panna Cotta that is silky smooth, not too sweet but just enough richness is something I’ve been seeking in a recipe. I’ve made Vanilla Panna Cotta before but I’ve always been fascinated by mango jelly with Vanilla Panna Cotta. I found this recipe on Kothiyavunu.com and it looked great and panna cotta’s don’t take toooo much time, and it’s usually easy enough to make too so I had to try it out.

Mango and Vanilla Panna Cotta (Kothiyavunu.com)

Preparation Time : 10 minutes + Setting Time : 3-4 hrs
Cooking Time : 15 minutes
Serves : 4

Ingredients

Panna Cotta
Heavy Cream : 1 cup /240 ml (Or thickened cream)
Sugar : 1 tbsp /15 grms (or to your taste)
Milk/Half & Half : 1 cup /240 ml
Unflavored Gelatin : 1 packet /11/2 tsp
Honey : 1/3 cup /80 ml
Pure Vanilla Extract : 1 tsp

Mango Jelly
Mango Puree : 1 cup / 240 ml
Sugar : 1/4 cup /60 grms (or to your taste) – I used 1/8 cup
Cool Water : 3 tbsp/45 ml
Unflavored Gelatin : 1 packet /11/2 tsp

Method

Panna Cotta

1. Pour 1/2 cup of the milk into a bowl and sprinkle the gelatin over. Let stand until gelatin has softened, about 5 minutes.

2. Meanwhile, in a small saucepan combine remaining cup of milk, cream, honey, sugar,and bring to a simmer over medium. Heat until all the sugar and honey have dissolved 5-7 minutes. Remove from heat and stir in the the vanilla extract. Watch the nix carefully as it is prone to splitting.

3. Now add and mix the gelatin until it is completely dissolved and allow the mixture come down to room temperature.

4. Pour into the serving bowls/glass as desired, cover with plastic wraps and refrigerate at least 2-4 hours or until set.

IMG_0202

Mango Jelly

1. Sprinkle gelatin over cool water.

2. Pour mango puree and sugar in a small saucepan and simmer until sugar has dissolved.

3. Now mix the gelatin into the mango mixture and stir until gelatin has dissolved.

IMG_0203

4. Remove from heat and allow to cool; pour it over the frozen panna cotta.

5. Allow to set it in a refrigerator for 3 to 4 hours until set.

IMG_0204


Impressions

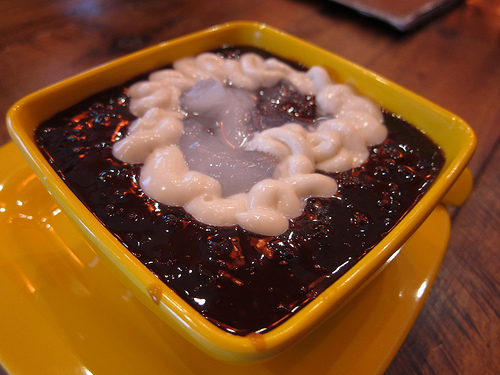
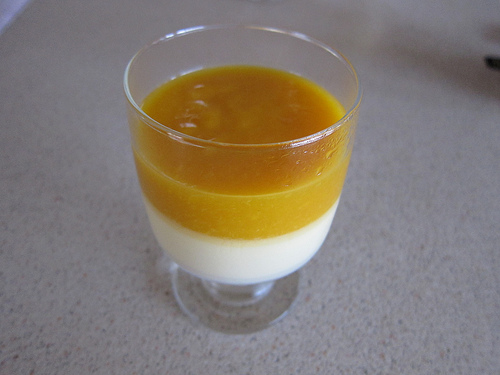
I think I made the worst mistake when cooking the panna cotta mix. I split the cream. Once it set, I realised that my thickened cream split into three layers! I tried scooping some of the fat from the top out (slightly yellow tinged) to make as “normal” as I could. The recipe wasn’t at fault though, I just left it on the stove too long and let it bubble/boil.

The mango jelly was easy to make, using the same kind of method as with the panna cotta mix and luckily I couldn’t have split that too!

The overall result was still quite decent. The panna cotta came out slightly grainy due to my neglect but flavour wise I couldn’t be happier. However, I found the use of thickened cream/heavy cream to be too dense for my liking. I’m not sure if using the standard cream would be harder to set but it didn’t seem as light as I would have liked. Other then that I enjoyed eating it and that’s as best of compliment I can give.

Pandan Snow Skin Mini Mooncakes with Peppermint Lotus Paste and Pumpkin Seeds

IMG_0585


Mooncake Festival is one of those Chinese traditions, where you eat a considerable amount of mooncake to celebrate well, a full moon. There are a number of Chinese festivals and it’s hard to keep track of them all but the Mooncake festival is one of those bigger occasions other than Chinese New Year. Lately I’ve become fond of the “snow skin” mooncakes and staying away from those traditional mooncakes which are golden brown in colour and have a wonderful fragrance to it. It’s probably due to my affection for mochi. We decided to give this a try using Christine’s Recipe. Check it out below

Pandan Snow Skin Mooncakes with Coconut Mung Bean Filling (Christine’s Recipes)
Prep time: 15 mins
Cook time: 60 mins
Yield: 16 mini mooncakes (50 grams each)

Ingredients
55 gm glutinous rice flour
45 gm rice flour
25 gm wheat flour / wheat starch
60 gm caster sugar
190 ml milk
30 ml condensed milk
25 ml vegetable oil (such as sunflower oil or canola oil)
40 ml pandan juice
2 to 3 drops of pandan paste / pandan essence, optional
320 gm peppermint lotus paste (or any other filling you like!)
2 Tbsp cooked glutinous rice flour, for coating

Method
1. In a large mixing bowl, combine glutinous rice flour, rice flour, wheat flour and sugar well.

IMG_9228

2. Mix milk, condensed milk, pandan juice and oil together. Pour into the flour mixture and stir to combine. Drain through a fine sieve into a large and shallow pan.

IMG_9229
3. Steam the batter in a wok over medium-high heat, for about 15 to 20 minutes. Try a bit of the dough. If it doesn’t have any raw flour taste, it’s cooked through. Remove from wok and let it cool down.

IMG_9230
4. Scrape the dough out onto a plastic board or a kitchen benchtop lined with plastic film. Lightly knead by hand until smooth. Cut dough into 16 portions, 30 grams of each.

5. Divide mung bean filling into 16 portions, 20 grams of each. Roll each into a round shape.

6. Wrap each filling ball with a dough portion. Roll with your palms and lightly coat with cooked glutinous rice flour. Shake off any excess flour. Place into a mooncake mould. Press to print the pattern. Repeat this step until finish all the dough and fillings. Store the mooncakes into an air-tight container. Put kitchen paper on top to prevent any condensed water dropped on the mooncake surface. Refrigerate overnight. Enjoy.

IMG_0586

Notes (Christine’s)
– How to prepare cooked glutinous rice flour: Simply cook the flour in a frypan without any oil over medium-low heat, stirring occasionally. When smoke releases and the flour turns light yellow, it’s cooked. Remove from the heat and let it cool down completely. Then you can use it to coat your mooncakes.

– When the dough is still hot, it seems to be quite oily. Don’t worry. It won’t be greasy at all, when it cools down completely.

– The snow skin mooncakes can be stored in freezer up to a few weeks. Before serving, just transfer the mooncakes to fridge for about 3 hours, until they become soften a bit.

IMG_0587

Impressions

I used a peppermint lotus paste for this recipe which I kindly received from a family friend in Malaysia. It had quite an interesting flavour to it but I’m not quite sure if it would be too many peoples’ liking.

For this recipe I used a bit more pandan essence as when I tasted the mixture, it was almost non existant but YMMV. I found I could only make 10 mooncakes with this recipe, I’m uncertain if it’s because the mixture evaporated or Christine used smaller moulds. I thought these were quite small anyway.

Eaten fresh, these mooncakes are soft with a bit of bite to them but once left out in the open for sometime they seem to harden up. I’m unsure if that’s just normal with these snow skin mooncakes because I’ve tried a Hong Kong variation which is stored in the fridge that was very soft to the touch and absolutely delicious (Mango flavoured).  I’ll probably try a different recipe next time but these turned out relatively so it’s not a bad recipe by any means.

Luxbites

IMG_0557

I heard so many good things about LuxBite that I had to force myself (not too hard, obviously) to make my way to their South Yarra location. LuxBite serves primarily sweet desserts and confectionary, but they also serve coffee, breakfast and lunch too! What makes LuxBite slightly different is that they have a slight Asian influenced to some of their desserts, for example one of their macarons has a Kaya filling. Kaya is a Malaysian term for Coconut Jam and homemade Kaya is absolutely delicious.

Their store is quite close by to South Yarra station, so it makes it convenient for those without cars or car-averse.

IMG_9164

In the above picture, hopefully you can see their selection of macaron flavours. There are your popular flavours such as Salted Caramel and Hazelnut have more interesting flavours like Rose and Ribena Lemonade.

IMG_9166

Their store has quite a number of sweet delights to choose from, with many having that French flair ala Elcairs as shown at the bottom of the image.

IMG_9165

It was really hard to choose a couple of desserts to try because they have so many on offer! We were still heading towards the city for the day so I couldn’t choose anything that needed to go to the fridge quickly so that helped.

As shown above, we chose the Chocolate Hazelnut Macaron. It’s this plus sized macaron with chunks of hazelnut pieces and a hazelnut and chocolate ganache. I quite enjoyed the macaron, it’s as you would want from a macaron. Crispy, slightly chewy and sweet. The hazelnut flavour of the chocolate and nuts really helped blend everything together. A real treat.

IMG_0559

We chose the interesting Lemonade Ribeena and Kaya Toast macarons. The Kaya Toast macaron has kaya as it’s filling. I think it’s homemade, but their kaya was unfortunately too sweet for my liking. I would even have preferred the Kaya jam jars you can buy from an Asian grocer with pandan. Even that jam is less sweet. For those that haven’t tried Kaya before may like it though but for me it lacked the coconut flavour and was way too sweet to be enjoyable.

The Lemonade Ribena on the otherhand was very interesting. It has this cream based lemonade flavour filling but inside there is what I believe (or remember) a small Ribena jelly cube. The Ribena jelly was delicious and made that macaron one of my favourites because it had such a pleasant flavour and was different to things I’ve tried before.

IMG_0554

Last on my list was LuxBite’s Lychee Raspberry Macaron. I love all things Lychee too so I couldn’t help to be intrigued by a Lychee and Raspberry Macaron, plus it looked amazing.

Inside this macaron, there is a whole lychee, but the salmon pink filling as you can see in the image was also slightly Lychee flavoured. The combination of the sweetness of Lychee along with the sourness of the icing sugar dusted Raspberries worked a treat. It melded together really well as the freshness of the Raspberries cut through that sweetness of basically everything else. A joy to eat.

Impressions

LuxBite impresses with its well crafted pieces that look amazing and taste great too. It’s no wonder people keep coming back for more. I really do recommend giving LuxBite a try.

LuxBite on Urbanspoon

LuxBite (Menu)

38 Toorak Road
South Yarra VIC 3141

Lemon Macarons

DSC00309

 I love lemons and when I make something new, if there is a way to add lemons to it I will. I made Lemon Macarons with Lemon Curd and they turned out quite well if I don’t say so myself. I remember making macarons again and again but never could get those damned feet until I switched to the Italian Meringue method. This was my only success with French Meringue. Check out the recipe from Tartelette Blog with the Lemon Curd recipe from Taste.com.au.

Lemon Macarons (Tartelette Blog) with Lemon Curd

French Meringue Macarons

Ingredients

Makes 50 to 60 shells, for 25 to 30 filled macarons.
2¾ cups (8.8 ounces/250 grams) almond flour
2¾ cups (12.4 ounces/350 grams)
powdered sugar
1 cup egg whites (from 7 or 8 eggs),
at room temperature
Pinch of salt
2 teaspoons powdered egg whites, if weather is humid
¾ cup (5.3 ounces/150 grams) superfine granulated sugar
5 to 7 drops gel paste food coloring (optional) (I used 2 teaspoons lemon zest instead)

Method

1. Preheat the oven to 300°F (325°F for a non-convection oven) 150°C, and line your baking sheets with parchment paper.

2. Blend the almond flour with the powdered sugar in your food processor to make a fine powder (or sift together, discarding any large crumbs and adding a bit more almond flour and powdered sugar as needed to compensate). Then sift the mixture through a strainer until it is as fine as you can get it. This keeps crumbs from forming on the macaron tops as they bake.

3. With the wire whip attachment on the electric mixer, beat the egg whites with the salt and the powdered egg whites (if you are using them), starting slowly and then increasing speed as the whites start to rise. Add the granulated sugar and the food coloring. Beat until the egg whites form stiff peaks and your meringue is firm and shiny.

4. Pour the beaten egg whites onto your almond flour mixture and gently fold them in, using a rubber spatula. Move your spatula from the bottom of the bowl to the edges with one hand, using your other hand to rotate the bowl. Now slap the sides of the bowl until the batter falls in a wide ribbon when you raise your spatula. When you can’t see any crumbs of almond flour and the mixture is shiny and flowing, you are ready to start piping.
The French have a special word—macaronner—to describe the physical action of mixing all the ingredients for macarons. This has to be done by hand. You cannot do it with your mixer—you must be able to feel the consistency of the macaron batter.

5.  Fit your pastry bag with a number 8 tip and fill with batter. Start by squeezing out a small amount of mix onto a parchment-lined baking sheet to form a 2½-inch circle. Be sure to leave 1 inch of space between macarons so they will not touch each other while they bake.
If the peak that forms on the top of the macaron does not disappear after piping, it means the batter could have been beaten a little more. Tap the baking sheet on the tabletop, making sure to hold the parchment paper in place with your thumbs.
Let the piped macarons rest for 15 minutes.

6. Bake for 14 minutes at 300°F/ 150°C. After the first 5 minutes, open the oven door briefly to let the steam out.
Let the macarons cool completely on a rack before taking them off the parchment paper. Press the bottom of a cooled baked macaron shell with your finger; it should be soft. If the bottom of the shell is hard, reduce the baking time for the rest of your macarons from 14 minutes to 13 minutes.
Using a pastry bag requires some practice. It may seem awkward at first, but you’ll soon get the hang of it.

Prepare the bag (if it hasn’t been used before) by cutting about 2 inches off the narrow end—just enough so that when you insert a number 8 decorating tip, about a third of the tip extends outside the bag. Push the tip firmly in place and spoon in your filling, leaving enough room at the top to twist the bag shut. It is best to fill the bag with half of the batter at a time, that way it is not too heavy. To make it easier to fill your pastry bag, place it upright in an empty jar or other straight-sided container. This will help steady the bag while you fill it with batter.
Squeezing the bag slowly, pipe each macaron shell out in a single dollop. Lift the bag quickly to finish.

Lemon Curd (Taste.com.au)
Ingredients
2 eggs, plus 2 egg yolks
3/4 cup (165g) caster sugar (Half sugar to 80g)
1/3 cup (80g) chilled unsalted butter
Zest and juice of 2 lemons

Method
1. Whisk whole eggs, yolks and sugar in a saucepan until smooth, then place pan over a low heat.
2. Add the butter, juice and zest and whisk continuously until thickened. Strain through a sieve into a sterilised jar. Lemon curd keeps, covered, in the fridge for 2 weeks.

Impressions

This was the first time I made macarons and they came out with feet! I don’t know what happened with the proportions for the shell because I recall reducing the icing sugar to half but it ended up extremely sweet anyway! Maybe I didn’t reduce the sugar at all haha. I loved the lemon curd, it was perfectly sweet and sour with that lemon aftertaste tang. Lovely.

Ganache Chocolate – Hazelnut Fan Slice

IMG_0552

I’ve already reviewed Gânache Chocolate Macarons, now it’s time to try their cakes. Well… cake (no s) for the time being. One step at a time!

I bought the above pictured cake at their Collins Street, Melbourne CBD store. I heard from a few friends that their Passionfruit cake is pretty darn good but I was instantly drawn to their Hazelnut Fan Slice aka Hazelnut Mousse Cake. Being a fan of both Hazelnut for its tasty nutty flavour, and mousse as it’s so soft, light and delicate it seemed like a fantastic combination with chocolate.

Their mousse cake has a couple of layers as your can see. The bottom layer is this biscuit base that has elements of nuts mixed through it, I found it to be absolutely delicious. They call it a sponge but I usually identify sponge as light and fluffy, but this seemed more like biscuit to me.

The next layer is a hazelnut praline, which is basically soft hazelnut chocolate that’s similar in texture to Nutella. Hazelnut overload yet? I think not!

Apparently there is a layer of Paillete feuilletine, which I have had no experience in tasting nor could I recall eating it but it was there…I think.

The next layer, more like huge chunk, is the chocolate mousse which was beautifully light and melts in your mouth instantly. It’s what I’d call a perfect mousse.

The top layer is a chocolate glaze that is so soft and tasty, it really just blends well altogether. As edible decoration on top, we have a tempered chocolate curl that has that fantastic snap required. To finish the whole dessert off, there is hazelnut pieces to complete the Hazelnut cake.

Impressions

I’ve got to hand it to them, they really know how to create a cake for Hazelnut and Chocolate lovers. It’s almost as if this dessert was made just for me!

The mousse along with that strong hazelnut flavour really creates this pleasant not too overly sweet treat. Of course it’s sweet, but it’s not sickly sweet. Now I’m really tempted to try their Mango/Passionfruit cake for a less rich option.

Ganache Chocolate on Urbanspoon

Gânache Chocolate

245 Collins St
Melbourne VIC 3000

Chocolate Cocoa Cupcakes

IMG_0545

On our little cupcake baking frenzy, we decided to make some chocolate cupcakes. We found a recipe in the The Crabapple Bakery Cupcake Cookbook by Jennifer Graham, you can buy the recipe book here and check out their website and details on the official website. Their actual cupcakes are quite different to what we’ve decided to make, because we didn’t make the icing/toppings or add the little rock chocolates. However the cupcake itself is the same, apart from reducing the sugar but I’ve listed the entire recipe along with what you need to do for the decorations as they do look quite fancy.

Dinosaur Rock Cupcakes – Chocolate Birthday Cakes

Makes: 24

Ingredients
3 cups plain flour
2 teaspoons bicarb soda
1 teaspoon baking powder
1 teaspoon salt
3 tablespoons instant coffee granules
1 cup hot water
1 cup cocoa
1 cup cold water
200g softened unsalted butter
1 1/2 cups castor sugar
4 eggs
1 tablespoon vanilla extract
Icing sugar for dusting

Method
1. Preheat oven to 170C. Line two 12-hole muffin trays with chocolate-coloured cupcake papers

2. Sift together the flour, bicarb of soda, baking powder and salt. In a separate bowl whisk together the coffee, hot water,and cocoa until you have a smooth paste. Add the cold water and whisk until evenly combined.

3. In a separate bowl, creaming the butter for 1-2 minutes. Add the castor sugar a third at a time, beating for 2 minutes after each addition. After the last addition, beat until the mixture is light and fluffy and the sugar has almost dissolved. Add eggs one at a time, beating for 1 minute after each addition or until mixture is light and fluffy. Add the vanilla extract and beat until combined.

4. Add a quarter of the flour to the creamed mixture and beat on low speed until combined. Add a third of the cocoa mixture and beat until combined. Repeat this process twice more. Add the remaining quarter of the flour and beat until thoroughly combined, do not over-beat as this will toughen the mixture.

5. Spoon mixture into cupcake papers, filling each about three quarters full. To prevent the cupcakes cracking on top, allowing the mixture to sit in the cupcake papers for 20 minutes before baking. Bake for 18-20 minutes or until a fine skewer inserted comes out clean.Remove cupcakes from the trays immediately and cool on a wire rack for 30 minutes before frosting.

6. If you prefer no icing, and for simplicity, just dust some icing sugar over cooled cupcakes. Looks like Christmas!

Decoration
1 quantity Vanilla Buttercream
Food Colouring: Apple-Green, Wilton’s Buttercup Yellow
24 Dinosaur/star candles
Chocolate Sprinkles
Chocolate Rocks

1. Divide the buttercream into two small bowls.Add a couple of drops of apple-green food colouring to one bowl and a couple of drops of yellow to the other. Mix to create even colours.

2. Frost half the cupcakes with the yellow buttercream, add half with the green. Working quickly, before the buttercream dries, top each cupcake with a candle, and decorate with sprinkles and chocolate rocks.

IMG_0544

Impressions

The recipe itself is quite nice, the cupcakes are as light as a butter cupcake can be. I found the taste of chocolate to be very mild, as it only uses cocoa powder. I couldn’t really taste the coffee either, I think it’s because our coffee granules have been oxygenated for too long and it has lost most of its coffee aroma. I think I’d prefer a chocolate cupcake to use actual melted chocolate in its recipe because you can really taste the difference when one uses cocoa or chocolate.

Other than that it’s a simple recipe, but if you went all out with decorations, I’m sure it would have tasted even better.

Dessert Story – Glen Waverley

IMG_9148

Suddenly there are a multitude of Dessert Story stores across Victoria. I don’t know what sparked this craze but this Taiwanese Dessert franchise is everywhere. My first thoughts were DESSERTS YES! MORE PLEASE! However, I was hesitant to try it  gawking at the prices of their desserts. Alas, it seems like it’s the trend here where desserts are almost as expensive as a main meal. So I might as well give up that fight. We tried the outlet in Glen Waverley were it sadly took over Claypot King, one of my favourite Malaysian eateries on Kingsway.

For some reason we tried two variations of red bean desserts. The red bean soup with palm seeds and coconut is quite interesting. I definitely enjoyed the palm seeds, well I like it in any dessert really. The red bean soup here really is a soup, as it’s quite runny. It still retains the red bean skin which gives it an added texture from the smooth and silky toppings of the coconut and palm seed. The flavour of the red bean soup was good, it wasn’t too sweet which is good in my books .

One thing I would prefer was if our hot dessert was actually hot! It came out luke warm, and to top it off, it was an extremely cold day where a steaming hot dessert was sorely needed. All in all, it was decent, the warm nature of the dessert certainly left a cold taste in my mouth though.

IMG_9150

We also tried the Red Bean and Black Sesame dessert, which basically is just one side with red bean soup and the other side with black sesame soup. The soups here are thicker and more akin to those you’d find in Malaysia.  The red bean soup was nice, still having the beans in there for taste, but again it was just warm, borderline reaching room temperature. I’m not sure what goes on in the kitchen  but warming the dish up to a higher temperature certainly wasn’t on their minds. The red bean soup was pleasant, it had a very comforting flavour, bringing me back to the the tastes of Malaysian desserts.

Strangely enough though, the black sesame soup (almost paste like) was super hot. It was a very odd to taste both the red bean and black sesame together and get this mix of hot and cold. A bit off putting to be honest, luckily the black sesame soup was hot enough to make the red bean warm enough. What I loved about the black sesame soup, yes love, was that it was bitter like it should be. Not overloaded with sugar to butt heads with the bitterness, but enough sugar to complement the black sesame. A real joy to eat.

Impressions

The range of desserts at Dessert Story is quite extensive. They have a wide variety of combinations of fruit and ice cold  desserts. With a smaller, yet varied selection of hot desserts. Their execution on this desserts is what was lacking and that, unfortunately, played a huge part in the overall impressions. Had it been hot enough, I’d be in praise mode but with both dishes coming up almost cold, there is really no excuse for that.

Unfortunate mistakes? Yes, definitely. I just hope that it won’t happen again. Give it a go, I dare you. Haha, seriously though, it should be good for a nice treat all things considered.

Dessert Story on Urbanspoon

Dessert Story
72 Kingsway
Glen Waverley VIC 3150


Praline Mud Cake @ Le Petit Gateau

IMG_6700

Le Petit Gateau is still my go to dessert place. Sadly, now that I’m working, it’s challenging to make a trip down there since they close at 5pm on weekdays, and unfortunately don’t open on weekends.

However, it’s most definitely worth the time and effort to make your way here. My first encounter with Le Petit Gateau’s cakes was when my sister bought one to celebrate my mother’s birthday. She has this undying love for the combination of nuts and chocolate. Just like me!

I was so amazed that there was even a cake that had the flavour of Hazelnuts. This Hazelnut Praline Mud Cake was made for us choc+nut lovers.

The mud cake has that nice dense texture, with I believe a sprinkling of thinly chopped nuts through the cake. Although it may be rich, it is certainly delectable.

What makes this cake so beautiful is that silky smooth chocolate icing layer around the cake. Glossy, and it just melts in your mouth. It has such a pleasant hazelnut flavour, that it’s like you’re eating the filling of a Ferrero Rocher again and again, but only better. Absolutely delicious.

The chocolate strip on top is tempered to perfection, with that nice snap when you break it. Those candied almonds and chocolate bits just are the icing on the iced chocolate mud cake.

IMG_6701

It even tasted better when I was greeted with the cake on my own birthday months ago! Happy Birthday to me!

Everyone must at least make a trip to Le Petit Gateau at least once. Their selection of petit (Hehe) cakes will make you salivate. If cakes aren’t your thing, but macarons are? This is the place to visit. I’m not certain if I have mentioned this but their macarons are amazing. One of the best macarons I’ve ever come across in Victoria. Their macaron flavours constantly change, but for those that like a bit of Green Tea, their Green Tea flavoured macarons are delicious. Crisp outer layer, not too airy, and just the right amount of chewiness.

Even just thinking about it, makes me want to go before work (when the shop opens at 7:30am) or taking up my whole lunch hour just to get there and back! To be honest, it would be well worth it.

Le Petit Gateau on Urbanspoon

Le Petit Gateau

458 Little Collins Street
Melbourne VIC 3000

Opening Hours
Monday to Friday, 7:30am-5pm

Tel: 03 9944 8893
fax: 03 9944 8895


Marquee Restaurant

IMG_6990

If it wasn’t for those “Deals” websites, I probably would never dine at Marquee Restaurant. Well, I wouldn’t say never but not in the foreseeable future perhaps. I think I’ve heard of Marquee before, but I seldom ever go to Toorak  so it was never on my list of “must do’s”

However I took up one of those deals where you could order a certain value of food for a discounted price. Marquee offers around four different courses, from Tastings, Entrees, Mains and Desserts. Primarily Marquee Restaurant serves European food, with a large mix of French dishes.

IMG_6993

We first ordered from the Tastings menu with their Roasted Scallops with garlic and truffle butter wrapped in puff pastry. I love scallops, and pastry so this was always going to go down well with me. The scallop was perfectly cook, not tough or chewy at all. It simply melted alway in your mouth, as best as a scallop could do anyway. The garlic and butter add the nice flavour to the dish and with the crunchy and thin pastry on top it works nicely together.

IMG_6992

These little burgers from the Tastings menu are Petit Wagyu Burgers with quail egg, baby beetroot, lettuce and tomato relish. This tiny things were so cute, just look at them! Almost too lovely to eat, almost. I loved these little burgers, they were absolutely delicious, with the ooze from the egg yolk making the burger moist and the wagyu wasn’t try either. I loved it.

IMG_6994

We ordered an entree too, this was the Hand-made crab and salmon raviolo, tomato consommé and baby basil cress. This was a bit disappointing to be honest, the crab and salmon filling in the raviolo was kinda bland and almost tasteless. Even the tomato consomme didn’t help with the flavour. Overall, I couldn’t find many redeeming qualities in this dish at all.

IMG_6997

One of the mains we ordered was the Baby snapper fillet with smoked prawn bisque and grilled prawns. The snapper was nicely cooked, and the spinach had nice tangy flavour. The sauce was quite good, a tad on the salty side though. The seafood was supposed to be the highlight or the centrepiece of the dish, however, the prawns were somehow bland and lacked prawn flavour. Overall, it has some good points but would I order this again? Probably not.

IMG_6998

I’ve always heard good things about Duck and Orange together. So I was so excited to order the Honey glazed duck breast on confit duck leg with chive mash and orange and balsamic jus. This was so good. The duck was amazing, so delicate and soft, just perfectly cooked and just melts away. The orange peel was slightly candied, and added a really nice different taste to the duck. I loved the balsamic jus too, I don’t think I’ve actually ever had jus before but my golly was it strong and tasty. Slightly salty, sweet and all things good. As you may know, I love potatoes, so the mash will always end up on a positive note. Overall, I loved this dish. The duck and the jus made this dish.

IMG_7000

I wanted a lighter dish to end my night at Marquee, so we ordered the Eton mess with strawberries, chantilly cream, smashed meringue, ice cream, strawberry coulis and mint. I quite liked this, the meringue was nice and crunchy but light, and with the strawberry coulis (it’s just a jam) it was tasted quite fresh and summery. The slightly sour strawberries worked well with the sweetness of the coulis and sweet meringue, and the cream added a nice richness but not overpowering. Overall, it was good, but not a “must order” dessert.

Impressions

Marquee Restaurant offers a nice selection of dishes, with plentiful that are tasty and satisfying. Would actually make me want to go there full price now that I’ve tasted their food. If you go to Marquee Restaurant, the duck is a must. I fine the prices to be on average slightly pricey, but I think that’s just the norm with these kind of restaurants. Marquee would now be on my list of places to dine on special occasions so I’m definitely glad to have dined here.

Marquee Restaurant on Urbanspoon

Marquee Restaurant (Menu)
445 Toorak Road
Toorak VIC 3142

Tuesday – Saturday 5pm – late

T: +61 3 9827 7938

Juniors’ Little Fellas Berry Swirls Cheesecake

IMG_6480

I wanted to try these mini baked Cheesecakes from Junior’s, which is a popular Cheesecake store in New York. I hadn’t used this book in a while as I dislike the sponge base, I prefer the biscuit base and most if not all of the recipes in the Junior’s Cheesecake Cookbook: 50 To-Die-For Recipes for New York-Style Cheesecake are in fact sponge based.

I made a Peanut Butter Cheesecake from this book and it turned out quite well, but wasn’t fond of the sponge cake base. I like the crunch and butteriness of the crumbed biscuits. The actual recipe calls for Raspberry puree, but I only had a packet of mixed assorted frozen berries (Raspberries, Blueberries and I think a few Black currents) but works quite well anyway. I’ve left the American measurements as is from the recipe book but added in the commonly used Australian measurements so you don’t have to!

Little Fella Raspberry Swirls

Makes 13 Little Fellas
Ingredients
6 ounces (about 2/3 cup/170g) dry-pack frozen whole raspberries (unsweetened, not in syrup) thawed and drained well
Two 8-ounce packages cream cheese (only full fat) at room temperature (Roughly 450g)
2/3 cup sugar (I reduced it to 1/2 cup)
3 tablespoons cornstarch
1 tablespoon pure vanilla extract
2 extra-large eggs
1/2 cup heavy or whipping cream
13 fresh raspberries (large, pretty ones) (I didn’t have any of these at the time)

Method
1. Preheat the oven to 350 F (176 C). Line 13 standard muffin cups with silicone, foil, parchment or paper lines. (If you have only 12, use a custard cup for the thirteenth one)

2. Pulse the thawed raspberries in your food processor until smooth (you need 1/3 cup of puree). Set aside.

3. Put one package of the cream cheese, 1/3 cup of sugar, and the cornstarch in a large bowl. Beat with an electric mixer on low until creamy, about 3 minutes, scraping down the bowl a few times. Blend in the remaining package of cream cheese. Increase the mixer seed to medium and beat in the remaining 1/3 cup sugar, then the vanilla. Blend in the eggs, one at a time, beating well after adding each one. Beat in the cream just until it’s completely blended. Be careful not to overmix!

IMG_6477

4. Divide the batter among the 13 muffin cups (fill each one almost up to the top). Drop a heaping teaspoon of the raspberry puree in the centre of each cup, pushing it down slightly into each little cake as you go. Using a thin, pointed knife, cut through the batter a few times, just until the raspberry swirls appear (do not mix in the puree completely or the cakes will turn pink and the swirls will disappear).

5. Place the muffin tin in a large shallow pan and pour hot water in until it comes about 1 inch (2.54cm) up the sides of the tin. Bake the cakes until set and the centres are slightly puffy and golden with red raspberry swirls, about 45 minutes. Remove the cakes from the water bath, transfer the tin to a wire rack and let cool for 2 hours. Cover the cakes with a plastic wrap (do not remove from the tin) and put in the freezer until cold, at least 1 hour.

IMG_6495

6. To remove the cakes, lift them out the cups with your hands ad peel off the liners. Place the cakes, top side up, on a serving platter or individual dessert plates. Top each with a raspberry and refrigerate until ready to serve. If there are any cakes left, cover with plastic wrap and store in the refrigerator. Or remove the fresh berries, then wrap and freeze for up to 1 month.

IMG_6496
Impressions

I like this recipe but it sure does take a seemingly long time to get any results.

Letting these babies cool for 2 hours felt like forever since I did it at night, and waiting another 1 hour in the freezer before placing it in the refrigerator for storage. So really what seemed like a short prep time, the waiting can be excruciating if you really had a cheesecake craving that night.

The water bath is a bit troublesome if you’ve never done it before. I also probably didn’t have a high enough pan to place my muffin trays on in order for the water to be high enough to reach 2.5 cm. Mine was probably around 1.5cm at most. So I have a feeling I may have over baked it, as I did leave it in the oven too long.

For that haven’t tried a well done one, you’d still be hard pressed to see any faults. Apart from the sullen appearance. You still get a nice cream cheese flavour, along with a touch of berry flavour. I wish I added more puree to be honest, or maybe my frozen berries weren’t very flavourful so I’ll give it another shot and see how those turn out. Overall, it’s a good recipe, I enjoyed the end results even though I know it wasn’t at all perfect (or even close). It doesn’t have a sponge or biscuit base at all. It’s more like a cheesecake muffin so if the the base is something you can’t live without you could probably add a biscuit base to a separate muffin tray (paper), let it set in the fridge and then once the cheesecakes are cooled, peel it off (if you put it in cups) and just place it on top of the base. I’m sure it’ll add a nice crunchy texture to it all.