Vulcano Gelato

IMG_0128

In Rye, across from the pier, there are a couple of ice-cream stores ready to fulfil your sweet desires. Cold Rock Ice-Creamery is one of the notable stores, but appears Vulcano Gelato has won the hearts (and mouths) of many visitors and locals alike.

You can see droves of people entering this very pink store but when looking in the other ice-cream stores, they are almost bare. I’ve taken some pics of the range of flavours below. Take a look!

IMG_0130

Vulcano Gelato serves a great variety of gelato and ice-cream flavours, most are your standard flavours you’ll find amongst most gelato stores.

IMG_0129

IMG_0132

In this picture, you can see their own flavour, aptly called Vulcano. I didn’t get a chance to try it but it appears to be a choc full and looks likes devilishly rich.

IMG_0131

As you can see there are your nice chocolate flavours, yogurt, mango, coffee etc.

IMG_0133

I tried their Hazelnut and Pistachio flavours, being a nut flavoured ice-cream fan myself. Their Hazelnut one was quite nice, it definitely reminds me of Ferroro Rocher flavours like you’ll find in Il Dolce Freddo in Carlton.

To be honest it was nice, but really nothing too special about it. I’ve read reviews of Vulcano Gelato and it definitely is a favourite for most. Maybe I chose the wrong flavours. I’ll definitely give it another try if I’m ever in Rye again. Of course, any ice-cream is fantastic in a warm day. Well, even in cold weather gelato works a treat to brighten any day!

Vulcano Gelato on Urbanspoon

Vulcano Gelato
2387 Point Nepean Road
Rye Vic 3941
T: 03 5985 1800

Queen Vic Market Cake Shop – Macarons

IMG_5651

If you have ever visited Queen Victoria Market’s Food Hall, I bet you would have come across this store. They have a wide selection of colourful macarons that definitely look enticing enough to eat.

This Cake Store also has a variety of other sweet snacks and desserts to satisfy those sweet tooth cravings.
IMG_5658

I tried their Chocolate Macaron, and shell is slightly too crunchy without that nice chew that Macarons usually have. The filling was quite nice though, but Chocolate anything is usually good.
IMG_5659

I really can’t remember what this one was but the Chocolate Ganache filling was probably a bit too sweet for my liking.
IMG_5657

This Vanilla Macaron was actually pretty nice. Again the shells aren’t really my favourite as they are slightly too high and airy.
IMG_5656

I think this one was Coffee, and that was probably one of my favourite one. The coffee flavour had a good bitterness to it which offset some of the sweetness so it makes it much more pleasant to eat.

Overall, their macarons were a slight letdown. I much prefer Le Petit Gateau’s Macarons to be honest even though they don’t have a wide variety of macarons.

I haven’t tried any of the other Cake Shop offerings but they do seem tempting!

Queen Victoria Market Cake Shop

155 Victoria St
Melbourne Victoria 3000

Green Tea Mochi with Red Bean and Black Sesame

IMG_6912

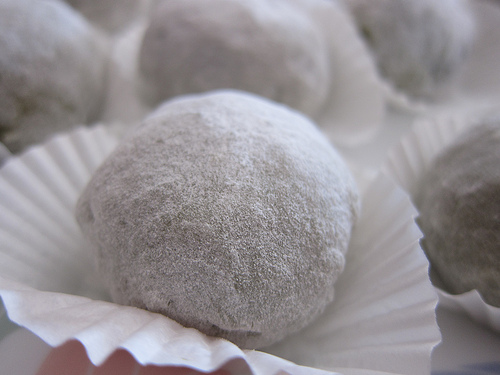
Mochi is a Japanese treat that is made from glutinous rice flour and is usually slightly chewy and soft with an assortment of fillings inside. In most offerings, red bean paste is used. Although more commonly known as a Japanese food, it is known to be popular in other Asian countries with their own twists or variances.

What goes best with red bean? Grean Tea.

I’ve adapted this recipe from Belachan2 and have made my usual  changes to the recipe to suit my own tastes.

Green Tea Mochi with Red Bean Filling
Ingredients
1 cup glutinous rice flour
1/2 tsp. green tea powder (for baking)
150ml water
1 tbs sugar

Red bean paste for filling (Recipe below)
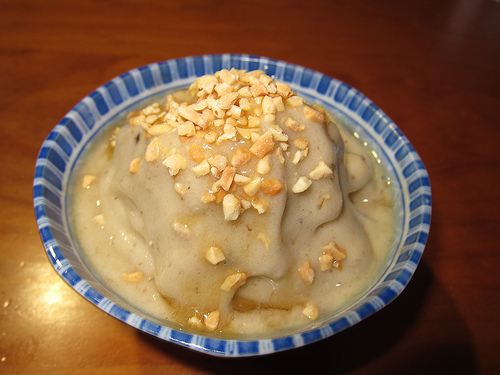
Black sesame paste for filling (Recipe below)

Cornstarch for dusting (microwave cornstarch for 2 mins, let it cool completely before using) – Or you can light heat up the glutinous rice flour in a pan for a couple of minutes (don’t burn) and let it cool to room temperature.

Method

1. In a glass bowl, combine flour, green tea powder and water. Stir to mix well. Then add in the sugar, stir til sugar dissolved.

2. Cover with a plastic wrap and microwave for 2 minutes. Remove and stir well. Return to microwave for another 30 seconds. Stir-well and check for doneness. If not, put it back for another 30 seconds, be careful not to burn it.

3. Flour the working surface with cornstarch and use a spoon to drop a ball of mochi on top and quickly cover it with starch. Divide into 8 or 10 pieces. Wrap the filling inside and cover with more cornstarch. Shape into balls and ready to serve.
IMG_6911

Red Bean Paste (From JustHungry)

Ingredients
2 cups washed azuki beans
3/4 to 1 cup sugar
1/2 tsp sea salt

Method
1. Soak the beans in cold water to cover for 24 hours.

2. Drain the beans and put them in a pot with water to cover. Bring the water to a boil, boil for a minute then drain the beans. Rinse the beans briefly under cold running water and drain again. Put the beans back in the pot with fresh cold water, bring to a boil, then drain and rinse again. This twice-boiling gets rid of much of the surface impurities and makes the an taste cleaner.

3. Put the beans back in the rinsed pot, and add enough water so that it comes up to about 2cm/1 inch above the beans. Bring to a boil, then lower the heat to a low simmer. Add water if it boils away. Skim off any scum on the surface. Cook until the beans are completely cooked and falling apart. Drain the beans, reserving the cooking liquid.

4. Put the pot of beans back on medium-low heat. Add the sugar and salt in 3-4 batches, while stirring with a wooden spoon or spatula to distribute the sugar and salt evenly. When the sugar melts, it will exude moisture, but if it seems a bit too dry or sticking to the pot, add a little of the reserved cooking liquid back in. Continue cooking while stirring occasiontaly, until the sugar is completely melted and absorbed into the beans. This step takes 10-15 minutes.

5. At this point the beans should be soft enough to mash easily with the side of your spatula. You can also use a potato mssher. Turn out onto a plate to let cool.

Rice Cooker Method (not exact)

1. Add around 250g washed azuki beans into a rice cooker
2. Fill the bowl with water until it covers all the beans
3. Let it cook in there for a couple of hours or until the beans start to soften
4. In the middle of cooking in the rice cooker, add sugar (up to you) and add a a couple of pandan leaves for flavour.
5. Once the beans are soft, you can either mash them together with a cooking utensil until smooth. If you want a really fine paste, you’ll probably need to put it through a sieve a couple of items or try a food processor.

Black Sesame Paste (Not exact)
Ingredients
100 g Black Sesame Powder
2 tbs Icing Sugar
1 tbs Butter/Margarine (Soft)

Method

1. Add all the ingredients together, you can use a whisk or a fork to mix until it forms a paste.
2. If it doesn’t mix properly, add slightly more margarine/butter and mix. Similarly, if it isn’t sweet enough for your liking, add more until it suits you.

Impressions

This recipe is fantastic if you like soft and slightly chewy Mochi but my first warning is if you cannot eat them all in the day (how can you not?) then it usually hardens overnight. There are a few recipes that won’t do this but I find them to be more dense and tougher to eat.

My second warning is that, the rice ball after heated up is extremely sticky. So add the flour to your hands, and on the plate/table. You’ll get the hang of it after a couple of tries but flour up each time as otherwise it can be a total disaster when you try putting in the filling. You can always eat the disasters so that’s a plus anyway. This is always my go to recipe and although I said it was tricky, it is a very simple process.

Mochi’s are like the Macarons of the East. The filling and the rice ball is all up to you! Enjoy!

Homemade Sauté Apple Tart

IMG_6686

This Apple Tart is really quite delicious, I’ve taken it from this recipe book called Patisserie by Leonard J Hanneman. The shortcrust pastry is actually quite easy to make and comes out great too. The recipe is broken into three parts but all are manageable and not out of anyone’s experience.  I recommend baking the shortcrust pastry first, then Apple Saute, and lastly the almond filling because the filling doesn’t require it to be cooled to room temperature.

Checkout the recipe I’ve used below: (The changes I made to the recipe are in brackets and italics)

Sweet Shortcrust Dough (123 Pastry)
Yield: 650 g pastry

Ingredients
200 g unsalted butter
100 g caster sugar (50 g sugar)
50 g egg (1 x 55 g egg)
300 g plain flour
pinch of salt

Method
1. Cream the butter and sugar lightly, using the paddle attachment.
2. Add the egg and continue creaming until absorbed.
3. Carefully fold in the flour and salt, mixing only until combined. The dough will be very sticky, and more like a biscuit paste. Wrap in plastic and chill prior to use.
4. Cut the chilled dough into manageable sized pieces, knead lightly first to soften, then roll out using dusting flour.

How to Blind Bake
1. Take a chilled pastry case. For a quicker chill, the freezer works wonders.
2. Place a piece of non-stick baking paper into the pastry case, then line it with foil, pressing the foil flush with the base of the pastry case and up the sides.
3. Fill with baking weights of beans, ensuring that the weights press up along the sides to support the walls. There can be fewer weights over the centre of the pastry. It is important to have sufficient weights to support the sides as it is the sides that will slump as the pastry heats during the baking process.
4. Blind bake the pastry at 170°C for 30 to 60 minutes depending on the thickness and the size of the cases.

IMG_6696

Here is the apple tart recipe below (and a slice of the tart above):

Sauté Apple Tart

Yield: 1 x 28 cm tart lined with 123 pastry, prebaked

Ingredients
6 apples, Granny Smith or Golden Delicious
60 g unsalted butter (Cooking margarine)
1 x 28 x 2cm or 2 x 16 x 2cm tart cases lined with sweet shortcrust and blind baked
1 vanilla bean, split and scraped or 1 teaspoon of cinnamon (1/2 tsp cinnamon and 1/2 tsp of vanilla extract)
60 g sugar (30 g sugar)
almond filling (below)

Method
1. Peel and core the apples; cut into 8 wedges
2. Melt the unsalted butter and add the vanilla pod (or cinnamon). Over high heat saute the apples in the butter and sprinkle over the sugar. Toss as they cook to a golden brown, though still firm. Do not overcook. Set aside to cool.

Almond Filling

Ingredients
80 g unsalted butter
60 g sugar (30 g)
120 g almond meal
100 g egg (2 x 55 g eggs)

Method
1. Cream the butter, sugar and almond meal, add the eggs and continue mixing until absorbed and the mixture is light and pale.
2. Spread the almond filling into the pre-baked and cold shortcrust shell/s.
3. Nestle the cool saute apples into the almond filling, wedges facing upward rather than fanned, to create height.
4. Bake at 170C for 50 minutes. Serve hot or at room temperature.

Impressions

I like this recipe because the shortcrust is nicely short and has a nice bite to it but overall it melts in your mouth like it should. The almond meal adds this grainy texture to the overall tart, however if you don’t like this more ‘whole wheat’ kinda taste then you can try food processing the almond meal a few times, and maybe sieve it as well so it comes out much finer.

Overall it’s a good recipe that is easy enough to make, the only trouble you may have is with rolling out the pastry dough in a warm environment. It can get soft and unmanageable very easily. So if it does become too soft when you start rolling it flat and trying to place it into the case, either place it in the fridge or freezer to let it harden up a bit and try again.

Taste of Singapore

IMG_6417edit

Taste of Singapore is located on Clayton Rd, not too far away from Monash University’s Clayton Campus. If I’m craving Malaysian food and can’t find it anywhere, Singaporean cuisine will satisfy my cravings. What I’ve noticed between Singaporean and Malaysian cuisine is that Singaporean food is usually slightly sweeter but of course that can depend on where you frequent.

What I found with Taste of Singapore is that it had fantastic flavours and yet wasn’t that sweet like most Singaporean food I’ve tried.

Taste of Singapore serves quite a few well known dishes along with some not so famous dishes such as Nasi Lemak, Murtabak and Nasi Briyani. They also offer some sweet treats like Kueh and Teh Tarik!

IMG_6414

Murtabak, as shown in the first image, is similar to Roti Canai but has a meat and onion filling. Usually this will be either lamb or beef. I’d probably go for their lamb but I know a few people who can’t quite stomach the lamb flavour.

Their Murtabak was very good, I do enjoy a crispy thin roti to dip into a spicy curry sauce and this dish met all my requirements for a great Murtabak. You also hardly ever can find a restaurant that sells Murtabak in Melbourne. So luckily it didn’t disappoint!

Taste of Singapore’s Nasi Lemak was surpisingly decent. Along with their cheaper than average, their serves are proportionate to their price. The Beef Rendang was cooked well and not too tough like some Rendang’s I’ve tried and the sauce had great authentic flavour to it too.

What was the biggest surprise was their chilli sauce/paste. I was expecting something sweet and not very spicy but this packed quite a good punch along with its sweetness so it balanced out nicely.

The usual assortment of egg, cucumber, anchovies and peanuts are mostly standard with what you get in any Nasi Lemak. I don’t think you can really go wrong with that.

Overall their Nasi Lemak is probably one of the better offerings I’ve tried in Melbourne.

IMG_6416edit

I was pleasantly surprised at how nice the flavours are from the Nasi Briyani, while the rice looks plain enough it has good flavours to it. Although their serving size is less than desirable and with only one skinny chicken drumstick, I don’t think it’s value for money to be honest.

IMG_6418

Oh Teh Tarik, how I love thee, and especially a good one. Taste of Singapore’s offering is one of the best I’ve tasted, probably up there with Chillipadi. It has a nice frothy top and it’s also not too sweet. A definite must try.

IMG_6415

Here is one of their Kueh offerings on my Saturday visit. It was so-so. What I didn’t like about it was how sweet it was. It just overpowered any flavour that the Kueh was supposed to have. The one upside is that the texture was quite nice, it was slightly chewy but mostly soft like jelly.

Taste of Singapore has great flavours and although there are some cons with a few of their dishes, it does have a lot of upsides so I’d recommend you give it a try. The Singaporean chef is also quite friendly to chat too, so it has a great atmosphere to boot. However, I’ll admit the decor leaves a little to be desired.

Taste of Singapore on Urbanspoon

Taste of Singapore

162 Clayton Rd
Clayton VIC 3168

Lynbrook Hotel

IMG_6540

I came across the Lynbrook Hotel after browsing Urbanspoon’s top Melbourne Buffet Restaurants. Having already tried China Bar, Consevatory and Kitchenworkshop (3 of the top 5), I was surprised to see Lynbrook Hotel so far up the top. Lynbrook? Lynbrook has a hotel?

After my initial shock, I checked out the official website, it said it had a International Buffet Bistro, offering European, Asian and Australian cuisines. This piqued my interest and afterall their prices were quite reasonable too.
IMG_6541
We went to try it out for my father’s birthday, and booked the earlier session to avoid the large cohords of people (I expected anyway). Their eating area is quite spacious and clean. It makes for a welcoming dining experience.

The food is grouped into several categories, from Asian (Chinese), European (Italian), Australian, and Indian with a bit of Thai, and of course Desserts.

The Food

While I didn’t take photographs of the food itself (I was too busy eating), the food was decent and there was a great variety of dishes.

In the Asian corner, they have Fried Rice, and a few stir frys which were surprisingly decent for a restaurant primarily served by Indian chefs.

There was a good selection of seafood, from fresh prawns, to steamed fish and a few of your standard ‘Fish and Chip shop’ items, and also roast items like roast beef and potatoes, vegetables in another area.

In their European flavoured area they served mostly Italian food, i.e pastas, lasagne and pizza.

Their Indian area took me by surprise, as it smelt great. A few different styled curries, and bite sized snack food. As I mentioned before they served Thai fish cake, which was spicy! However when my parents when again for a friend’s birthday celebration, they didn’t have these on offer. So it seems their selection of food varies slightly per week.

Their dessert menu consisted of a lot of cakes and sugary treats. My favourite was the warm almond cake, and the chocolate mousse. Of course, they served ice-cream for the kids, which was running empty by the hours end. I’ll admit their selection of desserts was great, but nothing can top soft serve ice-cream at Kitchen Workshop.

IMG_6542

There were a couple of downsides, their pizzas weren’t cooked long enough so the bread was still doughly. Perhaps their second run of pizzas were better, I didn’t attempt to try it again.

As mentioned earlier, their 3 tubs of ice-cream were probably sitting there for a while so it wasn’t replaced as quickly (or at all) during our session. Some of their dishes were slightly overcooked but I can overlook that as it wasn’t terribly bad.

Overall impressions

The Lynbrook Hotel serves a great selection of food, for what you pay for, you do get your monies worth.  Compared to Kitchen Workshop which is roughly the same price, I’d prefer Kitchen Workshop but if you’re looking for some tasty Asian dishes Lynbrook is your best bet.

Lynbrook Hotel on Urbanspoon

Lynbrook Hotel

550 South Gippsland Highway
Lynbrook
VIC 3975
Bistro Prices and Sessions Here


Red Velvet Cupcakes

IMG_6457

My sister gave me a link to a Red Velvet Cupcake recipe from Amy’s Food Adventures, in which she has adapted her recipe from the Food Network Canada. Apparently, I’m her guinea pig for recipes she finds. We had a gathering coming up and I thought, why the hey.

I had Red Velvet cupcakes a couple of times, the most famous one being Magnolia’s in New York and that was pretty darn good actually.

I was pretty interested in this recipe because it lacks butter, I’m assuming that’s the case with all Red Velvet cupcakes but I was keen to try it out after I realised that.

IMG_6338

This recipe uses a lot of red food colouring. A bit more than half of the food colouring bottle to give it that vibrant red colour.IMG_6455


I made a couple of tweaks to the recipe to my liking, with **. With the icing, I found it to bit a tad plain, so I added more lemon juice and zest to it to give it a really nice freshness to the whole cupcake and icing. The icing was pretty much a trial and error so I can’t remember the exact measurements, but if you want it slightly more lemony just keep adding some more juice until you feel it’s right.

Preparation time: 15 minutes

Cooking time: 25 minutes
Yield: 24

Ingredients
Red Velvet Cupcakes
2 eggs
1 1/2 cups of sugar (375 ml) *3/4 cup to 1 cup*
1 1/2 cups canola oil (375 ml)
1 cup of plain yogurt (250 ml)
2 tablespoons red food coloring (30 ml)
1 teaspoon vinegar (5 ml)
1 teaspoon vanilla extract (5 ml)
2 1/2 cups of flour (625 ml) *plain flour for cakes*
1 tablespoon cocoa (15 ml)
1 teaspoon baking soda (5 ml)
1 teaspoon salt (5 ml)
Icing
2 cups mascarpone (500 ml) *can use cream cheese too*
1 cup icing sugar, sifted (250 ml) *1/2 cup to 3/4 cup*
1/2 cup 35% cream (125 ml)
Zest of 1 lemon and *lemon juice*

Directions

Red Velvet Cupcakes
Preheat oven to 350 °F (180 °C).
In a food processor, mix the eggs with the sugar, oil, yoghurt, food coloring, vinegar and vanilla. Add flour, cocoa, baking soda and salt. Blend until just incorporated.
Place cupcake papers into a muffin pan, divide the batter in the cupcake papers, pour only halfway so batter doesn’t overflow, and bake, rotating half way through, for 25 to 30 minutes. Remove and let cool.
Icing
In a bowl, beat the mascarpone, icing sugar, cream and lemon zests together until the mixture is smooth.
Spoon a dollop of mascarpone cream on the cupcakes. *I piped mine onto the cupcakes so if the icing mixture is a bit too running or soft to pipe, just place it in the freezer or fridge until it hardens up a bit.*


IMG_6404
IMG_6407
IMG_6451I was extremely happy with this recipe. The cake was so moist. My first batch of small ones were a bit undercooked so it was a bit more ‘redder’ then I would have liked, but it tasted great. My second batch in the oven was slightly darker and looked great. This recipe is definitely a keeper.


Brownie and Passionfruit Chocolate Gâteau @ Le Petit Gateau

DSC00335

Le Petit Gateau has definitely made a name for itself in Melbourne with it’s delicious cakes and chocolates. Their Brownie and Passionfruit Chocolate Gateau is an interesting combination of passionfruit, chocolate and their famous delicious mudcake praline all rolled into one.

DSC00338

I have got to say, Le Petit just don’t know how to make a bad dessert. Their passionfruit jelly on the top, along with a nice thin layer inside, as well as a delicious crunchy bottom. All the layers create such a wonderful taste in your mouth.  Even if you tasted each layer separately it would have been perfect but together it’s just even better.

DSC00337

Only bad thing I can say is that their prices keep going up every year. It’s heading towards, ‘I don’t know if it’s worth it but I might still buy it anyway because it’s delicious’ pricing but alas I don’t think I would stop going to Le Petit Gateau. I’m hooked.

Le Petit Gateau

458 Little Collins St
Melbourne
Tel: 03 9944 8893
Opening Hours

Monday to Friday, 7:30am-5pm


One Ingredient Banana ‘Ice-cream’

IMG_5250

I read this on my Google Reader RSS somehow  and I wanted to give it a go. What you only have to do is freeze bananas and then blend them until it becomes creamy. Credit

It’s probably best if you freeze already browning bananas, I tend to peel my bananas before hand, put it into a bowl or container and just chuck it into the freezer.

Once it’s frozen, use a blender, I would think a food processor would work the same but I haven’t tried, and you just keep blending it until it amazingly turns into ice-cream! You’d never think it would but somehow it magically transforms.

If you don’t like bananas all that much, this recipe isn’t going to be something you would want to try as I’ll warn you, it will be a strong flavoured banana icee/ice-cream. It also won’t be exactly like an ice-cream since it doesn’t have any cream but you can basically add anything to it, to give it added flavours or textures like I have. This site has added a scoopful of peanut butter!

I just added a sprinkle of chopped peanuts and delicious maple syrup. Gosh it was nice and easy to make. My next mission is to buy an ice-cream maker. I don’t know when I will, but I would love to make my own real and fresh ice-cream.


Chocolate Souffle

DSC00372

I’ve always wanted to eat souffle, and when we went to the Conservatory at Crown, their chocolate souffles were quite the popular dessert so I didn’t have a chance to taste it.

So at last, I tried making it myself. I found this recipe on Taste.com.au, and it’s the basic run of the mill type of recipe but since I had never made it before and it didn’t require that many eggs I chose this one

Chocolate Souffle (Taste.com.au)
Preparation Time
20 minutes

Cooking Time
20 minutes

Ingredients (serves 6)
Melted butter, to grease
4 1/2 tbscaster sugar
60g butter
2 tbs plain flour
160ml (2/3 cup) milk
210g good-quality dark chocolate, chopped
3 eggs, separated
125ml (1/2 cup) thin cream
2 tbs brown sugar
1 tsp vanilla essence
Icing sugar, to dust

Method
1. Preheat oven to 180°C. Brush six 160ml (2/3-cup) ovenproof souffle dishes with melted butter to grease (using upward strokes on side). Sprinkle the inside with 1 1/2 tablespoons of caster sugar, shake out any excess.

2. Melt 30g of the butter in a saucepan over medium heat. Add flour and use a wooden spoon to stir for 1 minute or until mixture is smooth and begins to bubble. Remove from heat, gradually add milk, stirring until smooth and combined. Return to medium heat, stir until mixture thickens and comes to the boil. Boil for 1 minute, stirring. Remove from heat.

3. Stir in 125g of the chocolate and remaining caster sugar until combined. Transfer to a bowl. Add egg yolks and stir until well combined.

4. Use an electric beater to whisk egg whites in a clean, dry bowl until firm peaks form. Use a metal spoon to fold one-third of the egg whites into chocolate mixture. Fold in remaining egg whites until just combined.

5. Spoon the mixture evenly into prepared dishes. Place on a baking tray. Bake in preheated oven for 15-20 minutes or until well risen.

6. Meanwhile: combine remaining chocolate, remaining butter, brown sugar, cream and vanilla essence in a saucepan over low heat. Cook, stirring, for 2 minutes or until chocolate melts and mixture is well combined. Simmer, uncovered, for 1 minute. Remove from heat. Place in a jug.

7. To serve, place ramekins on plates. Dust with icing sugar. Use a spoon to make a hole in top of each souffle, pour in a little chocolate sauce.

Impressions:
I found it to be quite nice and moist on my first tasting, but I wasn’t too sure if I was doing it right since they seemed to sink after taking it out of the oven. You also kinda need to serve them all hot and fresh out of the oven otherwise it just doesn’t retain that moistness. Unless I was just doing it all wrong. I don’t know