Ginger Snaps (SimpleRecipes)

IMG_0177

 It’s that festive time of year and what better way to get into the mood then to bake some ginger cookies! I really don’t know why I like ginger snaps/cookies so much, I have such a strong distaste for ginger in anything. I found this recipe on SimpleRecipes.com and thought they looked quite cute. Little did I know how out of ordinary the recipe was when I started to make it.

Gingersnap Cookies (SimplyRecipes)

Yield: Makes 6 to 8 dozen cookies.

Ingredients
8 oz unsalted butter (226g)
1 1/4 cup + 2 Tbsp. granulated sugar (I used a bit more than 1/2 cup brown sugar)
1/2 teaspoon vanilla extract
2 small eggs or 1 1/2 large eggs
1/3 cup molasses
3 cups all-purpose flour
2 1/2 teaspoon baking soda
1/2 teaspoon salt
2 1/2 teaspoon cinnamon
2 1/2 teaspoon ground ginger
1/8 teaspoon finely ground black pepper

Method
1. Cream butter until soft; add sugar, and beat until light and fluffy. Add vanilla and eggs, and beat until fluffy. Add molasses and beat until well-mixed.

2. Sift the dry ingredients; add to the mixture, 1/3 at a time. Mix only until the dry ingredients become incorporated.

IMG_0174

3. Line a 9″ x 5″ loaf pan with plastic wrap, so that some hangs over the outsides. Press the dough into the bottom of the pan. Pack it tightly, and try to make the top as level as possible. Cover the dough with the plastic overhangs. Freeze until very firm, preferably overnight.

IMG_0175

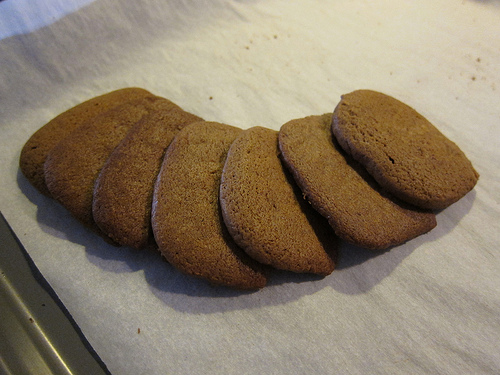
4. Unwrap and remove dough from the pan. Slice brick into thin slices, no more than 1/8″. Place on a parchment or Silpat-lined sheetpan (space at least an inch apart) and bake at 175 degrees Celsius until the edges turn dark brown, 7-12 minutes, depending on how thinly you have sliced the dough. Check the oven for doneness at 7 minutes.

IMG_0176

IMG_0178


Impressions

I made a few variations that didn’t seem to turn out that well. For one, I used cooking margarine which will have a lower fat content so it makes it less firm. So you’ll have difficulty trying to slice it evenly after it’s supposedly frozen and it’s hard to cut thin pieces because of it. Using a loaf pan is probably a good idea so you’ll get a consistent shape. My cookies certainly look terrible unattractive so that’s a reason to use a loaf pan instead of just throwing it into the freezer on a flat surface.

The other change I made was to the sugar content, I halved roughly but the cookies come out slightly less sweet then I would have liked. Probably 3/4 cup brown sugar would be the right amount if you’re eating them like this. I think if you intended on icing these

Other than that, taste wise it’s pretty good. I added a tad more ground ginger maybe 1/2 tsp and it gives it a more pronounced flavour to it.

Would I try the recipe again? I might, the long “cooking” time is a bit of a disincentive as you’ll have to wait one night or so to bake it but if I had an abundance of free time it’s worth a shot to try and perfect it.

Merry Xmas and have a safe and joyous New Year!


Lemon Macarons

DSC00309

 I love lemons and when I make something new, if there is a way to add lemons to it I will. I made Lemon Macarons with Lemon Curd and they turned out quite well if I don’t say so myself. I remember making macarons again and again but never could get those damned feet until I switched to the Italian Meringue method. This was my only success with French Meringue. Check out the recipe from Tartelette Blog with the Lemon Curd recipe from Taste.com.au.

Lemon Macarons (Tartelette Blog) with Lemon Curd

French Meringue Macarons

Ingredients

Makes 50 to 60 shells, for 25 to 30 filled macarons.
2¾ cups (8.8 ounces/250 grams) almond flour
2¾ cups (12.4 ounces/350 grams)
powdered sugar
1 cup egg whites (from 7 or 8 eggs),
at room temperature
Pinch of salt
2 teaspoons powdered egg whites, if weather is humid
¾ cup (5.3 ounces/150 grams) superfine granulated sugar
5 to 7 drops gel paste food coloring (optional) (I used 2 teaspoons lemon zest instead)

Method

1. Preheat the oven to 300°F (325°F for a non-convection oven) 150°C, and line your baking sheets with parchment paper.

2. Blend the almond flour with the powdered sugar in your food processor to make a fine powder (or sift together, discarding any large crumbs and adding a bit more almond flour and powdered sugar as needed to compensate). Then sift the mixture through a strainer until it is as fine as you can get it. This keeps crumbs from forming on the macaron tops as they bake.

3. With the wire whip attachment on the electric mixer, beat the egg whites with the salt and the powdered egg whites (if you are using them), starting slowly and then increasing speed as the whites start to rise. Add the granulated sugar and the food coloring. Beat until the egg whites form stiff peaks and your meringue is firm and shiny.

4. Pour the beaten egg whites onto your almond flour mixture and gently fold them in, using a rubber spatula. Move your spatula from the bottom of the bowl to the edges with one hand, using your other hand to rotate the bowl. Now slap the sides of the bowl until the batter falls in a wide ribbon when you raise your spatula. When you can’t see any crumbs of almond flour and the mixture is shiny and flowing, you are ready to start piping.
The French have a special word—macaronner—to describe the physical action of mixing all the ingredients for macarons. This has to be done by hand. You cannot do it with your mixer—you must be able to feel the consistency of the macaron batter.

5.  Fit your pastry bag with a number 8 tip and fill with batter. Start by squeezing out a small amount of mix onto a parchment-lined baking sheet to form a 2½-inch circle. Be sure to leave 1 inch of space between macarons so they will not touch each other while they bake.
If the peak that forms on the top of the macaron does not disappear after piping, it means the batter could have been beaten a little more. Tap the baking sheet on the tabletop, making sure to hold the parchment paper in place with your thumbs.
Let the piped macarons rest for 15 minutes.

6. Bake for 14 minutes at 300°F/ 150°C. After the first 5 minutes, open the oven door briefly to let the steam out.
Let the macarons cool completely on a rack before taking them off the parchment paper. Press the bottom of a cooled baked macaron shell with your finger; it should be soft. If the bottom of the shell is hard, reduce the baking time for the rest of your macarons from 14 minutes to 13 minutes.
Using a pastry bag requires some practice. It may seem awkward at first, but you’ll soon get the hang of it.

Prepare the bag (if it hasn’t been used before) by cutting about 2 inches off the narrow end—just enough so that when you insert a number 8 decorating tip, about a third of the tip extends outside the bag. Push the tip firmly in place and spoon in your filling, leaving enough room at the top to twist the bag shut. It is best to fill the bag with half of the batter at a time, that way it is not too heavy. To make it easier to fill your pastry bag, place it upright in an empty jar or other straight-sided container. This will help steady the bag while you fill it with batter.
Squeezing the bag slowly, pipe each macaron shell out in a single dollop. Lift the bag quickly to finish.

Lemon Curd (Taste.com.au)
Ingredients
2 eggs, plus 2 egg yolks
3/4 cup (165g) caster sugar (Half sugar to 80g)
1/3 cup (80g) chilled unsalted butter
Zest and juice of 2 lemons

Method
1. Whisk whole eggs, yolks and sugar in a saucepan until smooth, then place pan over a low heat.
2. Add the butter, juice and zest and whisk continuously until thickened. Strain through a sieve into a sterilised jar. Lemon curd keeps, covered, in the fridge for 2 weeks.

Impressions

This was the first time I made macarons and they came out with feet! I don’t know what happened with the proportions for the shell because I recall reducing the icing sugar to half but it ended up extremely sweet anyway! Maybe I didn’t reduce the sugar at all haha. I loved the lemon curd, it was perfectly sweet and sour with that lemon aftertaste tang. Lovely.

Almond and Vanilla Cupcakes

IMG_0539

Using The Crabapple Bakery Cupcake Cookbook by Jennifer Graham again (Buy it here/official website), we decided to do a variation of their Sweetheart cakes minus the icing and shape…. and probably the whole intention of making it actually!

Without any of the decorations and grandeur, these cupcakes are basically Vanilla/Almond flavoured cupcakes.  Don’t they look all rustic and homely?! Check out the recipe below with how to make the decorations/icing as well for those that want to try it.

Almond and Vanilla Cakes

Makes 18 min-heart cakes/24 cupcakes

Ingredients
1 1/2 cups plain flour
1 tablespoon baking powder
3 cups almond meal
250g softened unsalted butter
1 1/2 cups castor sugar (Used 3/4 cups)
6 eggs
1 tablespoon vanilla extract
1/4 cup natural yoghurt

Method
1. Preheat oven to 160C. Lightly grease three six-hole mini heart cake trays (Or just use cupcake pans with paper cups)

2. Sift together flour and baking powder. Add almond meal and combine

3. In a separate bowl, cream the butter for 1-2minutes. Add half the sugar and beat for 2 minutes. Add the rest of the sugar and beat for a further 2 minutes or until light and fluffy. Add the eggs two at a time, beating for 2 minutes after each addition or until mixture is light and fluffy. Add the vanilla and beat until combined.

4. Add a third of the flour to the creamed mixture and beat on low speed until combined. Add half of the yoghurt and beat until combined. Repeat this process. Add the remaining third of the flour and beat until thoroughly combined; do not over-beat as this will toughen the mixture.

5. Spoon mixture into the cake trays, filling each heart just over half full. Bake for 15 minutes or until a fine skewer inserted comes out clean. Leave to cool for about 5 minutes before turning out onto a wire rack to cool for a further 30 minutes before icing.

To make regular cupcakes
5. If using regular cupcake papers instead of mini-heart trays, this recipe makes 24 cupcakes. Bake at 160 C for 20-25 minutes or until a skewer inserted comes out clean.

Decoration
2 quantities Quick Royal Icing
Rose Essence
Food Colouring: Rose Pink
1 quantity Sugared Rose Petals

1. Prepare the icing to pouring consistency. Add 2-3 drops rose essence and 3-4 drops pink food colouring during preparation.

2. Place the sweetheart cakes onto a fine wire rack with feet. Pour over most of the icing, so that each cake is completely covered. Add a few more drops of the pink food colouring to the remaining icing to create a mid-pink colour.

3. Using a teaspoon, drizzle the icing over so that it runs down the sides a little. Use an offset palette knife to life the cakes onto a serving plate, then sprinkle with the sugared rose petals.

Variation
If you’re making these cakes for a man, ice the cakes with Dark Chocolate Ganache  and top with chocolate truffles.

Quick Royal Icing
Ingredients
Water
500 g bag premix royal icing

Makes 3/4 cup icing – enough for 12 cupcakes

1. Simply add a little water at a time to the sifted icing sugar, until you have the required consistency. If you want to use a flavouring essence, add a couple drops to the icing sugar before you add the water. If you want to use colouring, add it before you reach the desired consistency (if you add it at the end it will thin the icing). Use fruit juice or coconut milk instead of water for a flavoured icing.

Sugared Rose Petals
2 Fresh Pink Rose Heads (Not chemically sprayed)
1 egg white, lightly beaten
Castor Sugar

1. Rinse rose heads under cold water. Gently pat dry. Dip each rose petal into the egg white until just covered. Dip the wet petals into a bowl of fine castor sugar and shake off any excess. Place them on a wire rack to dry for about 1 hour.

Dark Chocolate Ganache
1 1/2 cups cream
400 g dark cooking chocolate (chopped)

Makes: 3 cups frosting
1. In a heavy based saucepan, bring the cream to the boil. Place the chocolate into a bowl and pour the boiling cream over. Leave for 1 minute to soften. Use a small spatula to carefully stir the ganache, being careful not to incorporate any air, until you achieve a silky frosting.

2. To use: If you want to achieve a smooth surface, dip cupcakes into the frosting immediately. If you want to achieve a fluffy frosting, let the ganache cool to room temperature and then apply to the cupcake with a small spatula. Do not stir the set ganache too much as it will become dull.

IMG_0540

Impressions

We didn’t go through all that shebang as I’m not a big fan of icing as I find it usually sickly sweet. Crazy I know. So what you get here is cupcakes dressed down to look like muffins. They have this rough texture mostly because of the almond meal that isn’t a fine powder. The process of making this is quite simple, it’s like baking any other cupcake.

As the cupcake itself it’s quite pleasant, it’s light and has a predominant almond flavour. Which isn’t a bad thing by all means. The texture of the cupcake is more grainy because of the almond meal, the yoghurt helps to make it lighter against the richness of the butter so it doesn’t feel like you’re just having a vanilla butter cake. Overall, I think it makes a nice treat that jumps between muffin and cupcake.

Chocolate Cocoa Cupcakes

IMG_0545

On our little cupcake baking frenzy, we decided to make some chocolate cupcakes. We found a recipe in the The Crabapple Bakery Cupcake Cookbook by Jennifer Graham, you can buy the recipe book here and check out their website and details on the official website. Their actual cupcakes are quite different to what we’ve decided to make, because we didn’t make the icing/toppings or add the little rock chocolates. However the cupcake itself is the same, apart from reducing the sugar but I’ve listed the entire recipe along with what you need to do for the decorations as they do look quite fancy.

Dinosaur Rock Cupcakes – Chocolate Birthday Cakes

Makes: 24

Ingredients
3 cups plain flour
2 teaspoons bicarb soda
1 teaspoon baking powder
1 teaspoon salt
3 tablespoons instant coffee granules
1 cup hot water
1 cup cocoa
1 cup cold water
200g softened unsalted butter
1 1/2 cups castor sugar
4 eggs
1 tablespoon vanilla extract
Icing sugar for dusting

Method
1. Preheat oven to 170C. Line two 12-hole muffin trays with chocolate-coloured cupcake papers

2. Sift together the flour, bicarb of soda, baking powder and salt. In a separate bowl whisk together the coffee, hot water,and cocoa until you have a smooth paste. Add the cold water and whisk until evenly combined.

3. In a separate bowl, creaming the butter for 1-2 minutes. Add the castor sugar a third at a time, beating for 2 minutes after each addition. After the last addition, beat until the mixture is light and fluffy and the sugar has almost dissolved. Add eggs one at a time, beating for 1 minute after each addition or until mixture is light and fluffy. Add the vanilla extract and beat until combined.

4. Add a quarter of the flour to the creamed mixture and beat on low speed until combined. Add a third of the cocoa mixture and beat until combined. Repeat this process twice more. Add the remaining quarter of the flour and beat until thoroughly combined, do not over-beat as this will toughen the mixture.

5. Spoon mixture into cupcake papers, filling each about three quarters full. To prevent the cupcakes cracking on top, allowing the mixture to sit in the cupcake papers for 20 minutes before baking. Bake for 18-20 minutes or until a fine skewer inserted comes out clean.Remove cupcakes from the trays immediately and cool on a wire rack for 30 minutes before frosting.

6. If you prefer no icing, and for simplicity, just dust some icing sugar over cooled cupcakes. Looks like Christmas!

Decoration
1 quantity Vanilla Buttercream
Food Colouring: Apple-Green, Wilton’s Buttercup Yellow
24 Dinosaur/star candles
Chocolate Sprinkles
Chocolate Rocks

1. Divide the buttercream into two small bowls.Add a couple of drops of apple-green food colouring to one bowl and a couple of drops of yellow to the other. Mix to create even colours.

2. Frost half the cupcakes with the yellow buttercream, add half with the green. Working quickly, before the buttercream dries, top each cupcake with a candle, and decorate with sprinkles and chocolate rocks.

IMG_0544

Impressions

The recipe itself is quite nice, the cupcakes are as light as a butter cupcake can be. I found the taste of chocolate to be very mild, as it only uses cocoa powder. I couldn’t really taste the coffee either, I think it’s because our coffee granules have been oxygenated for too long and it has lost most of its coffee aroma. I think I’d prefer a chocolate cupcake to use actual melted chocolate in its recipe because you can really taste the difference when one uses cocoa or chocolate.

Other than that it’s a simple recipe, but if you went all out with decorations, I’m sure it would have tasted even better.

Coconut Lemon Syrup Cupcakes

IMG_0536

Lemons. So useful in so many ways, a good cold remedy but also enjoyable as a refreshing drink or in sweets. I’ve seen Lemon Syrup cakes made previously and when I tasted it I was amazed at how moist it was. It wasn’t very light, it’s actually quite dense as a cake but because of the syrup that oozes through the cake it changes how everything tastes. Yes, lemons can do this.

There were plentiful of recipes out there for Lemon Syrup Cakes but none for cupcakes. Of course cupcakes are just mini cakes but I wasn’t sure of how many cupcakes one batch would make. Alas, I just tried one cake recipe and I made a mix of mini cupcakes and small cupcakes, not those normal sized cupcakes you commonly see.

I found a recipe by Donna Hay, I was hesitant to try it at first because she only knows how to make things look nice to sell magazines and books. However as it turned out, it was a delight. Check out the recipe and my impressions below!

Coconut and Lemon Syrup Cupcakes (Donna Hay)

Makes: Roughly 12-18 average sized cupcakes

(But I can’t be certain as it depends on the size of your cupcake cups)

Ingredients

Cake
150g butter
1/2 cup (100g) caster (superfine) sugar
1 tablespoon finely grated lemon rind
3 eggs
1½ cups (120g) dessicated coconut
1½ cups (225g) self-raising (self-rising) flour
¾ cup (185ml) milk
Lemon Syrup
1 cup (100g) caster (superfine) sugar
¾ cup (185ml) water
2 tablespoons lemon juice (add more to your liking)
Method

1. Preheat oven to 180°C (355ºF).
2. Beat the butter, sugar and lemon rind in an electric mixer until light and creamy. Add the eggs and beat well.
3. Mix through the coconut, flour and milk with a wooden spoon until smooth.
4. Place muffin/cupcake paper into the pans. Pour mixture into pans and bake for 25-35 minutes or until cooked when tested with a skewer. Leave to cool.

IMG_0533
5. To make the lemon syrup, combine the sugar, water and lemon juice in a saucepan over medium heat and stir until dissolved. If you like your syrup to be more “lemony” keep adding tablespoons full of juice until you get your desired flavour. I basically used a whole lemon’s juice but some may prefer just a touch of it.

IMG_0535
6. Simmer for 5 minutes or until thickened slightly and sticky. Pour over warm or cool cake.

7. If pouring is too difficult or slides off (top of cakes may be too crispy), use a brush instead and gently tab over it until it soaks in slightly.

IMG_0538

IMG_0532

Impressions

This recipe is quite easy to make. I had a slight hiccup when the batter looked all kinds of wrong, with the batter separating from the butter. I’m not sure if it was the acidic nature of the lemon rind or not or if I beat the mixture too long but it turned out reasonably well so maybe it was all for the best!

The coconut in the cake gives it such a pleasant texture and bite to it, we used coconut flakes which are chunkier than desiccated coconut but it was still good.

If you reduce the sugar in the lemon syrup as I did you can either reduce the water too or just wait it out and simmer it for longer. I mistakenly poured in the entire 185 mls when I halved the sugar to 100g but it just meant it took a bit longer for it to get thick.

Since my cakes were crispy on top, the syrup just slid right off if you tried pouring it on top. Instead a brush works wonders and can the cake seems to actually absorb more of the syrup. The syrup gives the cupcakes this amazing gloss, I loved it.

I was so pleased with the end result, packed full of lemon flavour. Not too sweet, just right. Would definitely make it again. Good job Donna Hay.


Dragon Cookies

IMG_3813

Once a year, in late January or early February, Chinese New Year comes along celebrating the next animal. Chinese New Year isn’t as extravagant in Australia but in recent years, the festivals in the Chinese dominated suburbs have gotten larger and larger.  I have never experienced an “authentic” CNY in Malaysia, where my parents were born, but they have certainly tried to bring their Malaysian/Chinese culture to Australia. One of the things I love doing is making treats and snacks to celebrate CNY and one of the tastiest treats is the Dragon Cookies. These cookies are so light, it should practically melt in your mouth as soon as you put it in there! It should be crispy and easy to break. It has such a pleasant, slightly buttery flavour but I can’t really describe it. All I know is, it tastes good. Check out the recipe from Home-made Cakes & Pastries – The Best of Patsie Cheong, it’s so easy to make!

Dragon Cookies 

Ingredients

150g Butter

150g Icing Sugar

2 Egg Yolks

1 Egg White


300g Cornflour

30g Milk Powder

60g Plain Flour

1/2 tsp vanilla essence


Method

1. Place the softened butter, icing sugar and eggs (yolks and white) in a bowl.

2. Beat until creamy and light.

3. Slowly stir in the sifted cornflour, milk powder, plain flour and then stir in the vanilla essence.

IMG_3802

4. Put it in a piping bag and press out the pattern. This mixture can get quite soft if it’s humid, so it’s best to do this part quickly.

IMG_3792

5. Put in oven, bake at 150C for 15 mins or until hard all the way through. (Should come out light yellow in colour) Leave to cool.

6. Enjoy!

IMG_3795

Impressions

This is a really simple recipe, but the “Dragon Cookies” can be easily to overcook if you don’t keep watch of them in the oven. As you can see, a few of mine are a tad too golden brown. However, they still taste good, it’s just doesn’t melt in your mouth as well. I have made this every year for the past couple years, and if you have kids it’s great fun for them to pipe and try different shapes, letters, or anything you can think of.

Mocha Chiffon Cake (Gourmeted Goldilocks Recipe)

IMG_0357

I was searching high and low for a nice looking Mocha Cake to bake for my mother. I came across Gourmeted’s Goldilocks Mocha Cake Recipe which looked fantastic. I’ve tried this a few times following the exact method however on both occasions my cake sank like a rock. One my third attempt I thought, why not use the tried and tested Chiffon Cake way. Here is my slightly adapted Gourmeted recipe below. A big thanks to Gourmeted because it’s a fantastic recipe.

Mocha Cake ala  Goldilocks (Gourmeted)
Ingredients

For the Cake:
6 large egg yolks, at room temperature
1 cup sugar
1 teaspoon coffee/espresso granules [Nescafe instant coffee recommended]
1 teaspoon cocoa powder
1 teaspoon vanilla
1 teaspoon water
½ cup canola oil
1 cup cake flour
1 teaspoon baking powder

6 egg whites, at room temperature
1 teaspoon cream of tartar

For the Mocha Buttercream
1 cup sugar
4 large egg whites, at room temperature
3 sticks (12 ounces) unsalted butter, soft, at room temperature
1 teaspoon coffee/espresso granules
1 teaspoon cocoa powder
5 teaspoons water
1 teaspoon vanilla extract
5 teaspoons amaretto (Or Kahlua)
Tools & Equipment

Stand mixer (preferred) but a hand mixer will be sufficient
1 Chiffon cake baking tin

Preparation

1. For the Cake: Preheat oven to 375°F (~160 C)

2. Whisk together egg yolks and sugar in a large bowl (or bowl of a stand mixer) over low, then medium speed, until creamy and light yellow in color.

3. Dissolve espresso or coffee granules and cocoa powder in water and vanilla in a small bowl, getting rid of lumps while stirring. Pour into the egg-sugar mixture, along with canola oil, and beat until well combined.

4. Remove large bowl from stand mixer (if using one) and sift cake flour and baking powder over it. Stir with a wooden spoon until well blended, scraping the sides of the bowl once.

5. Whisk egg whites and cream of tartar into stiff peaks in a medium bowl, and fold into the mocha batter, a dollop or two first to liquefy the thick batter, and then in thirds.

6. Place the batter in the pan. Bake on two racks for 30 to 40 minutes. The cake is done when the tops become golden brown and the cake tester comes out clean when inserted in the middle.

IMG_0350

7. Once ready, take out of the oven and cool upside down on a mug. If you want to make the icing, the cake must be left to cool completely.

IMG_0353

8. For the Buttercream: Whisk sugar and egg whites for 3 to 5 minutes in a medium heatproof bowl set over a saucepan of simmering water (water should not touch the bottom of the bowl), until meringue is hot to the touch. The sugar granules will be dissolved and you will be left with a fluffy marshmallow cream-like froth.

9. Remove bowl from heat and beat for 5 minutes with a hand mixer set to medium speed, or pour into a bowl of a stand mixer with a whisk attachment to mix.

10. Add half of the butter and beat with a hand mixer (or paddle attachment for stand mixer) until smooth before adding the next half to combine. Scrape the sides of the bowl with a spatula and give it a quick stir. Beat again on medium-high for another 6 to 10 minutes to thicken.

11. Dissolve cocoa and espresso/coffee granules in water, vanilla extract, and amaretto in a small bowl. Pour into the buttercream and beat for 2 minutes, scraping the sides at least once.

12. Spoon about ½ cup of frosting on top and spread it evenly with a flat metal spatula.Spread a thick layer of frosting over the side, working from the bottom up to the top. Frost the top by placing a mound of icing and spreading it to the side. You can decorate the cake with the remaining frosting as you wish.


IMG_0362

As you can see I didn’t do the icing this time around. I have done it previously and it is indeed delicious. I used Kahlua instead of Amaretto but I believe Amaretto gives it a nice almond flavour to it.

IMG_0359

Impressions

This  Mocha cake… I’m just going to call it a Mocha Chiffon Cake is beautifully soft. I put it only for roughly 30/35 minutes, just done and it is as moist as ever. If you’re a fan of Chiffon Cakes, and want a slight coffee hit. This is for you! I think if you try the Gourmeted way, you may still find success, it’s just that I used a hand mixer on my previous two attempts. My planetary stand mixer works wonders with egg whites and is excellent in producing stiff peaks so that could be the reason why I found success on my third attempt.

This is slightly smaller than my Orange and Pandan Chiffon Cakes, as it only uses 6 eggs, but it’s still quite nice as you can see. It’s just a tad shorter. I might try a Black Sesame Chiffon Cake sometime because I seriously can’t get enough of Black Sesame.


Orange Chiffon Cake

IMG_5914

After baking my first Pandan Chiffon Cake, we decided to try baking the Orange Chiffon Cake. Usually Pandan and Orange and they two popular versions in Melbourne. I’m really not sure of many other versions, I’ve seen someone do a Black Sesame one but haven’t had a chance to try that yet.

The difference between the Pandan and Orange Chiffon Cake recipes is the Orange version tastes much lighter because  of the use of coconut milk in the Pandan recipe which makes it slightly more dense. Without further adieu here is my mother’s recipe which works a treat!

Orange Chiffon Cake
Ingredients

8 egg whites
100 g sugar
1/2 tsp cream of tartar

8 egg yolks
60 g sugar

180 g self-raising flour (or 160 g plain flour and 20g cornflour)

1/2 tsp salt
1 1/4 tsp baking powder

120ml vegetable oil/corn oil
80ml orange juice

1 tsp orange extract

Method
1. Preheat oven to 160/170 degrees Celsius.
2. Sieve the flour, salt and baking powder into a medium sized bowl.
3. Add the vegetable oil, orange juice, orange extract, egg yolks and sugar into the dry ingredients and mix until just combined.
4. Whip the egg whites and once it starts to bubble add the cream of tartar.
5. Keep whipping until the mixture is nearing soft peaks, then slowly add the sugar with the electric mixer is still running and until hard peaks form.

IMG_5891
6. Add 1/3 of the meringue into the wet mixture until the thick mixture softens. Then slowly add in the rest of the meringue until just combined. Do not overmix!
7. Pour into the cake pan (one made for upside down cakes – it has a hole in the middle)
8. Place in the oven for 30/40 minutes. If the top of your cake gets brown too quickly, lower the oven temperature to around 150. To see if it’s done, you can use a skewer and poke it through the middle. If it comes out clean, it’s done.

IMG_5898
9. Remove from the oven when done, and flip it upside. If the cake as risen higher than the cake pan’s height, use a mug and rest the middle cylinder on top.

IMG_5940
IMG_5904
10. Allow the cake to cool until room temperature.

IMG_5916

Here’s how it looks inside!

IMG_5951

I find that you’ll always have a slight depression and density at the bottom because of the meringue cooling. You’ll be hard pressed to find a Chiffon cake that doesn’t sink a bit so don’t worry if yours does. It’s fine!

IMG_5949

Impressions

I find the Orange Chiffon Cake to be extremely light, but full of orange flavour. The orange juice really adds the much needed freshness and flavour. It really will depend on the oranges and how ripe they are but a little bit of orange extract is good just in case the orange juice doesn’t do its job.

Using a stand mixer really makes a difference to a hand mixer. I find the hand mixer either overbeats the meringue, or doesn’t evenly beat the egg whites. Maybe it’s just my poor hand mixing but with a stand mixer and especially a planetary mixer, you get hard peaks extremely quickly and without much fuss. The key in making a good Chiffon Cake is obtain hard peaks and carefully mix it in with the batter but just enough. Once you’ve tried it a couple of times, you’ll know how hard/gentle to mix and after that it really does become easy to make.

If you love light, fluffy cakes  and you don’t want a buttery aftertaste, Chiffon Cakes are excellent for your cake fix.

Juniors’ Little Fellas Berry Swirls Cheesecake

IMG_6480

I wanted to try these mini baked Cheesecakes from Junior’s, which is a popular Cheesecake store in New York. I hadn’t used this book in a while as I dislike the sponge base, I prefer the biscuit base and most if not all of the recipes in the Junior’s Cheesecake Cookbook: 50 To-Die-For Recipes for New York-Style Cheesecake are in fact sponge based.

I made a Peanut Butter Cheesecake from this book and it turned out quite well, but wasn’t fond of the sponge cake base. I like the crunch and butteriness of the crumbed biscuits. The actual recipe calls for Raspberry puree, but I only had a packet of mixed assorted frozen berries (Raspberries, Blueberries and I think a few Black currents) but works quite well anyway. I’ve left the American measurements as is from the recipe book but added in the commonly used Australian measurements so you don’t have to!

Little Fella Raspberry Swirls

Makes 13 Little Fellas
Ingredients
6 ounces (about 2/3 cup/170g) dry-pack frozen whole raspberries (unsweetened, not in syrup) thawed and drained well
Two 8-ounce packages cream cheese (only full fat) at room temperature (Roughly 450g)
2/3 cup sugar (I reduced it to 1/2 cup)
3 tablespoons cornstarch
1 tablespoon pure vanilla extract
2 extra-large eggs
1/2 cup heavy or whipping cream
13 fresh raspberries (large, pretty ones) (I didn’t have any of these at the time)

Method
1. Preheat the oven to 350 F (176 C). Line 13 standard muffin cups with silicone, foil, parchment or paper lines. (If you have only 12, use a custard cup for the thirteenth one)

2. Pulse the thawed raspberries in your food processor until smooth (you need 1/3 cup of puree). Set aside.

3. Put one package of the cream cheese, 1/3 cup of sugar, and the cornstarch in a large bowl. Beat with an electric mixer on low until creamy, about 3 minutes, scraping down the bowl a few times. Blend in the remaining package of cream cheese. Increase the mixer seed to medium and beat in the remaining 1/3 cup sugar, then the vanilla. Blend in the eggs, one at a time, beating well after adding each one. Beat in the cream just until it’s completely blended. Be careful not to overmix!

IMG_6477

4. Divide the batter among the 13 muffin cups (fill each one almost up to the top). Drop a heaping teaspoon of the raspberry puree in the centre of each cup, pushing it down slightly into each little cake as you go. Using a thin, pointed knife, cut through the batter a few times, just until the raspberry swirls appear (do not mix in the puree completely or the cakes will turn pink and the swirls will disappear).

5. Place the muffin tin in a large shallow pan and pour hot water in until it comes about 1 inch (2.54cm) up the sides of the tin. Bake the cakes until set and the centres are slightly puffy and golden with red raspberry swirls, about 45 minutes. Remove the cakes from the water bath, transfer the tin to a wire rack and let cool for 2 hours. Cover the cakes with a plastic wrap (do not remove from the tin) and put in the freezer until cold, at least 1 hour.

IMG_6495

6. To remove the cakes, lift them out the cups with your hands ad peel off the liners. Place the cakes, top side up, on a serving platter or individual dessert plates. Top each with a raspberry and refrigerate until ready to serve. If there are any cakes left, cover with plastic wrap and store in the refrigerator. Or remove the fresh berries, then wrap and freeze for up to 1 month.

IMG_6496
Impressions

I like this recipe but it sure does take a seemingly long time to get any results.

Letting these babies cool for 2 hours felt like forever since I did it at night, and waiting another 1 hour in the freezer before placing it in the refrigerator for storage. So really what seemed like a short prep time, the waiting can be excruciating if you really had a cheesecake craving that night.

The water bath is a bit troublesome if you’ve never done it before. I also probably didn’t have a high enough pan to place my muffin trays on in order for the water to be high enough to reach 2.5 cm. Mine was probably around 1.5cm at most. So I have a feeling I may have over baked it, as I did leave it in the oven too long.

For that haven’t tried a well done one, you’d still be hard pressed to see any faults. Apart from the sullen appearance. You still get a nice cream cheese flavour, along with a touch of berry flavour. I wish I added more puree to be honest, or maybe my frozen berries weren’t very flavourful so I’ll give it another shot and see how those turn out. Overall, it’s a good recipe, I enjoyed the end results even though I know it wasn’t at all perfect (or even close). It doesn’t have a sponge or biscuit base at all. It’s more like a cheesecake muffin so if the the base is something you can’t live without you could probably add a biscuit base to a separate muffin tray (paper), let it set in the fridge and then once the cheesecakes are cooled, peel it off (if you put it in cups) and just place it on top of the base. I’m sure it’ll add a nice crunchy texture to it all.

Pandan Chiffon Cake

IMG_5873

Chiffon Cake was invented in America but have remained popular in South-East Asian countries, and extremely popular in Malaysia. The most popular versions are Orange or Pandan/Coconut Chiffon Cakes and are enjoyed by many for its light and fluffy texture. Here is a version of my Pandan Chiffon Cake. Chiffon Cakes sometimes take a couple of tries to get right due to different oven temperatures and the mixing of the meringue and wet mixture so if you don’t succeed on your first try. Please try again!

Pandan Chiffon Cake
Ingredients

7 egg whites
100 g sugar
1/2 tsp cream of tartar

7 egg yolks
60 g sugar

190 g flour
1/2 tsp salt
2 tsp baking powder

80ml vegetable oil
140ml coconut milk
1/2 tsp pandan extract

Method
1. Preheat oven to 160/170 degrees Celsius.
2. Sieve the flour, salt and baking powder into a medium sized bowl.
3. Add the vegetable oil, coconut milk, extract, egg yolks and sugar into the dry ingredients and mix until just combined.
IMG_5851
4. Whip the egg whites and once it starts to bubble add the cream of tartar.
5. Keep whipping until the mixture is nearing soft peaks, then slowly add the sugar with the electric mixer is still running and until hard peaks form.
IMG_5855
6. Add 1/3 of the meringue into the wet mixture until the thick mixture softens. Then slowly add in the rest of the meringue until just combined. Do not overmix!
7. Pour into the cake pan (one made for upside down cakes – it has a hole in the middle)
8. Place in the oven for 30/40 minutes. If the top of your cake gets brown too quickly, lower the oven temperature to around 150. To see if it’s done, you can use a skewer and poke it through the middle. If it comes out clean, it’s done.
9. Remove from the oven when done, and flip it upside. If the cake as risen higher than the cake pan’s height, use a mug and rest the middle cylinder on top.
IMG_5871
10. Allow the cake to cool until room temperature.

IMG_5878

Impressions
What I like about this recipe is how light the chiffon cake is. When you take a bite, the cake just melts in your mouth. Not to inflate my ego or anything but I found it better than those purchased in my local Asian Grocers. This recipe isn’t too sweet, but still has that nice and subtle pandan flavour. You can always increase or decrease the amount of pandan extract you put it, as well as the coconut to whatever you prefer. That’s the fun thing about making things yourself, you can make something just to your liking.

If your chiffon cakes sinks slightly when cooling, that’s fine. All cakes shrink slightly when cooled. If your cake shrinks too much, this may be a result of over mixing for the batter or the meringue. Or even under mixing for the meringue.

IMG_5884

I find that if you use a good stand mixer, it’s much easier to make the meringue and definitely more consistent than using a hand held mixer. It’s also less troublesome to try pouring sugar into the egg whites if you use a stand mixer (I know, I’ve tried)

All in all, Chiffon cakes can be slightly difficult but once you get the basics down, you’ll find it isn’t so hard after all.